Why Colorful Boho Cat Scratchers Transform Spaces
Neutral boho is beautiful, but colorful boho? That’s where the magic happens. When you introduce intentional pops of terracotta warmth and sage serenity into your space, suddenly everything feels more alive, more collected, more you. These earthy yet vibrant tones bring depth without overwhelming, adding soul to natural textures while keeping that relaxed boho energy intact. And your cat’s furniture? It deserves that same thoughtful color story.
Terracotta and sage are the perfect boho color duo because they’re grounded in nature—think sun-baked clay pots and desert sage plants—yet they read as sophisticated rather than rustic. They play beautifully with the woods, rattans, and woven textures that define boho style, while giving you permission to layer in burnt orange, dusty rose, olive green, and cream for a palette that feels curated but not matchy. Cat scratchers in these colors become design elements you actually want to showcase rather than hide.
The beauty of working with color in cat furniture is that it can age gracefully—a scratch mark on a terracotta-painted surface just adds to the handcrafted, lived-in feel. These ideas prove that functional doesn’t mean boring, and that your cat’s scratching needs can be the excuse you’ve been waiting for to finally commit to that colorful boho vision you’ve been pinning for years.
1. Terracotta-Dipped Sisal Rope Post with Sage Platform
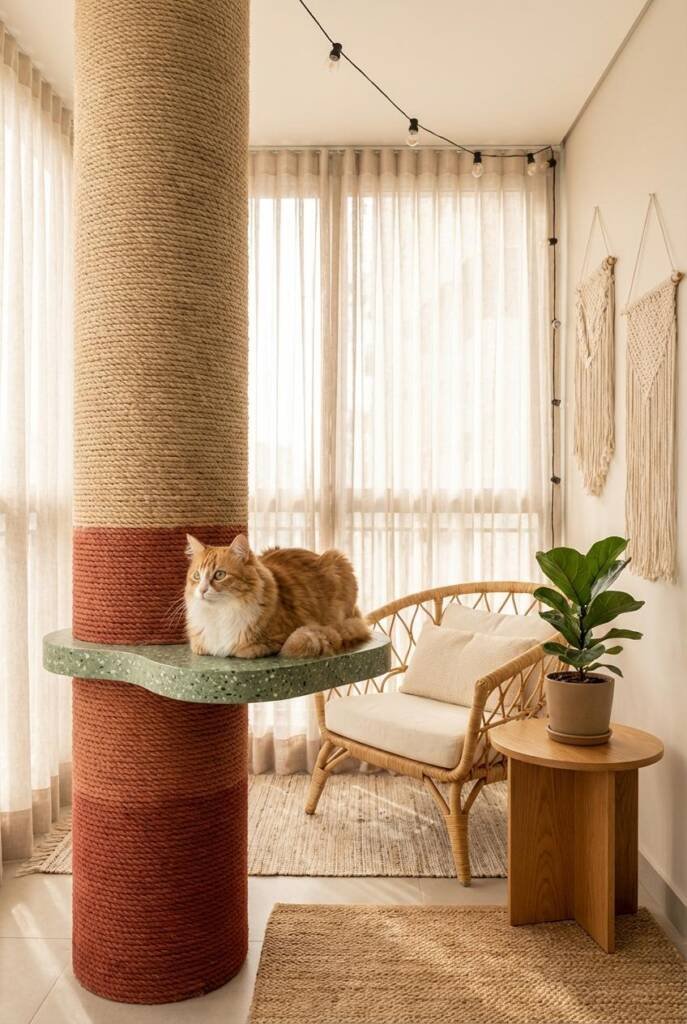
Create an ombré effect on a floor-to-ceiling sisal post by hand-dyeing the bottom third in rich terracotta, leaving the natural sisal visible as it fades upward. Mount a sage green platform midway up with curved edges and a plush cushion in coordinating cream. The color blocking creates visual interest while the height variation gives cats options for scratching at different levels during their full-body stretches.
The terracotta染-dipped section grounds the piece, making it feel intentional and designed rather than purely functional. As cats scratch, the sisal underneath shows through in an organic way that enhances rather than detracts from the color effect. This piece works beautifully in corners where the height draws eyes upward while the warm terracotta anchors the base.
DIY Color-Dipping Sisal Rope for Custom Effects
- Use fiber-reactive dye specifically formulated for natural plant fibers—regular fabric dye won’t penetrate sisal effectively
- Pre-wrap your post with undyed sisal first, then apply dye with a large sponge brush working upward from the base
- Create gradient effect by diluting dye progressively as you work up the post—mix 3 batches at full strength, 50%, and 25%
- Protect your floors with plastic sheeting and work in a well-ventilated area—dye will drip during application
- Allow 24-48 hours for complete drying before letting cats use the post—test for colorfastness by rubbing with damp cloth
- Seal color with spray fixative designed for natural fibers if you want extra protection against fading
- Embrace imperfection—uneven dye application creates that authentic hand-dipped artisan look
2. Sage Green Corner Protector with Terracotta Piping Detail
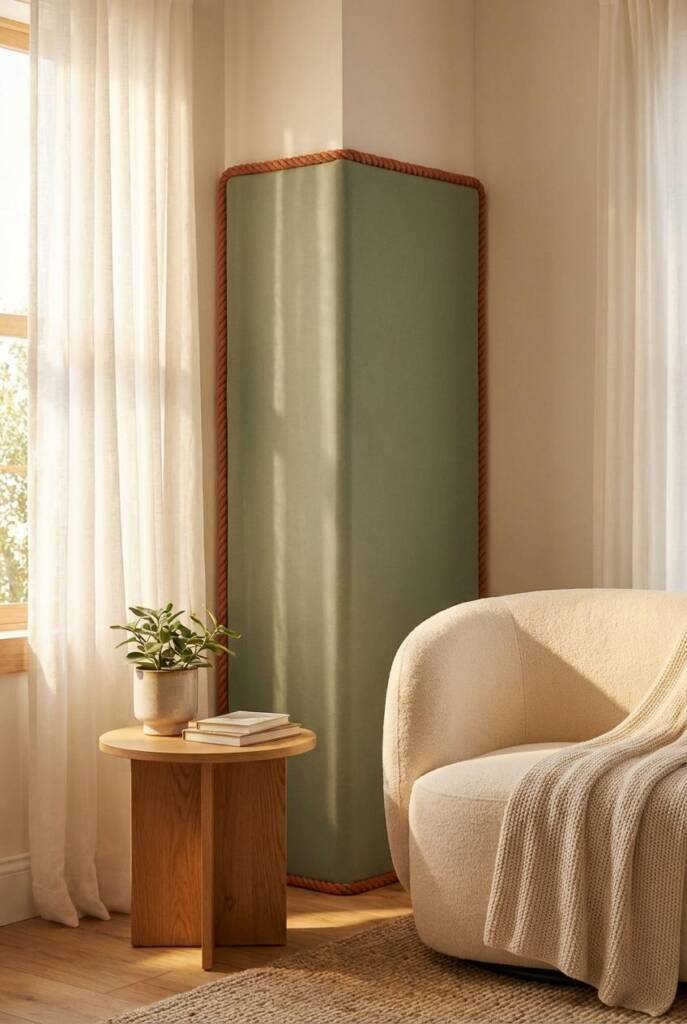
Transform standard corner scratchers by wrapping them in sage green canvas or heavy cotton, then adding thick terracotta-colored rope or fabric piping along all the edges. This creates clean architectural lines while protecting corners in style. The piping detail elevates the piece from basic to custom, and the color combination makes it look like an intentional design choice rather than damage control.
The sage provides a soft, sophisticated base that won’t show every scratch mark, while the terracotta piping adds just enough warmth to tie into other accents throughout your space. Install two on adjacent corners to create a cohesive look, or place one in a high-traffic entryway where it makes an immediate colorful impression.
Installing Piping That Stays Put Through Scratching
- Use welting cord (cotton rope with a fabric-covered core) rated for upholstery—it’s designed to withstand friction
- Hot glue works initially but reinforce every 6 inches with heavy-duty staples underneath for long-term hold
- Miter corners at 45-degree angles for professional-looking joints where piping meets at edges
- Wrap piping start and end points back on themselves and secure with extra glue to prevent unraveling
- Choose outdoor canvas for the main sage fabric—it’s thicker and resists claw punctures better than regular cotton
- Stretch fabric taut before securing to avoid wrinkles that will worsen with scratching and pulling
- Add a layer of thin batting underneath the sage fabric for extra cushioning that cats appreciate during scratches
3. Colorful Macramé Wall Hanging with Integrated Scratching Sections
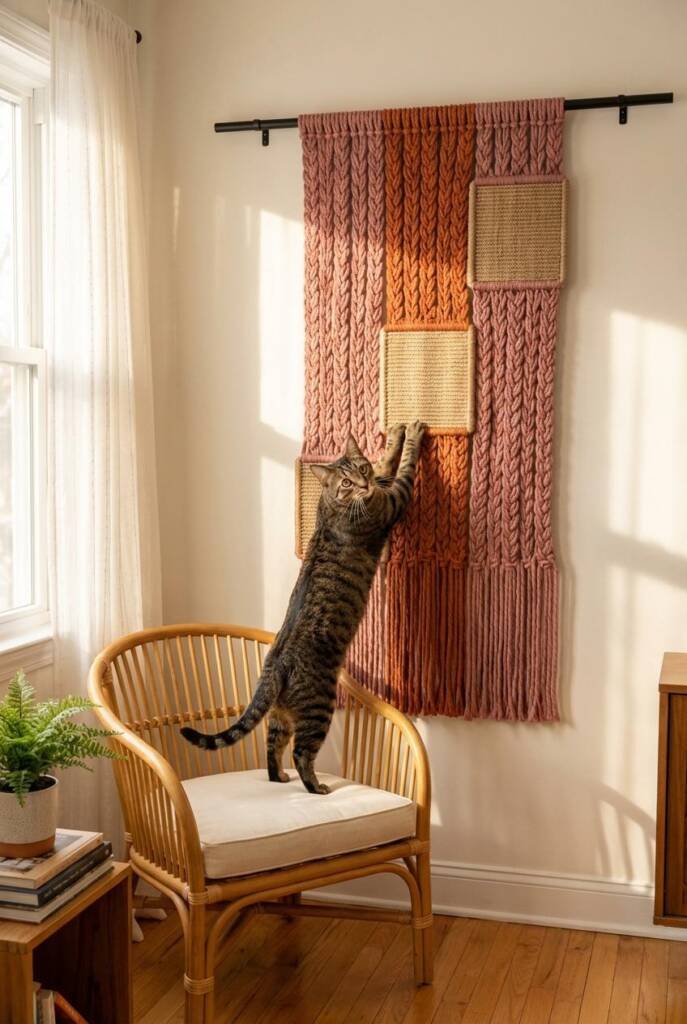
Design a large macramé wall hanging that incorporates rectangular scratching panels wrapped in terracotta and sage fabrics, suspended within the knotted cotton rope work. The macramé creates the artistic backdrop while the fabric-wrapped panels serve as functional scratching surfaces. Dye sections of the cotton rope in complementary colors—dusty rose, cream, burnt orange—to create a color story that flows through the entire piece.
This transforms the typical macramé wall hanging into interactive cat furniture that’s so visually stunning, guests won’t realize its purpose until they see your cat using it. The layered texture of knotted rope, woven fabric panels, and flowing fringe creates dimensional interest that photographs beautifully while serving daily scratching needs.
Creating Macramé That Supports Weight and Scratching Force
- Start with 5mm or 6mm cotton rope rather than thin cord—you need substantial thickness to support panel weight
- Use a hardwood dowel (1.5 inch diameter minimum) as your mounting bar rated to hold at least 30 pounds
- Secure panels with square knot clusters above and below each scratching section—use 8-12 ropes per panel for stability
- Create a backing board from thin plywood behind scratching panels so they don’t swing excessively during use
- Mount dowel to wall studs with heavy-duty brackets, not just drywall anchors—scratching creates surprising lateral force
- Test each panel by pushing firmly before considering the piece complete—there should be minimal swing or give
- Space panels 12-18 inches apart vertically so cats can use multiple sections without the macramé tangling
- Add weighted tassels at the bottom of long fringe sections to prevent excessive swinging during use
4. Terracotta Ceramic Planter Scratcher with Sage Succulents

Repurpose or commission a large terracotta planter (20-24 inches diameter) with a sisal rope scratching post growing from the center like a sculptural trunk. Plant the base with real or artificial sage-green succulents and trailing plants, filling the planter with decorative river rocks that add weight for stability. The terracotta vessel becomes a statement piece that looks like intentional décor while the sisal post provides vertical scratching.
The earthy orange of terracotta pottery has infinite variations—from pale peachy tones to deep russet—so you can match your exact color preference. The circular form encourages cats to walk around and scratch from all angles, and the planted base adds that boho essential: bringing the outside in.
Choosing and Arranging Succulents Around Scratching Posts
- Select cat-safe varieties only: Echeveria, haworthia, and sempervivum are all non-toxic options.
- Use artificial succulents if your cat is a determined plant nibbler—high-quality faux plants are indistinguishable from real
- Plant in clusters of odd numbers (3, 5, or 7) for natural-looking arrangements that don’t appear staged
- Vary heights and textures—combine rosette shapes with trailing varieties and upright architectural forms
- Leave 3-4 inches of clear space around the base of the scratching post so cats can position themselves comfortably
- Top-dress with decorative stones rather than exposed soil to deter digging and keep the planter looking polished
- Choose drought-tolerant plants since the planter will be indoors and watering around a cat scratcher is challenging
- Rotate the planter quarterly so all sides of the succulents get equal light exposure and grow evenly
5. Geometric Color-Block Wall Panels in Terracotta, Sage, and Cream
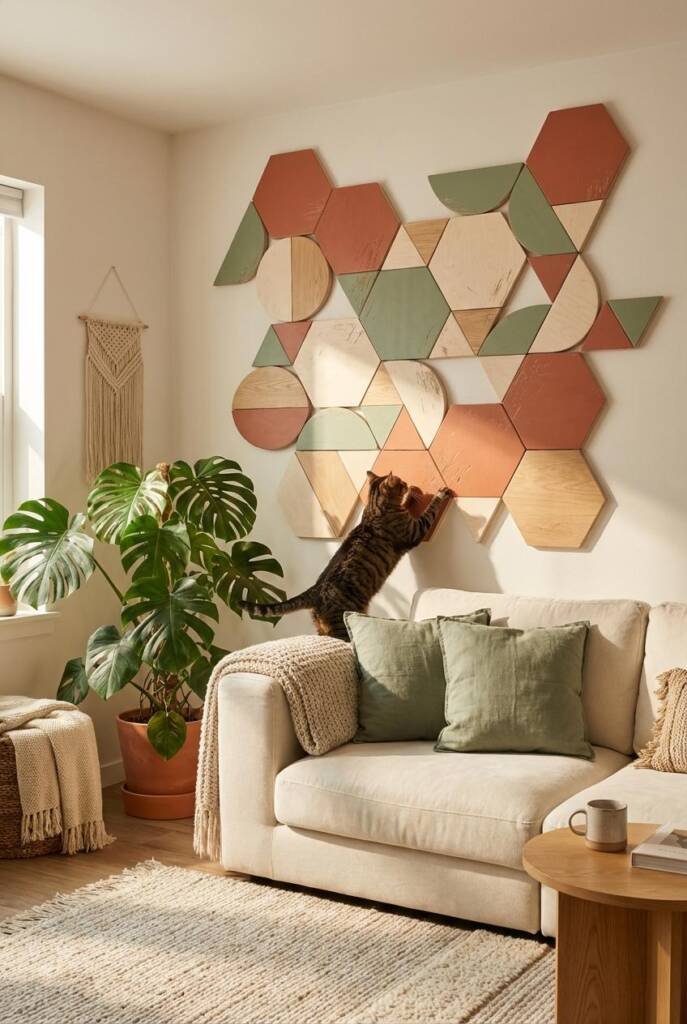
Mount geometric wooden panels (hexagons, half-circles, triangles) painted in a curated palette of terracotta, sage green, and cream across a wall section. Back each panel with sisal rope or textured fabric for scratching, creating a three-dimensional color-blocked installation that serves as modern art. The mix of shapes and colors creates a playful yet sophisticated composition that becomes a focal point in any room.
Arrange the panels in an asymmetric cluster at cat height (12-40 inches from floor) so they’re functional first, then scatter a few smaller decorative pieces higher up to complete the visual story. The color variation means each panel reads as its own element while contributing to the overall composition—very boho, very collected-over-time.
Painting Wood Panels for Maximum Color Saturation
- Sand all panels with 220-grit sandpaper before painting to ensure smooth, even color application
- Use primer first—white for sage and cream, gray-tinted for terracotta to prevent needing 4+ coats
- Choose matte or eggshell finish rather than glossy—it hides imperfections and looks more organic and handcrafted
- Apply 2-3 thin coats instead of one thick coat to avoid drips and achieve professional-looking coverage
- Let each coat dry completely (4-6 hours minimum) before adding the next—rushing creates sticky, uneven results
- Distress edges lightly with fine sandpaper after final coat for a lived-in, vintage-bohemian feel
- Seal with matte polyurethane formulated for high-traffic areas since these panels will take scratching abuse
- Touch up annually with matching paint to keep colors vibrant—embrace slight variations as part of the handmade charm
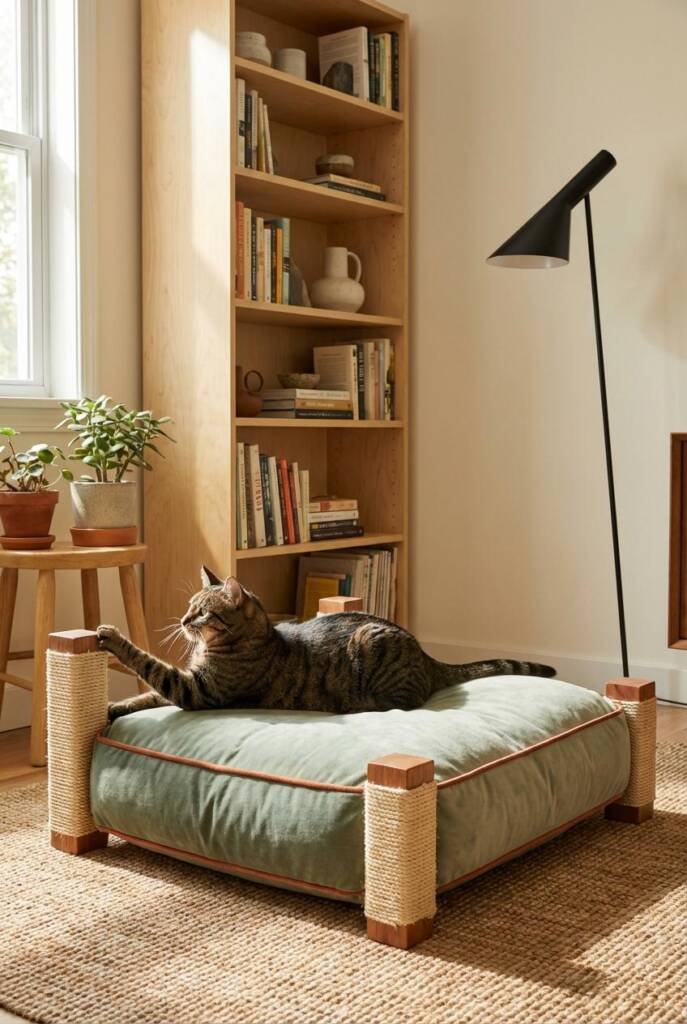
6. Sage Velvet Ottoman Scratcher with Terracotta Tassel Trim
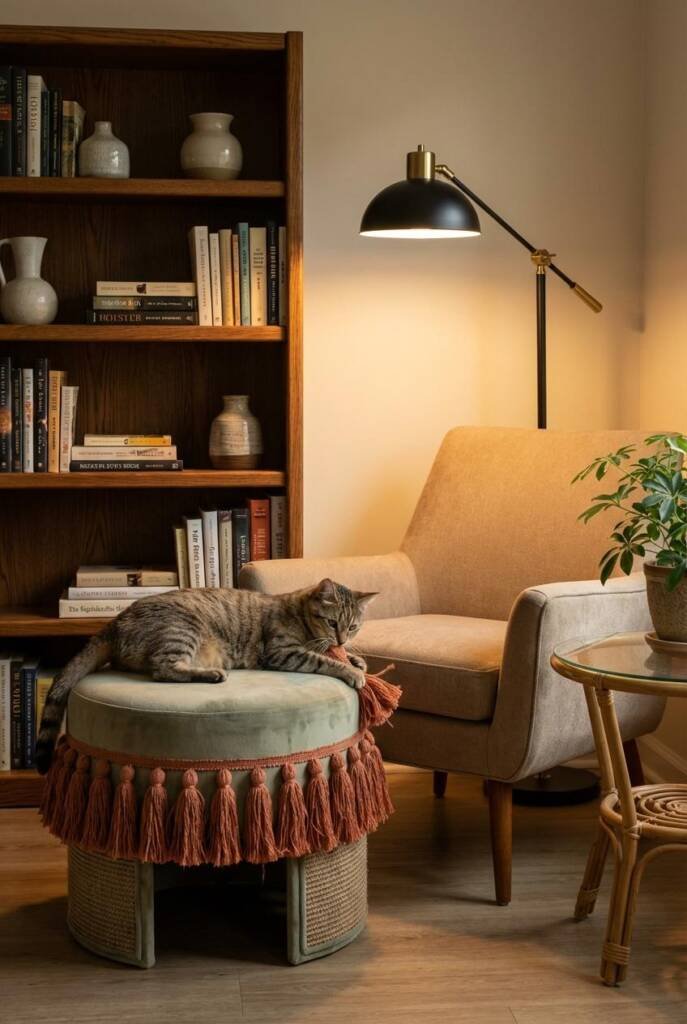
Commission or DIY a round ottoman wrapped in sage green velvet (or velvet-look performance fabric) with thick terracotta-colored tassels forming a fringe around the bottom edge. The plush velvet top is removable to reveal a sisal scratching surface underneath, while the wrapped sides provide additional vertical scratching. The tassels add playful movement and texture while hiding the base and adding that bohemian craft-fair aesthetic.
This piece pulls double duty as actual seating that guests can use, making it perfect for small spaces where every piece needs to justify its footprint. The jewel-toned sage velvet feels luxurious against the earthy terracotta, and the combination reads as curated vintage rather than obviously new.
Working with Velvet and Performance Fabrics for Pet Furniture
- Choose performance velvet with crypton or similar protective coating—it resists stains and cleans easier than traditional velvet
- Test with a claw on a fabric swatch before committing—some velvets snag easily while others bounce back beautifully
- Brush velvet regularly with a soft clothes brush in the direction of the nap to keep it looking fresh and luxurious
- Vacuum weekly with an upholstery attachment to remove embedded cat hair before it works into the pile
- Spot clean immediately with a damp microfiber cloth and mild soap—blot rather than rub to avoid crushing velvet pile
- Use velvet-specific cleaner for deeper stains—regular upholstery cleaner can leave water marks or crushing
- Rotate cushions monthly if your ottoman has multiple pieces to ensure even wear and sun fading
- Accept the patina—velvet develops beautiful character with use, showing light and dark variations that add depth
7. Tiered Rattan Shelf with Colorful Woven Baskets
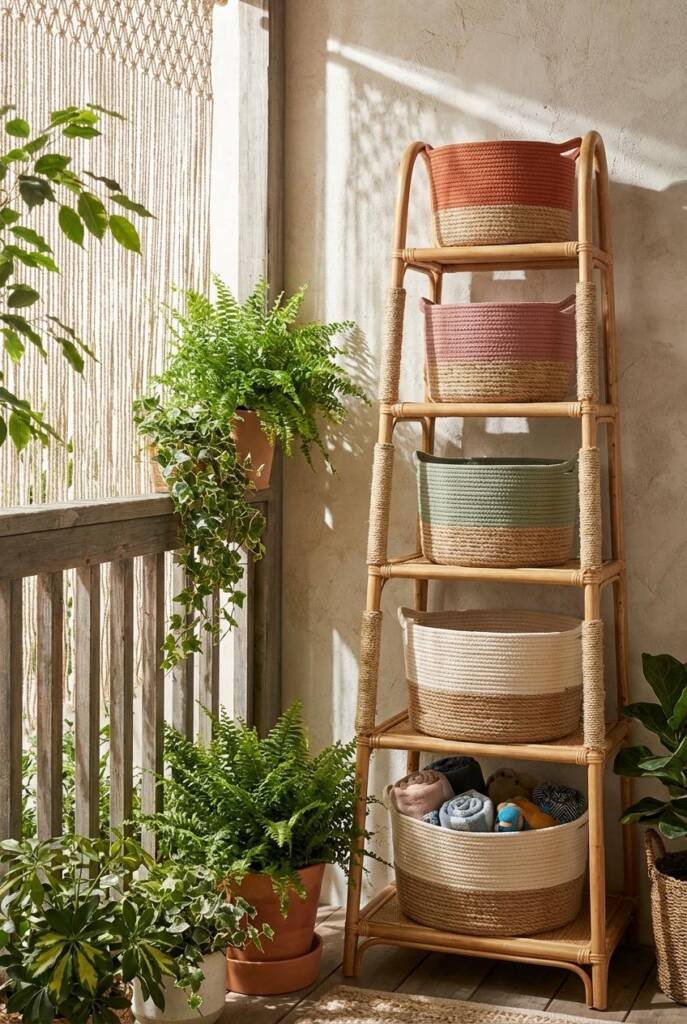
Create a leaning or wall-mounted rattan shelf system with 3-5 levels, each holding colorful woven baskets that double as scratching surfaces. Choose baskets in terracotta, sage, burnt orange, cream, and dusty rose, mixing sizes and weave patterns for visual variety. The basket exteriors provide scratching while the interiors store cat toys, grooming supplies, or rolled blankets in coordinating colors.
This modular approach means you can rearrange baskets seasonally or as your color preferences evolve—swap in a new sage basket when the current one shows wear, or rotate in seasonal accent colors while keeping terracotta as your anchor. The vertical shelf structure maximizes space while creating that collected, well-traveled boho vibe.
Selecting Baskets That Withstand Scratching and Look Cohesive
- Mix natural materials—combine seagrass, water hyacinth, palm leaf, and rattan for textural variety within your color palette
- Choose tight weaves over loose, open patterns—they hold up better to claws and maintain their shape longer
- Verify color is woven in, not painted on—check the basket interior to ensure color goes all the way through the material
- Size baskets appropriately—largest (14-16 inch) on bottom shelves, graduating to smaller (8-10 inch) at top
- Look for reinforced rims which prevent baskets from collapsing when cats lean on them during scratching
- Test flexibility by squeezing the basket—it should have some give but spring back to shape immediately
- Coordinate handle styles across your collection—all rope handles, or all woven, or all without handles for cohesion
- Rotate basket positions every 2-3 months so wear patterns distribute evenly across your collection
8. Terracotta Arch Scratcher with Sage Fabric Draping
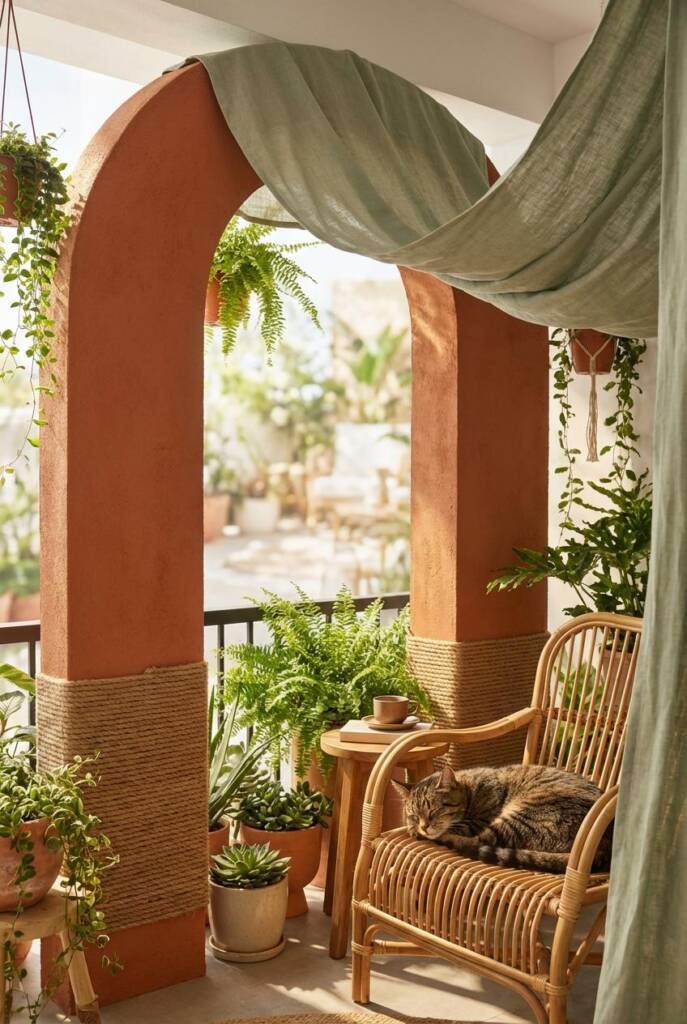
Build or buy an arched scratcher frame painted in warm terracotta, then drape lightweight sage linen or cotton gauze fabric over the top like a bohemian canopy. The arch legs provide vertical scratching surfaces while the fabric adds softness and creates a semi-enclosed space cats love for lounging. The terracotta structure reads as architecture while the flowing sage fabric brings that effortless, breezy boho feeling.
This piece becomes a room divider that doesn’t block light or sightlines—the sheer fabric filters rather than obstructs. Position it between your living and dining areas, or use it to define a corner reading nook where your cat can retreat. The combination of solid structure and flowing textile creates the perfect balance of form and function.
Draping and Securing Fabric for Movement Without Mess
- Choose lightweight fabrics in the 3-4 oz range—heavy enough to drape beautifully but light enough to move with air currents
- Pre-wash all fabric before draping to allow for shrinkage and soften the hand—you want lived-in texture, not crisp stiffness
- Use removable clips or ties at the top of the arch so you can take fabric down for washing without damaging the structure
- Cut fabric 1.5x the width of your arch for proper fullness—skimpy draping looks unfinished and accidental
- Hem all edges to prevent fraying even if you’re going for a raw, relaxed look—unhemmed fabric deteriorates quickly
- Add subtle weights like small river stones in fabric pockets at bottom corners to prevent excessive billowing during cat activity
- Layer two coordinating fabrics in slightly different shades of sage for depth and visual interest
- Steam periodically to remove wrinkles and refresh the draping—or embrace the wrinkled, lived-in texture as part of the aesthetic
9. Colorful Pom-Pom Hanging Rope Scratcher
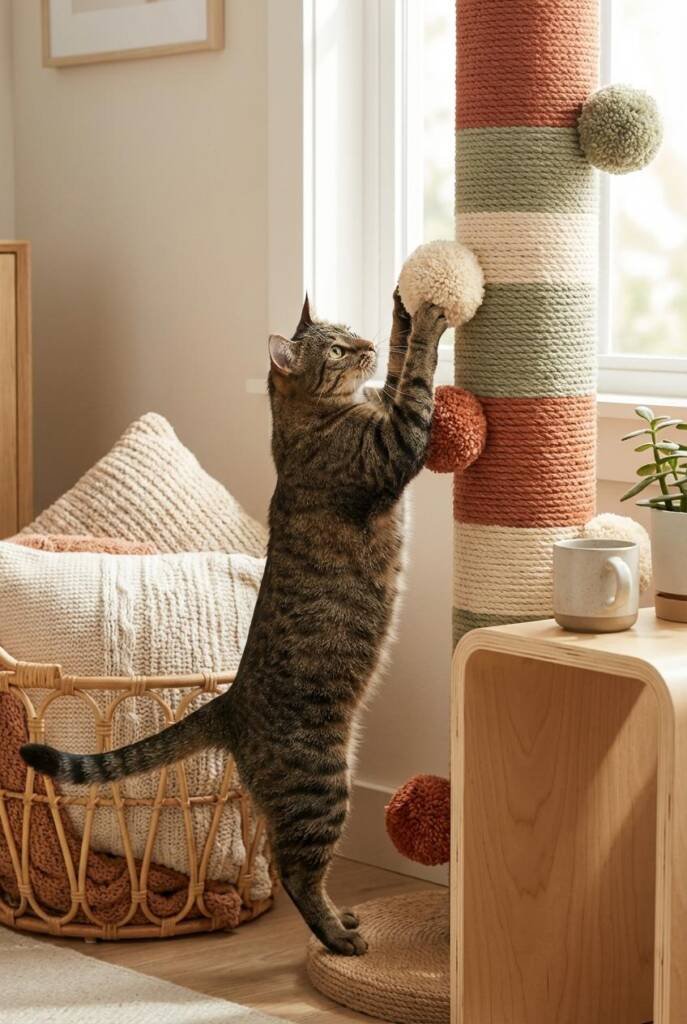
Suspend a thick natural rope from the ceiling and wrap sections with terracotta, sage, cream, and burnt orange yarn or fabric strips, then attach large handmade pom-poms in coordinating colors at intervals. The wrapped rope creates varied textures for scratching while the oversized pom-poms add whimsy and give cats something to bat during play. The color bands create a totem pole effect that draws the eye vertically.
This playful piece works especially well in eclectic boho spaces where a sense of humor is part of the design story. The pom-poms can be replaced or rotated seasonally—make extras in different color combinations so you can refresh the look whenever inspiration strikes. The vertical installation takes zero floor space while making a maximum color impact.
Making Durable Pom-Poms That Survive Play
- Use thick yarn (bulky weight or heavier) or fabric strips cut from canvas or felt—thin yarn creates floppy, sad pom-poms
- Create 5-6 inch diameter pom-poms rather than small decorative ones—substantial size withstands batting and looks intentional
- Wrap yarn 150-200 times around your pom-pom maker or cardboard template for full, dense spheres
- Tie the center bundle with strong waxed thread or thin wire rather than matching yarn—regular yarn can slip and unravel
- Trim pom-poms into perfect spheres with sharp fabric scissors, then trim again after first use to reshape any pulled sections
- Secure to rope with zip ties hidden inside the pom-pom rather than hot glue—glue fails with humidity and cat force
- Make extras in each color and store them for quick replacements when pom-poms get too beat up
- Refresh flattened pom-poms by misting with water and fluffing with fingers—they’ll poof back to life
10. Sage Green Cube Tower with Terracotta Interior Accents
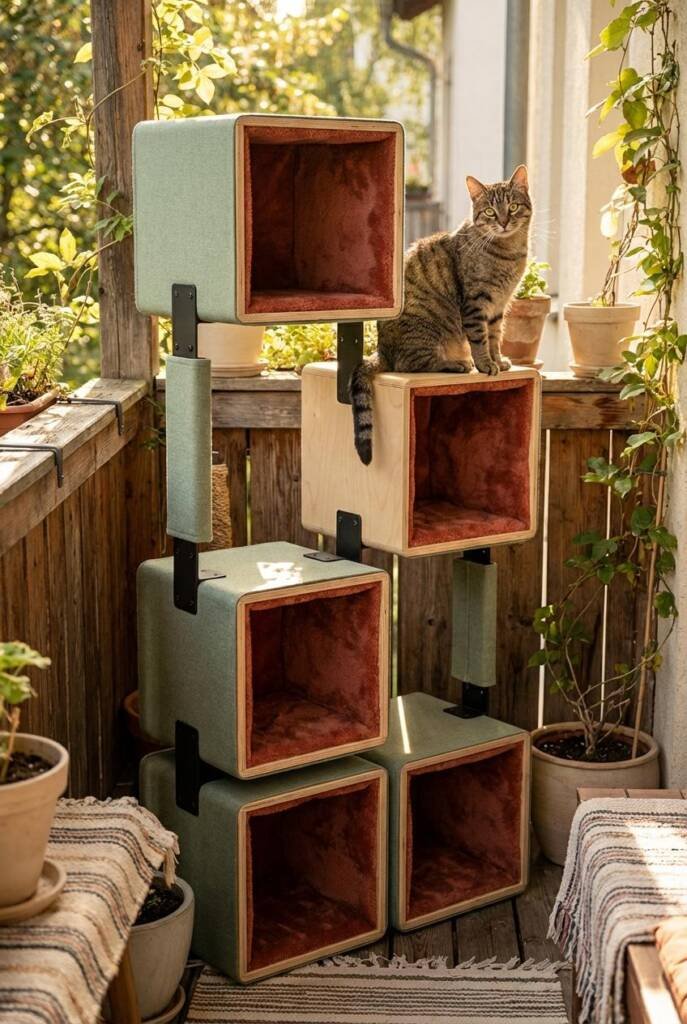
Stack large cube-shaped scratchers (16-18 inches per side) wrapped in sage green sisal or fabric, with the interior of each cube lined in terracotta-colored cushions or carpet. The exterior provides vertical scratching on all four sides while the cozy interiors become hiding spots cats claim as their own. Stack 3-4 cubes in a staggered formation for architectural interest that creates multiple levels.
The color surprise inside each cube adds a delightful detail that makes the piece feel considered and custom. As cats enter and exit, flashes of terracotta peek out against the sage exterior. This modular system can be reconfigured as needed—separate the cubes across a room for multiple stations, or stack them differently for a fresh look.
Building Stable Cube Configurations That Don’t Topple
- Connect cubes internally with furniture brackets or corner braces that won’t show but provide serious stability
- Weight the bottom cube by placing a layer of sand in a sealed bag or adding a plywood base filled with aquarium gravel
- Stagger your stack by offsetting each cube 2-3 inches from the one below for better weight distribution
- Secure the entire tower to the wall using L-brackets at the top rear cube for insurance against tipping
- Test stability by pushing firmly on the top cube from multiple angles—it should feel rock-solid
- Create entrance openings at varying positions so not all cubes open on the same side—this distributes weight better
- Use anti-slip pads under the bottom cube on hardwood floors to prevent the entire structure from sliding
- Limit height to 4 cubes maximum (about 6 feet) without wall anchoring—anything taller needs professional installation
11. Terracotta-Stained Wood Ladder with Sage Rope Wrapping
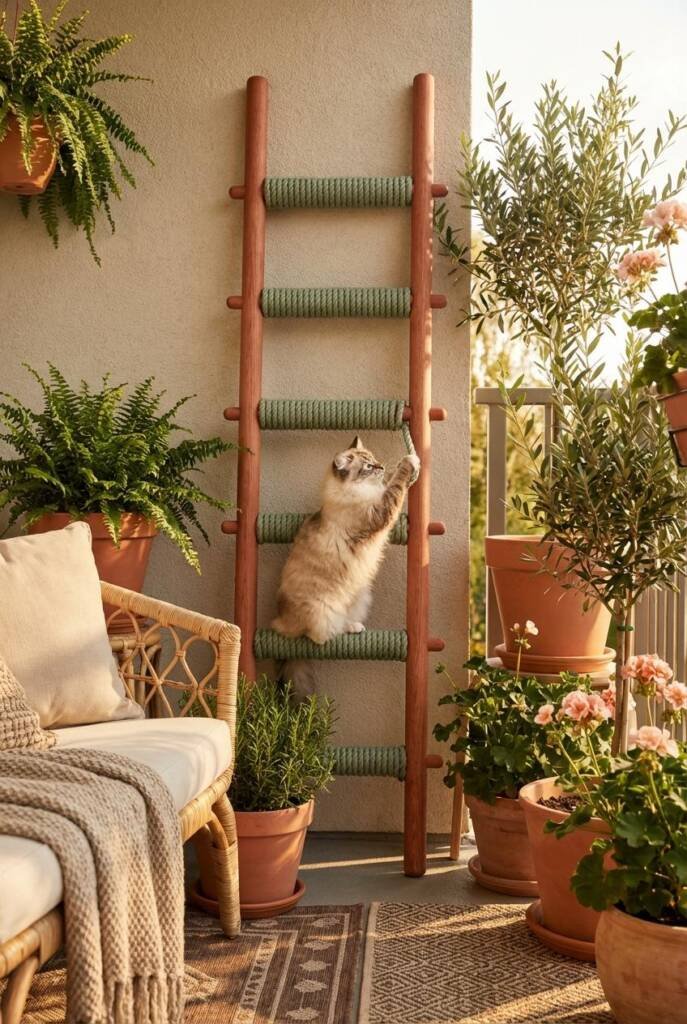
Transform a decorative wooden ladder into a leaning scratcher by staining it in rich terracotta tones, then wrapping the rungs with thick sage-colored rope or fabric strips. The ladder leans at an angle against the wall, offering horizontal scratching surfaces at varying heights while looking like an intentional design element. Hang small potted plants or decorative objects from upper rungs to complete the styling.
The wood grain showing through the terracotta stain adds organic variation that makes the piece feel artisanal and one-of-a-kind. The sage rope wrapping protects the rungs from claw damage while adding softness and grip that cats prefer. This piece works beautifully in narrow spaces—entryways, beside windows, or in that awkward gap between furniture.
Staining and Sealing Wood for Indoor Cat Furniture
- Sand the bare wood progressively through 120, 180, and 220 grit for smooth, even stain absorption
- Apply wood conditioner before staining if working with soft woods like pine—it prevents blotchy, uneven color
- Test stain color on the underside or back of the ladder first—wood species affects final color dramatically
- Apply stain with foam brush working in the direction of the grain, wiping excess after 5-10 minutes
- Layer multiple coats of lighter stain rather than one heavy coat of dark stain for more natural, dimensional color
- Allow 24 hours between coats and sand lightly with 320 grit between applications for professional results
- Seal with water-based polyurethane in matte or satin finish—3 coats minimum for protection against scratches and moisture
- Let cure completely (72 hours after final coat) before allowing cats near it—uncured poly can be tacky and collect hair
12. Colorful Woven Floor Cushion with Integrated Scratching Corners
Create oversized floor cushions (30-36 inches diameter) in sage velvet or linen with terracotta piping, and add sisal rope-wrapped blocks at each corner that extend slightly beyond the cushion edge. The cushion serves as a lounging spot for humans or cats, while the corner blocks provide targeted scratching surfaces. The elevated corners also create easy grab points for repositioning the heavy cushion.
Stack 2-3 cushions in varying sizes and colors for a casual floor seating area that’s wholly functional for both species. The layered look is quintessentially boho—mixing textures, playing with scale, and creating cozy floor-level spaces that encourage relaxation. Add smaller accent cushions in burnt orange and cream to complete the color story.
Constructing Heavy-Use Floor Cushions That Keep Their Shape
- Use high-density foam (3-4 inches thick, 35+ lb density) rather than polyester fill—it maintains shape under weight
- Wrap foam in batting before adding the outer cover to create a softer edge and prevent the foam texture from showing through
- Create removable covers with hidden zippers so you can wash them without replacing the entire cushion
- Choose upholstery-weight fabric (10+ oz) for the outer cover—decorator fabrics meant for light use won’t survive
- Add a non-slip backing to the bottom using rubber mesh or dots to prevent the cushion from sliding across floors
- Stuff corners firmly with extra batting or fabric scraps before adding rope blocks—loose corners look sloppy and collapse
- Box the corners by sewing straight across the corner seams to create three-dimensional, structured edges
- Rotate cushions weekly between different positions in your stack to distribute wear evenly across all surfaces
13. Sage and Terracotta Braided Rope Wreath Scratcher

Hang a large wreath (24-30 inches diameter) made from braided rope in alternating sage and terracotta sections, creating a circular scratching surface that doubles as oversized wall art. The braiding creates dimensional texture that cats can really dig into, while the circular form breaks up the usual rectangular scratching surfaces. Mount it low enough that cats can reach while standing, or position it at human eye level and watch cats jump to access it.
The wreath shape taps into that boho love of circular forms—round mirrors, woven wall hangings, rattan sunbursts. This piece fits right into that aesthetic family while serving a completely different purpose. Add preserved eucalyptus, pampas grass, or dried flowers tucked into sections for extra boho styling that doesn’t interfere with the scratching function.
Braiding and Securing Rope for Circular Forms
- Start with 1-inch diameter rope in two colors—anything thinner won’t have enough presence at wreath scale
- Cut three strands (one terracotta, two sage, or vice versa) each 2.5x your desired finished wreath circumference
- Secure strand ends together with heavy-duty cable ties or waxed thread before beginning your braid
- Braid tightly and evenly—loose braiding unravels quickly when cats claw at it
- Form the wreath shape by coiling the braid around a wire wreath form base for structure and mounting support
- Secure the braid to the form every 4-6 inches with zip ties or floral wire—hide these attachment points within the braid twists
- Join the start and end by unraveling the final 6 inches of each, interweaving the strands, and wrapping tightly with matching rope
- Mount using D-rings or picture hanging wire on the back rather than just a nail—wreaths are heavier than they look
14. Terracotta Pot Tower with Sage Rope Scratching Sections
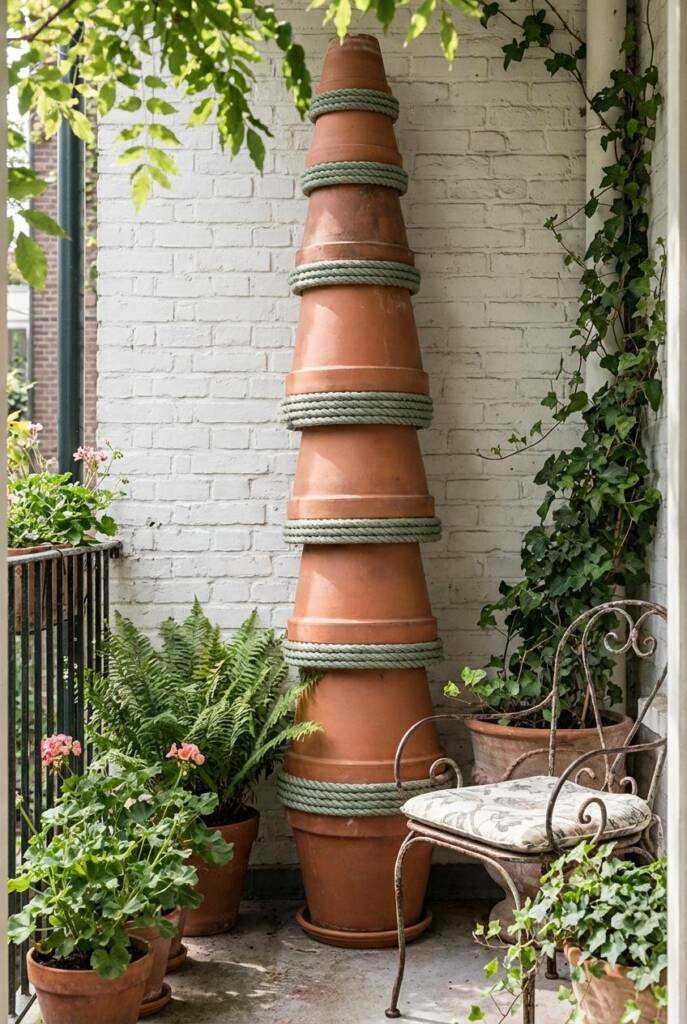
Stack graduated terracotta pots (largest at bottom, smallest at top) upside down to create a tower, with thick sage-colored rope wrapped around the neck of each pot where they connect. The smooth terracotta provides a cool surface cats enjoy lying against, while the rope sections offer scratching satisfaction. The gaps between stacked pots create peek-a-boo hiding spots and climbing challenges.
This sculptural tower looks like an art installation—the repetition of circular forms, the gradient from large to small, the color blocking of orange clay and green rope. Top the smallest pot with a planted succulent or air plant display, or leave it empty as a minimalist design choice. The weight of terracotta makes this piece incredibly stable despite its height.
Stacking and Securing Clay Pots for Pet Furniture
- Seal all drainage holes with silicone or cork stoppers before stacking—you don’t want gaps that collect debris
- Use museum putty between each pot layer to prevent shifting while still allowing disassembly for cleaning
- Run a threaded rod through the center of all pots for maximum stability—drill carefully through each drainage hole
- Secure the rod at top and bottom with washers and nuts that sit flush against the pot surfaces
- Weight the bottom pot by filling it partway with sand before sealing if your tower feels too top-heavy
- Choose thick-walled pots over thin, cheap terracotta—they withstand cat weight and won’t crack easily
- Wrap rope sections that connect pots by securing with construction adhesive rated for exterior use
- Keep tower height to 5 pots maximum (about 4-5 feet) for safety—taller structures need wall anchoring
15. Color-Block Canvas Hammock Between Sage Posts
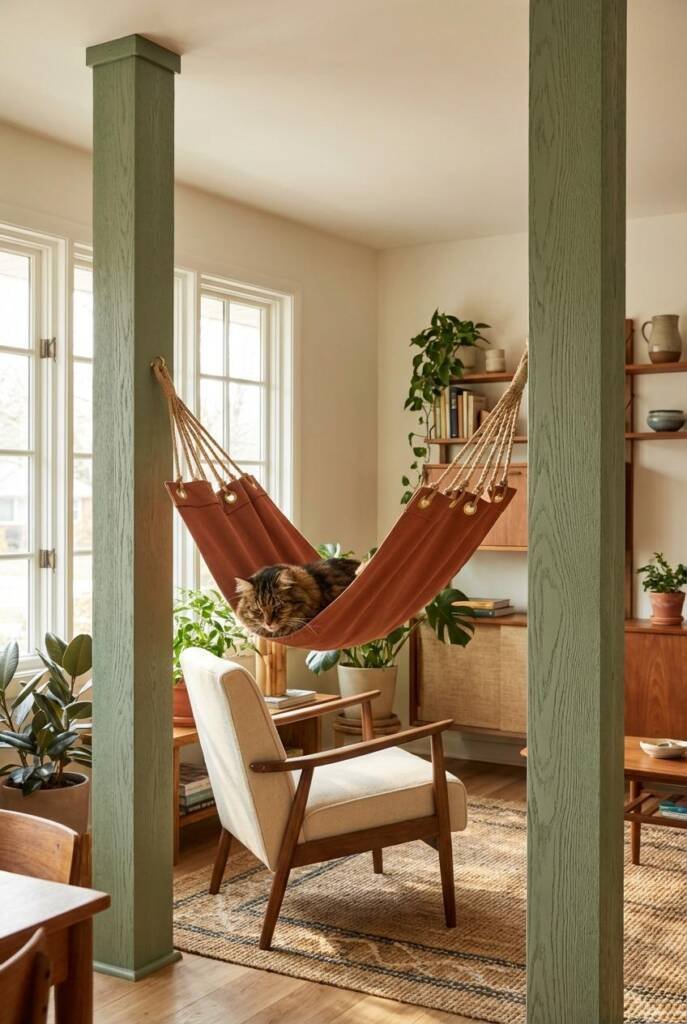
Install two sage-painted floor-to-ceiling posts and stretch a heavy canvas hammock between them in terracotta, secured with grommets and rope. The canvas provides a satisfying surface for scratching while the suspended hammock becomes a favorite lounging spot that sways gently with movement. The color-block effect of sage supports and terracotta fabric creates bold graphic impact.
Cats love the slight movement of suspended furniture—it adds an element of challenge and engagement that static pieces lack. The canvas can be removed easily for washing, and you can create multiple canvas pieces in different color combinations to rotate seasonally. This installation turns cat furniture into a functional art piece that anchors an entire room.
Installing Hammocks That Support Weight and Scratching Motion
- Secure posts floor-to-ceiling using tension or attaching to joists—they’ll experience significant lateral pull
- Use grommets rated for outdoor use on heavy canvas (12+ oz duck cloth)—cheap grommets tear out under stress
- Space grommets 6-8 inches apart along hammock edges rather than just at corners for even weight distribution
- Lace thick rope (1/2 inch diameter minimum) through grommets in a continuous line rather than individual ties
- Create tension by wrapping rope around posts multiple times before tying off—a single wrap will slip
- Test with weight by placing heavy books or bags of flour in the hammock before introducing cats
- Position hammock 18-24 inches off the floor for easy access—cats won’t use it if the jump feels risky
- Add a non-slip mat underneath in case cats overshoot their landing when jumping down
Curating Your Colorful Boho Cat Space: The Essential Accent Pieces
You’ve committed to color with your scratchers—now let’s talk about the supporting cast that makes everything feel cohesive rather than random. These complementary pieces tie your terracotta and sage story together while adding the layers and textures that make boho spaces feel collected and personal.
- Terracotta Floor Vases with Dried Botanicals: Large terracotta vessels (18-24 inches tall) filled with pampas grass, dried palm leaves, or wheat stalks in natural tones create height and drama near your scratchers. The repetition of terracotta throughout the space—in pottery, scratcher colors, and accents—creates visual rhythm. Choose vessels with interesting shapes or textures like ribbed surfaces or distressed finishes that add character.
- Sage Green Throw Blankets in Multiple Textures: Layer knitted, woven, and velvet throws in varying shades of sage across seating areas. The tonal variation prevents the space from reading as flat or one-note while the different textures add touchable dimension. Drape them casually over furniture rather than folding them precisely—the relaxed styling is essential to the boho aesthetic. Cats will absolutely claim these as their own, so choose washable fabrics.
- Burnt Orange and Rust Accent Pillows: Bridge your terracotta and sage with pillows in the warmer orange family—burnt orange, rust, clay, and sunset tones. Mix solid velvets with patterned linens featuring geometric designs or abstract shapes. The warm accents prevent the sage from reading too cool or sterile while adding energy that makes spaces feel alive. Cluster 3-5 pillows per seating area in odd numbers for natural arrangements.
- Natural Wood Shelving in Warm Tones: Floating shelves or ladder shelves in oak, acacia, or mango wood echo the warm terracotta tones while adding the essential boho element of exposed wood. Style them with small terracotta pots, sage-colored books, and cream ceramics. The wood grain adds organic variation that keeps the space from feeling too designed or coordinated.
- Woven Wall Baskets in Mixed Sizes: Create a basket gallery wall using flat woven baskets in terracotta, natural, sage, and cream. Vary the sizes from 8 to 20 inches in diameter and arrange them in an organic cluster rather than a grid. The three-dimensional texture adds depth to walls while the color variation ties into your scratcher palette. Bonus: they hide imperfections on walls you’d rather not repair.
- Macramé Plant Hangers with Colorful Cord: Suspend planters using macramé hangers that incorporate dyed cord in your color palette—sage green mixed with natural cotton, or terracotta-dyed sections. Fill them with trailing pothos, philodendrons, or spider plants that add living movement. The hanging elements draw eyes upward and emphasize ceiling height while continuing your color story vertically.
Living in Full Color Where Cats and Style Both Thrive
Choosing color in a space where you live with pets is an act of confidence—it says you refuse to let function dictate boring design, and that you trust yourself to create beauty that serves multiple purposes. These terracotta and sage scratchers prove that pet furniture can be the starting point for your entire color palette rather than something you hide or apologize for. The warm earthiness of terracotta grounds spaces emotionally while sage brings calming balance—together they create rooms that feel both energizing and restful.
Boho style has always celebrated the imperfect, the handmade, the collected-over-time aesthetic. When your cat scratches a terracotta-painted surface, those marks become part of the story—evidence of a well-loved life rather than damage to cover up. The beauty of working with these earthy colors is that they age gracefully, developing patina and character that mass-produced neutrals never achieve. Every scratch, every faded spot, every worn edge adds authenticity.
At Sweet Purrfections, we believe your most colorful design dreams and your cat’s most basic needs can coexist beautifully. Whether you’re layering in small pops of color or committing to a full terracotta and sage takeover, there’s a way to honor both aesthetic vision and animal reality. Keep exploring ideas that prove function can be beautiful—because the most memorable spaces are the ones where both people and pets feel completely at home.