Concrete-look cat towers bring the raw, architectural edge of brutalist design into your living room — and they do it without sacrificing a single inch of function for your cat. These towers, finished in microcement, concrete-effect wrap, or textured mineral coatings, slot into modern lofts and industrial spaces the way a cheap carpeted tree never could. We’re talking pieces that range from a $45 DIY transformation to premium sculptural builds over $500, all designed to look like they belong in a Tadao Ando building rather than a pet aisle.
What you’ll find below are 9+ concrete-look cat tower ideas that each come with a step-by-step DIY breakdown so you can actually build, modify, or source them yourself. We cover brutalist shelf systems that pass as custom built-ins, a concrete-effect condo that secretly hides a litter box, floating wall steps that double as art, and an under-$200 Amazon find that genuinely fooled an architect. Every idea pulls double duty — giving your cat vertical territory, scratching surfaces, and cozy perches while giving you a piece that elevates your entire room.
Whether you’re working with a 600-square-foot studio or a wide-open converted warehouse, there’s a concrete-look option here that fits your space, your budget, and your cat’s personality. Let’s get into it.
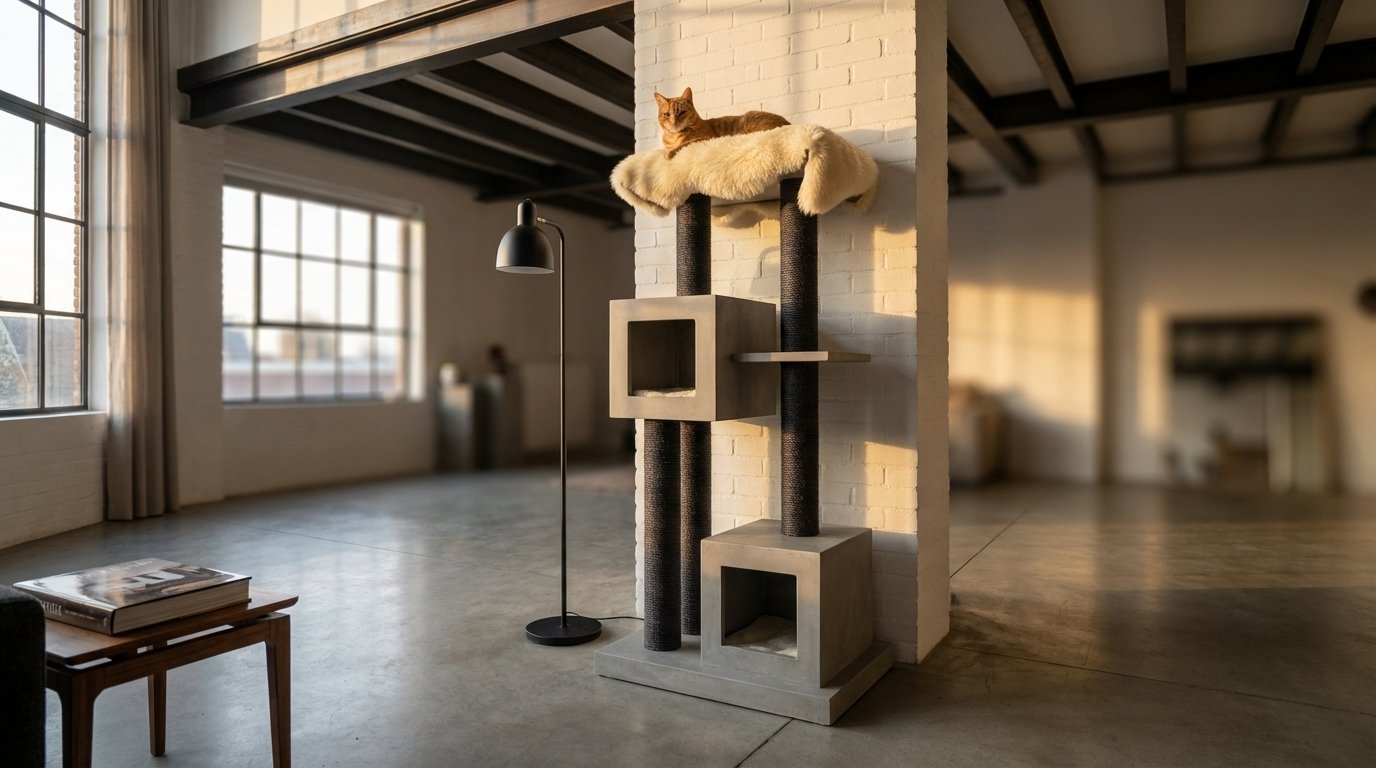
1. The Monolith Tower That Looks Like a Museum Sculpture
Your cat tower shouldn’t be the thing you apologize for when guests walk in.
Most cat towers look like they belong in a garage sale. The Monolith-style concrete-look tower flips that entirely — it reads like a brutalist sculpture you’d find in a gallery lobby, all clean slabs and raw texture. The trick is that none of these are actually concrete. They use resin composites, fiber-reinforced polymers, or MDF with mineral-finish coatings to nail that poured-concrete aesthetic at a fraction of the weight.
The sisal-wrapped sections blend seamlessly into the concrete-grey finish instead of screaming “cat furniture” from across the room. At 55″ tall, it handles multi-cat households without dominating a space the way a ceiling-height tower would.
What makes this style work in a modern loft specifically is the material honesty. Exposed ductwork, polished concrete floors, steel-frame windows — a brutalist cat tower doesn’t compete with those elements, it echoes them. Your cat gets vertical territory; your interior stays intentional.
How to Style a Sculptural Cat Tower as a Living Room Focal Point
- Choose Your Wall: Place the tower against your most minimal wall — no gallery walls or shelving competing for attention. Leave at least 18″ of clear space on each side so it reads as a standalone piece.
- Ground It With Texture: Set the tower on a flat-weave rug in charcoal or warm sand to define the zone. A 4×6 from Ruggable ($229) works and is machine-washable for inevitable hairballs.
- Add One Accent, Not Five: Place a single oversized planter or floor lamp beside it — something 36″+ tall that creates a visual grouping without clutter. Avoid symmetry; offset it slightly.
- Light It Intentionally: Aim a warm-toned spotlight or picture light at the tower from above. Even a $35 clamp lamp from IKEA turns a cat tower into a sculptural moment after dark.
- Budget move: DIY the concrete look by wrapping a basic $80 cat tower in mineral-textite contact paper like d-c-fix concrete grey ($12/roll) — total cost under $100.
2. The Brutalist Shelf System Your Guests Will Think Is Custom Built-In
Nobody needs to know your gallery wall is actually a cat jungle gym.
MiaCara’s Torre wall-mounted cat shelves use a concrete-effect laminate that reads as poured cement from across the room. Arrange them in an asymmetrical grid up a loft wall, and guests will genuinely ask which architect did your built-ins. The matte mineral finish, clean radiused edges, and hidden mounting hardware make these look like they belong in a Tadao Ando project, not a pet store.
Cats get a vertical climbing gallery with multiple routes and resting platforms — exactly the kind of three-dimensional territory that keeps indoor cats mentally sharp and physically lean. You can start with three shelves and expand over time, which is the real beauty of modular systems: your climbing wall grows with your budget and your cat’s confidence.
The concrete laminate is also genuinely practical — it won’t absorb odors, scratches buff out more easily than real concrete, and it wipes clean in seconds. If you want the brutalist aesthetic without committing to actual masonry on your walls, this is the move.
How to Install a Concrete-Look Cat Shelf System Without Damaging Loft Walls
- Map your layout: Use painter’s tape to mock up shelf positions on the wall, spacing platforms 12–16 inches apart vertically so your cat can hop comfortably between them.
- Find your studs or use proper anchors: In drywall lofts, toggle bolts rated for 50+ lbs per point are non-negotiable — MiaCara’s mounting plates need at least two secure anchor points per shelf.
- Install the mounting plates first: Drill the steel wall plates level using a laser level (a Bosch GLL 30 runs about $35 and saves you from crooked shelves), then slide each Torre shelf onto its plate.
- Add a sisal or cork accent shelf: Mix in one MiaCara cork-top platform as a scratching station so your cat has a reason to use every level, not just camp on the highest one.
- Budget move: Skip the brand name and DIY concrete-look shelves using IKEA LACK shelves ($12.99 each) wrapped in concrete-effect contact paper like d-c-fix for under $60 total.
3. A $45 DIY Concrete-Wrap Hack That Transforms Any Cheap Cat Tree
That expensive brutalist cat tower on your mood board? You can fake it with contact paper and a $35 Amazon tree.
You don’t need to drop $300 on an architectural cat tower to get that raw concrete aesthetic — you need a $22 roll of d-c-fix Concrete Grey mineral-effect contact paper and a budget cat tree you’re willing to transform. Wrapped over the flat platforms and base panels of any basic tree, this self-adhesive film is dead convincing from across the room. The slightly matte, textite finish photographs beautifully against white walls and exposed brick, and it turns a forgettable beige tower into something that looks like it belongs in a Tadao Ando building.
The trick is choosing a cat tree with flat, geometric surfaces rather than curved or heavily carpeted ones. The Amazon Basics Cat Tree ($35) works perfectly — its simple boxy platforms give you clean planes to wrap without fighting weird contours. Leave the sisal posts exposed; the natural rope against faux concrete is exactly the kind of material contrast brutalism thrives on. Cats won’t care about the surface swap since they’re scratching the posts, not the platforms, and the contact paper holds up surprisingly well to claw traffic on flat surfaces.
One extra move that sells the whole thing: swap out any dangling pom-pom toys for a simple leather cord with a wooden bead. It kills the “pet store” vibe instantly and keeps the material palette honest.
How to Give a Budget Cat Tree a High-End Concrete Makeover in One Afternoon
- Strip and prep: Remove any carpet pads from the flat platforms using a flathead screwdriver and clean the particle board with rubbing alcohol. You need smooth, dust-free surfaces for the adhesive to bond.
- Cut and apply the film: Cut d-c-fix Concrete Grey ($22/roll on Amazon) with 1-inch overhang per side, peel back gradually, and squeegee from center outward to eliminate air bubbles.
- Wrap the edges: Fold the overhang around each platform edge and secure with a heat gun on low for 10 seconds per section — this locks the film down and prevents cat claws from lifting corners.
- Reassemble and style: Reattach platforms to the sisal posts, place on a simple black rubber mat, and skip any colorful accessories — let the concrete and rope do the talking.
- Budget move: The full hack — Amazon Basics Cat Tree plus one roll of d-c-fix film — runs about $57, which is roughly 80% less than the cheapest purpose-built concrete-look tower we’ve found.
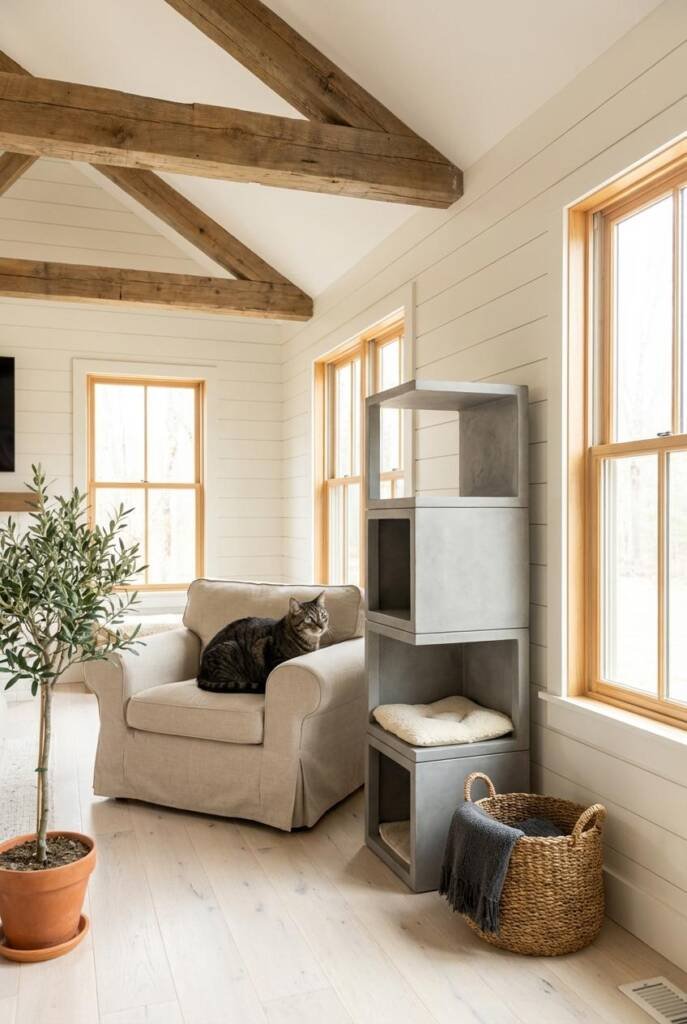
4. The Concrete-Effect Condo That Hides a Litter Box in Plain Sight
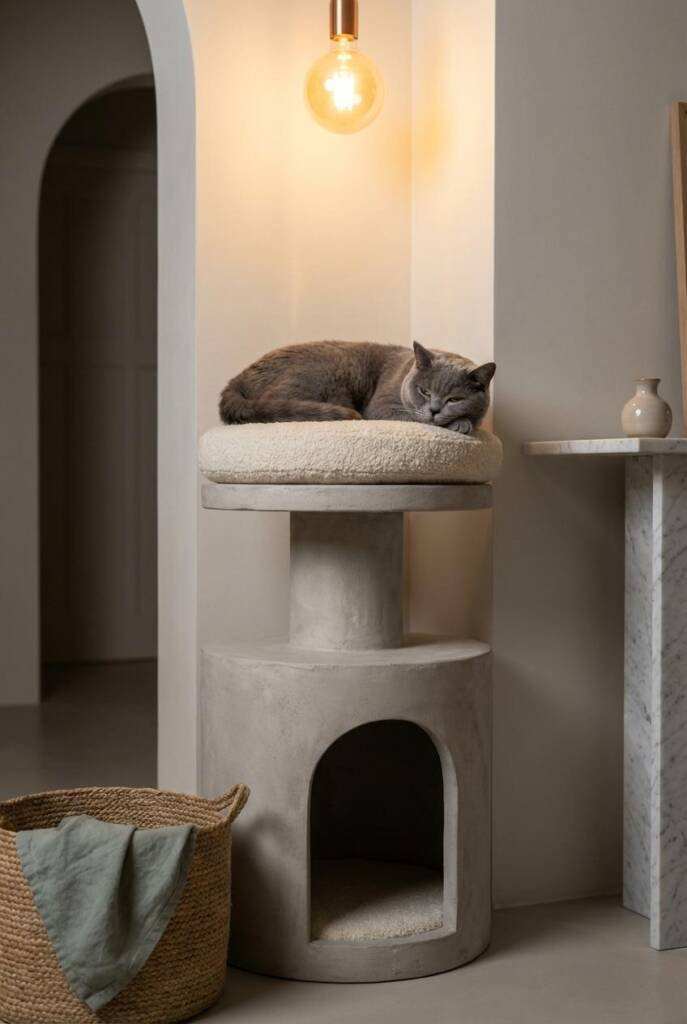
What if your cat’s litter box doubled as the most architectural piece of furniture in your apartment?
Most people hide the litter box in a closet or bathroom corner, then spend money on a separate cat tower. This concrete-effect condo eliminates that compromise entirely. The bottom compartment is sized to fit a standard 19×15-inch litter pan behind a discreet side entry, while the upper levels serve as lounging platforms and a cozy enclosed den — all wrapped in micro-cement textured panels that look like poured concrete. From across the room, it reads as a sculptural side table or brutalist pedestal, not cat furniture hiding a toilet.
The side-entry design gives cats the privacy they prefer (enclosed boxes reduce stress-related avoidance, per multiple feline behaviorist studies) while keeping odor contained better than open setups. The panels wipe clean with a damp cloth, and the litter compartment has a removable tray liner for quick swaps. If your loft is under 700 square feet, this kind of dual-purpose piece isn’t just clever — it’s essential real estate management.
How to Conceal a Litter Box Inside a Brutalist Cat Tower
- Choose your litter pan first: Measure your current box and confirm it’s under 19×15 inches to fit Kakureta’s bottom compartment. If you use a top-entry box, you’ll need to switch to a standard open pan.
- Position for ventilation and access: Place the tower at least 4 inches from the wall so air circulates behind the litter compartment, and orient the side entry away from high-traffic sightlines.
- Add odor control inside the compartment: Stick a flat activated-charcoal filter ($8 for a 4-pack on Amazon) to the interior ceiling of the litter section to absorb ammonia between cleanings.
- Establish a cleaning rhythm: Scoop daily through the side entry and pull the removable tray liner for a full wash every two weeks to prevent micro-cement staining.
- Budget move: Skip the Kakureta and DIY the look by wrapping a $40 IKEA Kallax insert with self-adhesive micro-cement contact paper ($25 per roll) for a sub-$70 hidden litter box station.
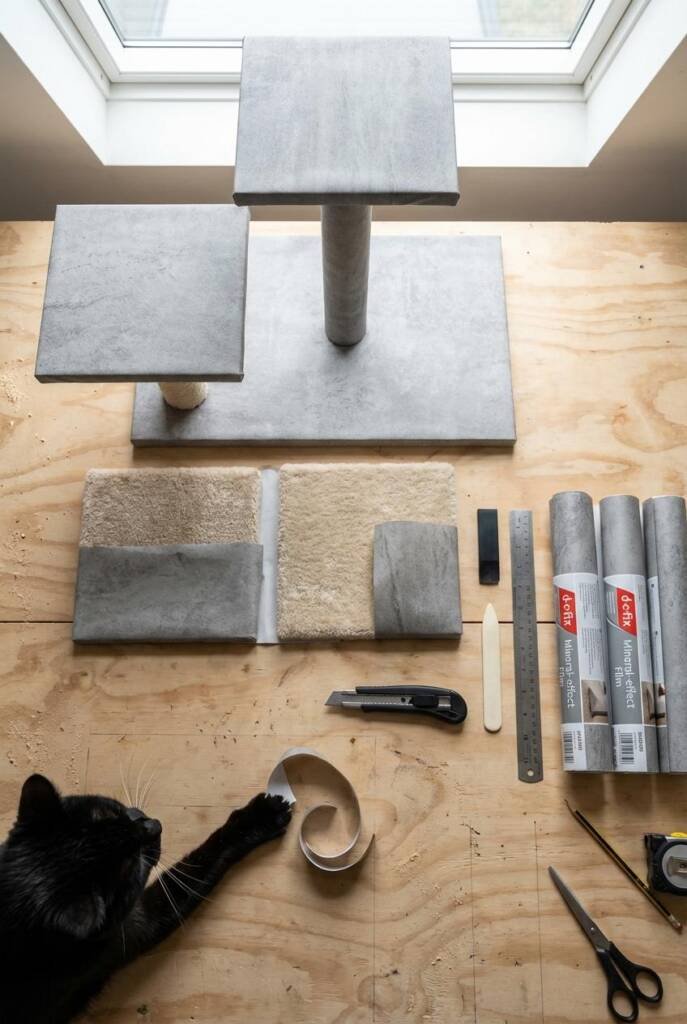
5. Why Microcement Finish Towers Are Basically Indestructible (Your Cat Will Try)
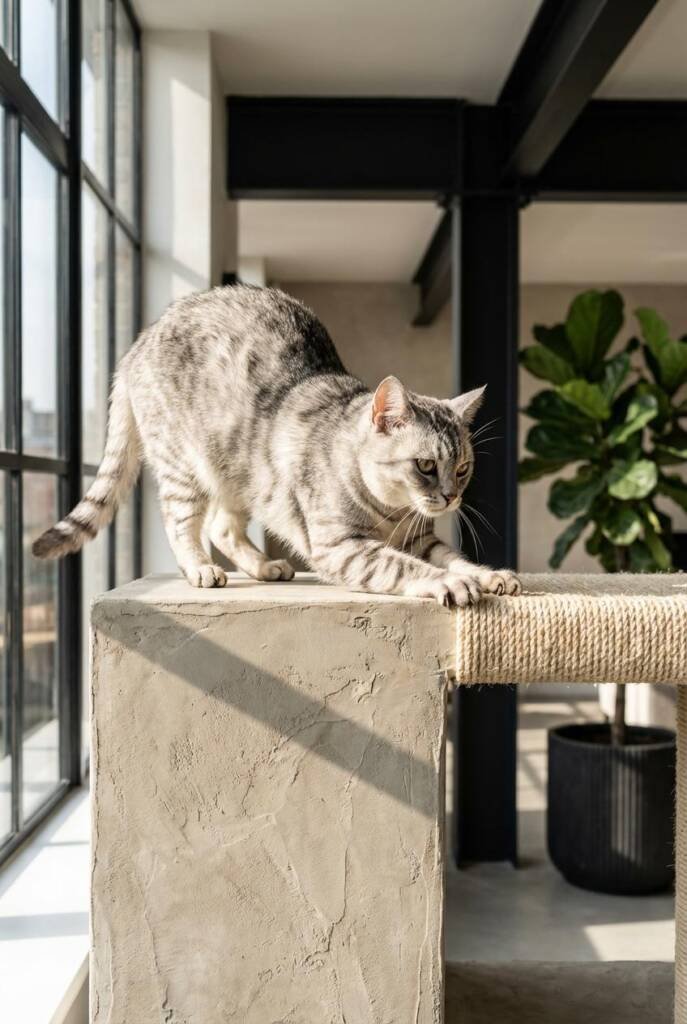
Your cat has destroyed every surface you’ve ever loved — microcement is the finish that fights back.
Microcement is the same finish high-end designers use on kitchen countertops and bathroom walls — a thin polymer-modified cement layer that bonds to almost any substrate. Applied over MDF or plywood cat tower frames, it creates that raw, poured-concrete aesthetic without the 200-pound weight penalty. The texture reads as industrial and sophisticated, and it develops a subtle patina over time that actually makes scratches look intentional rather than destructive.
The coating hits about 2mm thick — enough to shrug off claw marks that would gouge regular paint or laminate. It’s also sealed, so hairballs, water spills, and the occasional “miss” wipe clean with a damp cloth. The MDF core keeps total weight under 35 pounds for a 58-inch tower, meaning you can actually reposition it without recruiting your neighbors.
What makes microcement genuinely different from concrete-look vinyl wraps or spray paint is longevity. Wraps peel at the edges within months of determined scratching. Microcement chemically bonds to the surface, so your cat’s claws meet a mineral-hard shell instead of a decorative layer waiting to fail.
How to Choose a Microcement Cat Tower That Survives Claws and Zoomies
- Check the coating thickness: Look for at least 1.5–2mm of microcement — anything thinner is decorative only and won’t survive daily claw contact. CATIFICATION CO and Brutalist Pets both hit this spec.
- Confirm it’s sealed: Unsealed microcement absorbs liquids and stains permanently. Ask the seller whether a polyurethane or wax topcoat is applied — reputable brands include this standard.
- Test the base weight ratio: A 48–60 inch microcement tower should weigh 30–45 lbs. Under 25 lbs likely means the cement layer is cosmetic; over 55 lbs suggests actual concrete, which risks cracking if tipped.
- Pick a matte finish over gloss: Matte hides minor surface scratches and looks more like real poured concrete — gloss shows every claw trail and fingerprint within a week.
- Budget move: DIY microcement kits from Topciment or Luxury Concrete run $85–$120 and cover enough surface to coat an existing MDF cat tower yourself.
6. Pair It With Raw Steel: The Concrete + Metal Combo That Interior Designers Love
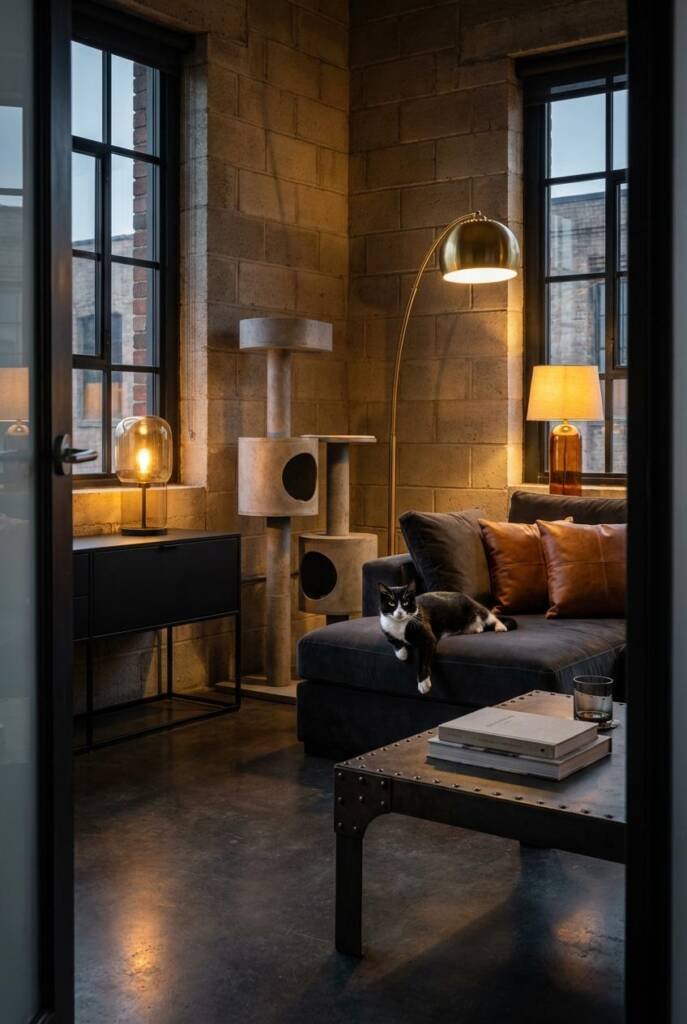
Concrete and raw steel together hit different — here’s how to make your cat’s tower the anchor of a brutalist corner that looks editorially styled.
A concrete-look cat tower standing next to matte black powder-coated steel furniture isn’t just a design choice — it’s a whole mood. The pairing works because both materials share the same visual DNA: raw, honest, unapologetically industrial. Together they create a brutalist vignette that looks intentional rather than thrown together, the kind of corner that stops people mid-scroll on Instagram.
Pair it with a black steel side table or magazine rack positioned 12-18 inches away, and you’ve got a composition that reads as one cohesive moment rather than “cat stuff next to people stuff.” Cats love the height advantage these towers provide, and the sturdy steel pieces nearby won’t budge when your cat inevitably launches off them.
The trick interior designers use: keep the color palette to three materials max. Concrete gray, matte black steel, and one warm accent — a camel leather cushion or walnut wood tray — prevents the space from feeling cold. That single warm element is what separates “brutalist loft” from “unfinished basement.”
How to Style Concrete and Raw Metal Together for a Cohesive Loft Look
- Anchor With the Tower: Place your concrete-look cat tower in a corner or next to a window, at least 8 inches from the wall so cats can access all sides.
- Flank With Black Steel: Add a matte black powder-coated shelf or side table within 18 inches — CB2’s Framework bookshelf ($349) is a go-to for this exact pairing.
- Add One Warm Accent: Break up the gray-and-black palette with a single warm material like a cognac leather throw pillow or a small walnut tray on the shelf.
- Light It Deliberately: Position a black metal floor lamp (like the IKEA HEKTAR, $59) to cast directional light on the vignette — overhead lighting flattens concrete textures.
- Budget move: Hit up a steel fabricator on Etsy for custom matte black wall shelves starting around $45 — half the cost of retail brands for the same powder-coated finish.
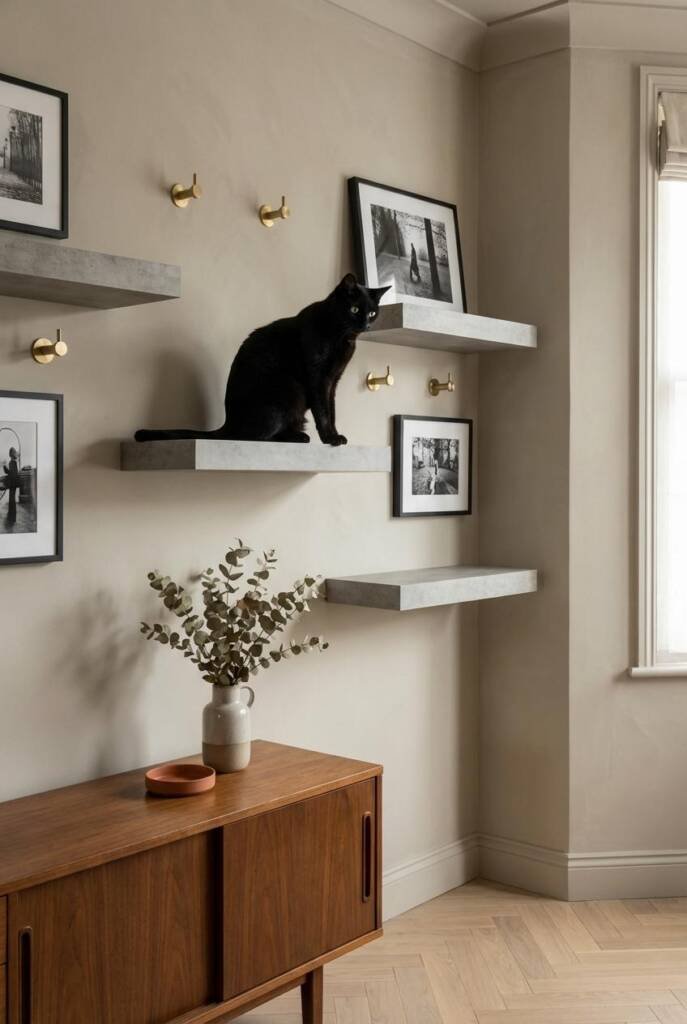
7. The Floating Concrete-Look Cat Steps That Double as Wall Art
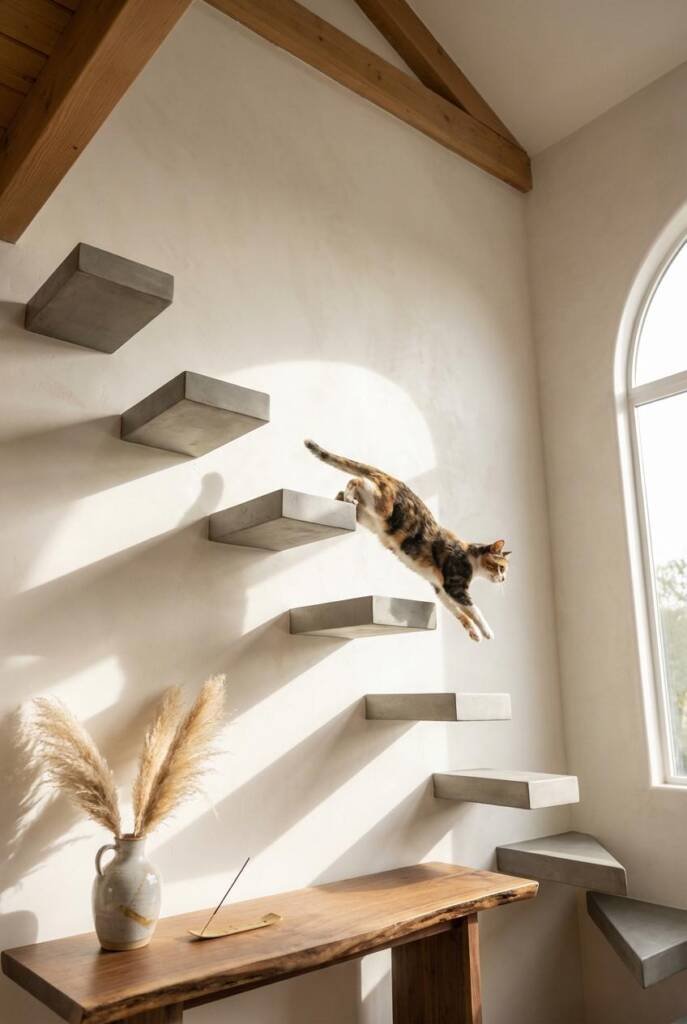
Your cat’s climbing wall just became the most interesting thing in your apartment.
These aren’t shelves — they’re individual cantilevered steps that zigzag up your wall like a brutalist staircase to nowhere (or, more accurately, to your cat’s favorite ceiling-height perch). Stagger five or six at asymmetric intervals and the whole arrangement becomes kinetic wall art — especially once your cat is mid-ascent.
Each step supports up to 62 lbs despite weighing almost nothing, thanks to cast-resin construction over a steel mounting bracket. Cats love them because the climbing path satisfies their hardwired need to patrol vertical territory, and the textured surface gives solid grip even at speed. Pair them with one of their concrete-finish wall-mounted beds at the top ($89) and you’ve got a complete vertical highway that looks intentional, not improvised.
The real magic is that guests won’t clock these as cat furniture until your cat launches across them. That’s the brutalist sweet spot — functional infrastructure disguised as design.
How to Arrange Floating Cat Steps in an Artful Ascending Pattern
- Map Your Climbing Path: Use painter’s tape to mock up step placement on your wall, spacing each step 12-16 inches apart vertically and 14-18 inches horizontally. Asymmetric zigzag patterns read more artistic than straight diagonals.
- Anchor Into Studs: Each CatastrophiCreations step mounts with two screws that must hit studs — use a stud finder and pre-drill, since cast-resin brackets have zero flex tolerance.
- Install Bottom to Top: Start with the lowest step at roughly 24 inches off the floor so your cat can jump on from standing, then work upward following your tape guide.
- Add a Destination Perch: Cap the sequence with a wall-mounted lounger or hammock (CatastrophiCreations’ concrete-finish Hammock, ~$89) so there’s a reward at the summit — otherwise cats stall at the top step with nowhere to go.
- Budget move: Skip the branded set and DIY concrete-look steps using IKEA LACK shelves ($6.99 each) coated with a concrete-effect paint like Rust-Oleum Chalked in Aged Gray for under $50 total.
8. Add a Faux Sheepskin Topper and Watch Your Cat Claim It Forever
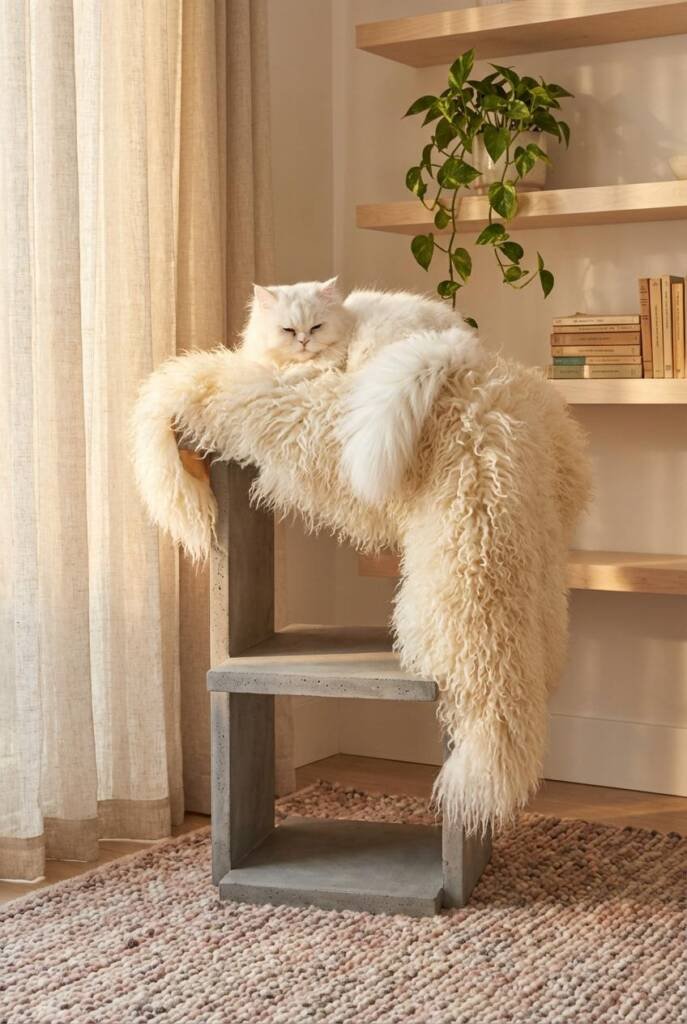
The fastest way to make a brutalist cat tower irresistible is one sheepskin and about 30 seconds of draping.
Raw concrete aesthetics hit different when there’s a cloud of creamy sheepskin pooled on top. That single textile contrast — industrial gray against organic white — is the kind of tension that makes interior designers lose their minds. It also happens to be the exact move that turns a concrete-look cat tower from “nice furniture” into your cat’s non-negotiable throne.
Cats are texture obsessives, and nothing wins them over like genuine sheepskin. The lanolin naturally resists odor, the fibers trap body heat without overheating, and the deep pile gives cats that “nesting” sensation they crave. A Faux sheepskin from Amazon runs about $20 and fits most tower platforms that measure 14–18 inches across. Drape it so the edges hang slightly over the platform — cats love the visual boundary, and it looks infinitely better than a flat cut. Once your cat claims it, good luck ever washing it without a protest yowl.
How to Soften Brutalist Cat Furniture With Textiles Cats Actually Love
- Pick the right pelt: Choose an Icelandic or Mongolian sheepskin with long-staple fibers (3–6 inches). A single pelt around 24×16 inches fits standard tower platforms without bunching.
- Secure it subtly: Use two small adhesive Velcro strips ($4 at 3M Command) on the platform underside so the sheepskin stays put during zoomies but lifts off for cleaning.
- Break it in fast: Rub the sheepskin against your cat’s existing bedding for 10 minutes so it picks up familiar scent — this cuts adoption time from days to hours.
- Maintain the texture: Shake it out weekly and hand-wash with Eucalan No Rinse Wool Wash ($14) every 4–6 weeks to keep the fibers soft and odor-free.
- Budget move: IKEA’s LUDDE sheepskin ($29) is a surprisingly decent alternative that holds up well to cat claws for 6+ months.
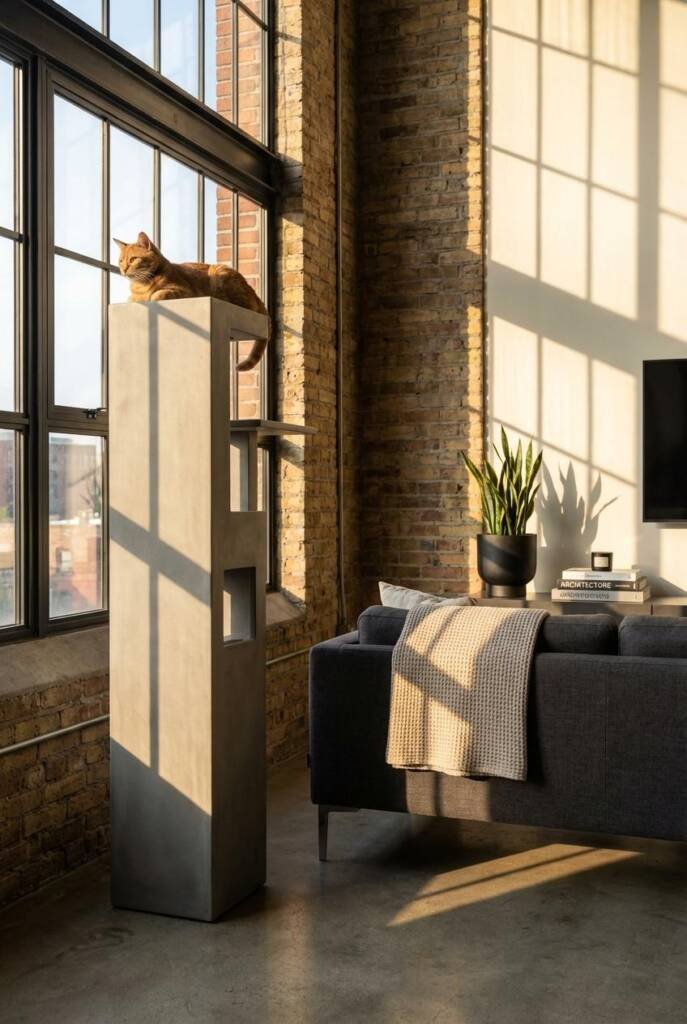
9. The Under-$200 Amazon Find That Fooled Our Architect Friend
Our architect friend thought this was a custom concrete sculpture — it’s a $189 cat tower from Amazon.
The textured cement-gray panels have a matte, mineral-like finish that photographs almost identically to poured concrete, and the clean right angles and stacked cubic form read as a minimalist sculpture rather than pet furniture. At roughly 52 inches tall, it’s substantial enough to anchor a corner without overwhelming a loft.
Cats get three enclosed cubes for hiding, two flat perches for surveying, and sisal-wrapped posts integrated into the structure rather than bolted on as an afterthought. The 30-pound base keeps it stable for cats up to 15 lbs, and the panels wipe clean with a damp cloth — no fabric to trap hair.
The one catch: the stock sisal is light beige, which slightly breaks the monolithic concrete illusion. Five minutes with a can of charcoal-gray fabric dye fixes that completely.
How to Make a Budget Concrete-Look Cat Tower Look Expensive
- Dye the sisal dark: Soak the sisal rope sections with Rit DyeMore in Graphite ($6) to match the cement-gray panels and eliminate the beige contrast.
- Swap out the base pad: Replace the included carpet pad with a 14×14-inch piece of dark gray industrial felt from a craft store for a seamless look.
- Add weight for stability: Place a thin 5-lb steel plate or concrete paver inside the bottom cube to give it that satisfying heavy, monolithic feel larger cats demand.
- Style the surrounding area: Position one matte black planter and a single architectural book stack within 18 inches — just enough context to sell the sculptural vibe without cluttering.
- Budget move: At $189 plus roughly $15 in upgrades, you get a brutalist cat tower that rivals custom builds costing $600+.
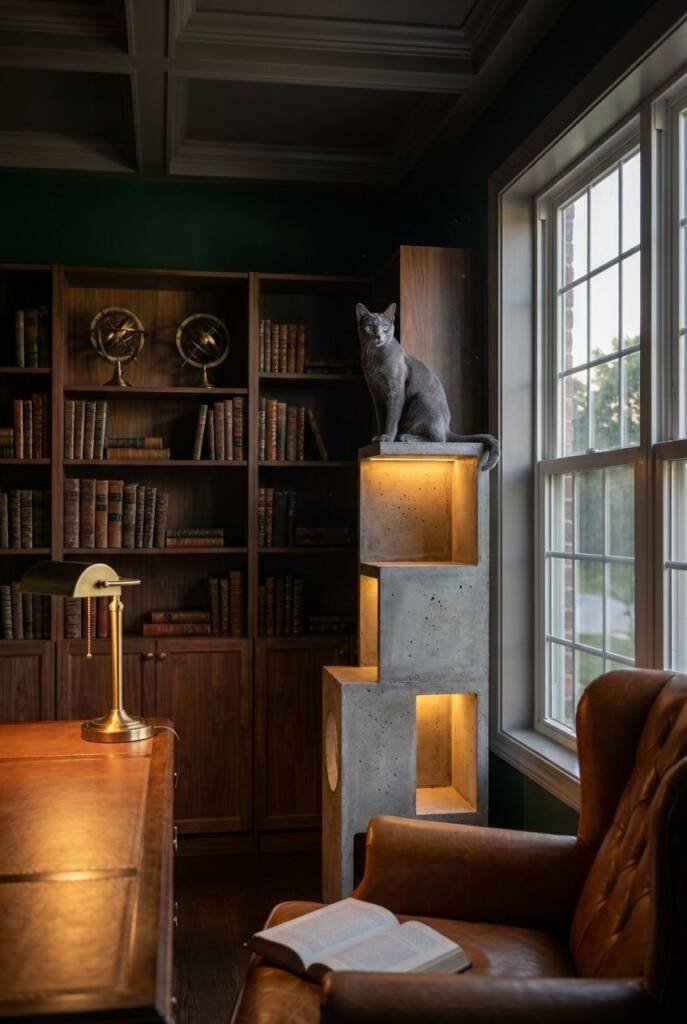
10. Go Full Tadao Ando: A Concrete Cat Tower With Integrated LED Lighting
Your cat tower should be the last light you turn off at night — because it’s the best one in the room.
Tadao Ando made bare concrete feel sacred with nothing but light and shadow — and a handful of brands have applied that exact philosophy to cat furniture. RINN, a Japanese stone and concrete company, produces cast-concrete cat towers with recessed warm LED strips embedded into the channels and platforms. At night, the piece stops being cat furniture and becomes a glowing architectural light sculpture that anchors your entire room. We’re talking 2700K warm white LEDs tucked into clean reveals, casting soft upward light that traces the tower’s geometry.
Cats actually benefit here — the warm glow gives them visibility for nighttime climbing without the harshness of overhead lights, and concrete’s thermal mass absorbs daytime heat, creating warm sleeping surfaces after sundown.
This is the only cat tower idea on this list that genuinely replaces a piece of lighting in your room. Kill a floor lamp, add a cat tower — your electrician and your cat both win.
How to Use LED-Lit Cat Furniture as Ambient Evening Lighting
- Choose your light temperature: Stick with 2700K-3000K warm white LEDs — anything cooler reads clinical, not architectural. Philips Hue Lightstrip Plus ($80 for 6.6 ft) lets you dial in the exact Kelvin.
- Plan the channel placement: Route LED strips along the underside of platforms and inside vertical grooves so the light source stays hidden — you want to see the glow, never the bulb.
- Wire to a smart plug or dimmer: Connect everything to a Lutron Caseta dimmer ($60) or smart plug so the tower automatically shifts from daytime sculpture to evening ambient light at sunset.
- Kill competing light sources nearby: Place the tower at least 5 feet from other lamps so it reads as its own light zone — this is how it becomes a statement instead of background noise.
- Budget move: Skip imported concrete and wrap a $40 MDF tower in concrete-look contact film, then add a $15 USB LED strip underneath each platform for the same nighttime glow under $60 total.
Concrete-Look Cat Towers That Welcome Pets
From museum-worthy monolith towers to budget-friendly concrete wraps you can finish in an afternoon, these concrete-look cat towers prove that brutalist design and cat-friendly living aren’t just compatible — they’re a perfect match. The raw textures, neutral palettes, and geometric forms of this style naturally complement the platforms, perches, and hideaways your cat actually needs. Whether you went the DIY route or dropped a link in your cart for that architect-fooling Amazon find, you’re building a home that respects both your aesthetic standards and your cat’s instincts.
The best part about committing to a concrete-look cat tower is how effortlessly it anchors a room. Pair it with raw steel accents, a sheepskin topper, or integrated LED lighting, and you’ve got a statement piece that happens to be covered in cat hair (we won’t tell). These are the kinds of design choices that make guests do a double-take — first at the tower, then at your cat lounging on top of it like she commissioned the whole thing.
Here at Sweet Purrfections, we create content at the intersection of cool home decor and real life with pets. Because we believe your home should look like it belongs in a design magazine AND work for the furry family members who actually run it.
Leave a Reply