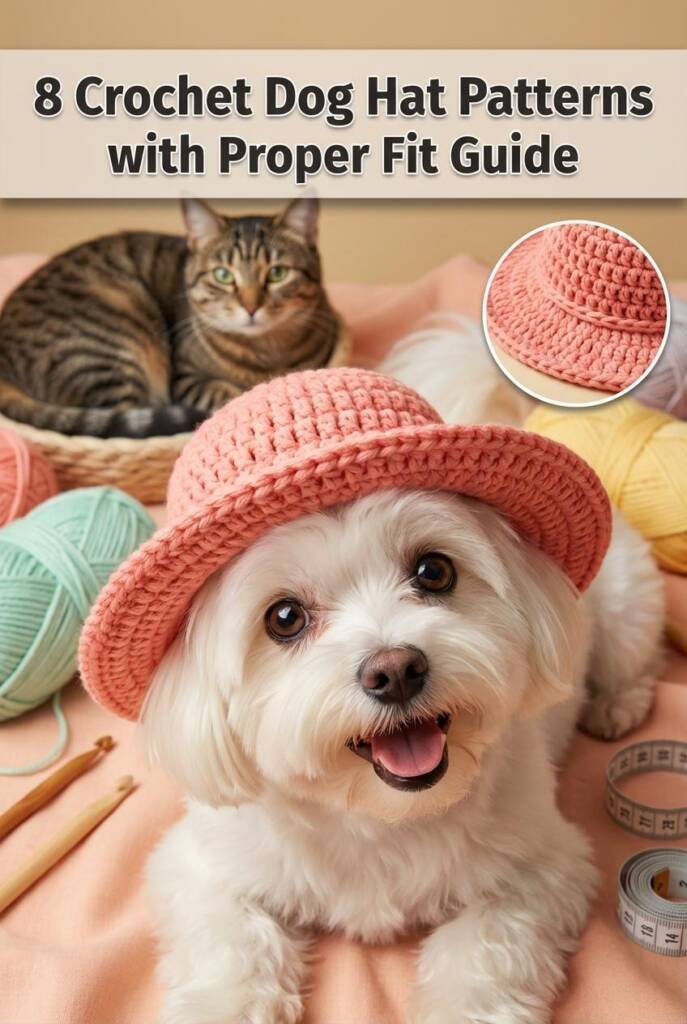
You’ve seen those adorable photos of dogs in tiny hats all over social media, and you’ve probably thought “I could never make that.” Here’s the truth: most of those hats use the exact same basic techniques you already know if you can crochet a simple circle or rectangle. The difference between a sad, floppy dog hat and one that actually stays on and looks amazing comes down to three things: proper measurements, strategic ear holes, and a chin strap that doesn’t strangle your pup.
These patterns are designed specifically for beginners who want professional-looking results without learning complex stitches. Each hat addresses a real problem dog owners face—whether it’s sun protection for dogs with thin fur, warmth for senior dogs who get cold easily, or just creating something ridiculously cute for the holidays. And because we’re realistic about dog behavior, every single pattern includes adjustable features so you’re not starting over if the fit isn’t perfect.
Materials You’ll Need for All Patterns
Before we dive into individual hats, gather these basics. Having everything ready means you can actually finish a project instead of abandoning it halfway through because you’re missing one thing.
- Yarn: Medium weight (worsted/size 4) acrylic or cotton blend works best. Acrylic is machine washable (crucial for dog accessories), while cotton breathes better for summer hats. You’ll need 50-150 yards depending on dog size.
- Hook Size: 5.0mm (H-8) or 5.5mm (I-9) – these sizes work with worsted weight and create fabric that’s sturdy but not stiff.
- Measuring Tape: Non-negotiable. Guessing sizes is why homemade dog hats end up unworn in drawers.
- Stitch Markers: Keep track of rounds without losing your mind.
- Yarn Needle: For weaving in ends and attaching straps.
- Ribbon or Elastic: For chin straps that actually keep hats on.
How to Measure Your Dog (This Makes or Breaks Everything)
Most people skip this step and wonder why their beautiful hat slides off or sits too tight. Take five minutes to measure now, save yourself from remaking the entire thing later.
- Head Circumference: Measure around the widest part of your dog’s head, just behind the ears and above the eyebrows. Add 1 inch for comfort. This is your most important measurement.
- Ear-to-Ear Distance: Measure across the top of the head from the base of one ear to the other. This determines where ear holes need to go.
- Front-to-Back Length: From between the ears to just above the eyebrows. This tells you how deep to make the hat.
- Ear Height and Width: If you’re making a hat with ear holes (most should have them), measure each ear’s height and width at the base. Dog ears vary wildly even within breeds.
Write these measurements down. Tape them to your coffee mug. Tattoo them on your arm. Whatever it takes to not lose them halfway through crocheting.
1. The Classic Beanie (Perfect for Cold Weather)
This is the gateway hat—simple enough to build confidence, practical enough to actually use. Dogs with thin coats, senior dogs who get chilly, or any pup dealing with cold winters needs this. The magic is in the ribbed brim that grips gently without being tight, and ear holes positioned so the hat doesn’t muffle their hearing. You’ll use this pattern as a foundation for fancier hats later.
The single crochet ribbing creates stretch that accommodates different head shapes, and working in continuous rounds means no weird seam on top of their head. Dogs tolerate this style because it doesn’t obstruct their vision or movement.
- Yarn Needed: 75-100 yards worsted weight in any color
- Time Estimate: 2-3 hours for a small dog, 3-4 for large
Step-by-Step Pattern
- Foundation Chain: Chain enough stitches to equal your dog’s head circumference measurement minus 2 inches (the ribbing stretches). Join with slip stitch to form a ring.
- Ribbed Brim (Rounds 1-4): Work in back loops only for ribbing effect. Round 1: Single crochet in back loop of each stitch around. Don’t join, work in continuous spiral. Place marker at beginning. Rounds 2-4: Continue single crochet in back loops. The fabric should stretch to fit snugly around your dog’s head behind the ears.
- Main Body (Rounds 5-10): Switch to regular single crochet (both loops). Work even rounds until the hat measures about 2 inches less than your front-to-back measurement. Try it on your dog at this point—it should cover from between the ears to just above the eyebrows.
- Creating Ear Holes: This is where it gets real. On the next round, when you reach the spot where your dog’s ear should poke through, chain 4-6 stitches (depending on ear size), skip the same number of stitches in the previous round, continue single crochet. Repeat for the second ear on the opposite side. Next round: Single crochet into the chain spaces to reinforce the ear holes.
- Crown Shaping (Final Rounds): Now we close the top. Every round, decrease by working sc2tog (single crochet two together) evenly spaced around—about 6-8 decreases per round. When opening is about 1-2 inches, fasten off and weave tail through remaining stitches to close completely.
- Chin Strap: Cut two 12-inch pieces of ribbon or soft elastic. Attach one piece to each side of the brim near where it sits at jaw level. Try on dog and tie under chin—should be snug enough to stay but loose enough to fit two fingers underneath.
The Secret: Before declaring it done, turn the hat inside out and weave in ALL loose ends, then turn it right-side out. Loose yarn ends will irritate your dog and they’ll paw the hat off immediately.
2. The Sun Hat with Brim (For Summer Protection)
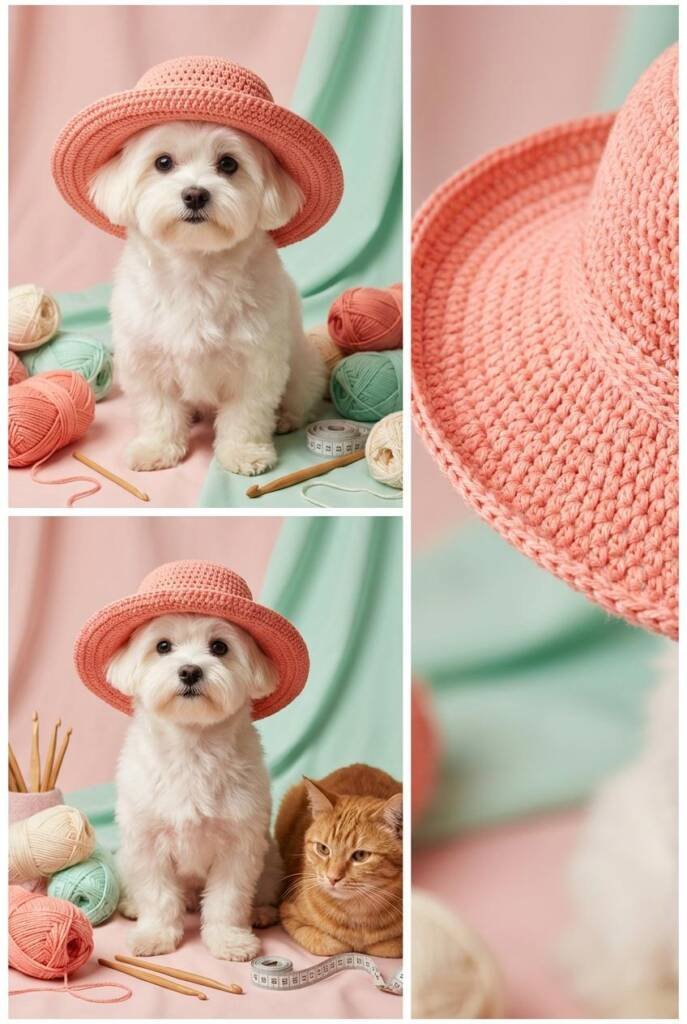
Light-colored dogs, dogs with thin fur on their heads, and any pup who spends time outside in bright sun genuinely needs this. Sunburn on dog noses and ears is real and painful. This hat provides actual shade while staying secure enough for active dogs. The wide brim works because it’s crocheted in a way that maintains shape without being stiff.
Cotton yarn breathes better than acrylic for summer wear, and the brim construction uses increases that create natural curve. The chin strap is essential here—without it, the brim catches wind and the hat becomes a frisbee.
- Yarn Needed: 100-125 yards cotton or cotton-blend worsted weight in light colors (reflects heat better than dark)
- Time Estimate: 3-4 hours
Step-by-Step Pattern
- Crown Start (Magic Ring Method): Make a magic ring. Round 1: 6 single crochet into ring, pull tight, slip stitch to join (mark this as your join point for all rounds). Round 2: 2 sc in each stitch around (12 sts). Round 3: Sc in next st, 2 sc in next st repeat around (18 sts). Round 4: Sc in next 2 sts, 2 sc in next st repeat around (24 sts). Continue this increase pattern (adding one more single crochet between increases each round) until the circle flat-measures slightly smaller than your dog’s head circumference divided by 3.14. Confused? Just make it about 3-4 inches across for small dogs, 5-6 inches for large dogs.
- Sides (Straight Rounds): Once your circle is wide enough, work several rounds of even single crochet with no increases. This creates the part that sits on top of the head. Work 4-6 rounds depending on your dog’s front-to-back measurement. Try it on—should cover from between ears to above eyes.
- Ear Hole Placement: Identify where ears will poke through. On next round, chain 6-8, skip same number of stitches, continue around. Do second ear hole on opposite side. Following round: sc into chain spaces to reinforce holes.
- Brim Construction: This is where the sun protection happens. Round 1 of brim: 2 sc in every other stitch around (increases create flare). Round 2: Sc in each stitch. Round 3: 2 sc in every third stitch. Round 4: Sc in each stitch. Round 5: 2 sc in every fourth stitch. Final round: Sc in each stitch. Your brim should now extend 2-3 inches beyond the crown.
- Brim Shaping: To make it hold shape, work a round of slip stitches around the very edge of the brim. This tightens and stabilizes the edge so it doesn’t flop.
- Chin Strap Attachment: Cut 14 inches of ribbon or make a crocheted chain. Attach to both sides where the brim meets the crown at jaw level. This keeps the hat from flying off when your dog shakes their head.
Pro Tip: Soak the finished hat in fabric stiffener (or a mixture of 1 part white glue to 2 parts water), shape the brim how you want it, and let it dry completely. This makes the brim hold its curve instead of drooping sadly.
3. The Ear Warmer Band (For Dogs Who Hate Full Hats)
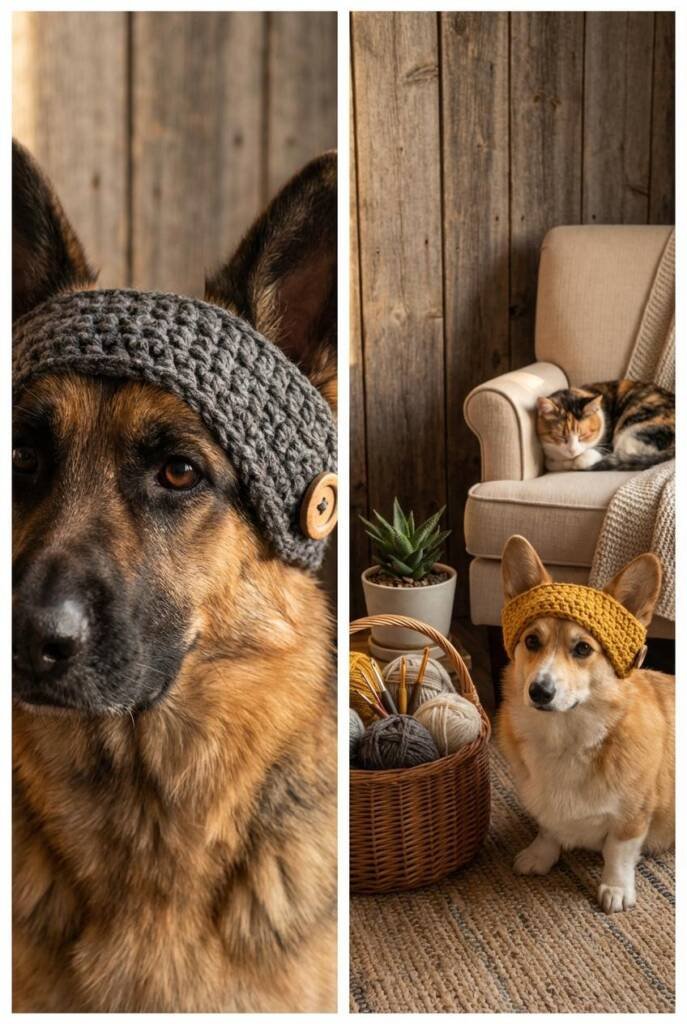
Some dogs will never tolerate something covering the top of their head, but they still get cold ears. This is genius for those dogs—it’s essentially a headband that covers ears and the base of the skull where cold hits hardest. Great for dogs with stand-up ears like German Shepherds or Corgis, and perfect for older dogs with arthritis who feel cold but hate restrictions. Takes 45 minutes to make and most dogs don’t even realize they’re wearing it.
Minimal coverage means minimal fuss. It stays put because it wraps around the widest part of the head, and the fleece lining (optional but recommended) feels cozy instead of scratchy.
- Yarn Needed: 40-60 yards worsted weight, soft fleece fabric strip (optional)
- Time Estimate: 45 minutes to 1 hour
Step-by-Step Pattern
- Foundation: Chain enough to wrap around your dog’s head from just behind one ear, under the chin, to behind the other ear. This should equal about 2/3 of your full head circumference measurement. Try it around your dog’s head before continuing—should feel snug but not tight.
- Building Width: Row 1: Sc in 2nd chain from hook and each chain across. Chain 1, turn. Rows 2-8: Sc across. Chain 1, turn. The band should now be about 3-4 inches wide, enough to cover the base of the ears when positioned correctly.
- Ear Pockets (Optional but Brilliant): On each end of the band, fold up about 1 inch of fabric and single crochet through both layers to create a little pocket. Dog ears tuck into these pockets and stay warmer. If your dog has floppy ears, make the pockets deeper (1.5-2 inches).
- Closure Options: Choose one easy finish. A button closure with a sewn button on one end and a crocheted loop on the other, Velcro pieces sewn to each end for an adjustable fit, or two 6-inch crocheted chains attached to each end and tied under the chin.
- Comfort Upgrade: Cut a piece of soft fleece fabric the same size as your crocheted band. Use fabric glue or hand-stitch it to the inside (the part that touches your dog). This prevents any scratchiness and adds extra warmth.
The Reality Check: This won’t stay on a dog who’s actively playing or running around. It’s for hanging out on the couch, short walks, or car rides. Set expectations accordingly.
4. The Bucket Hat (Trendy and Functional)
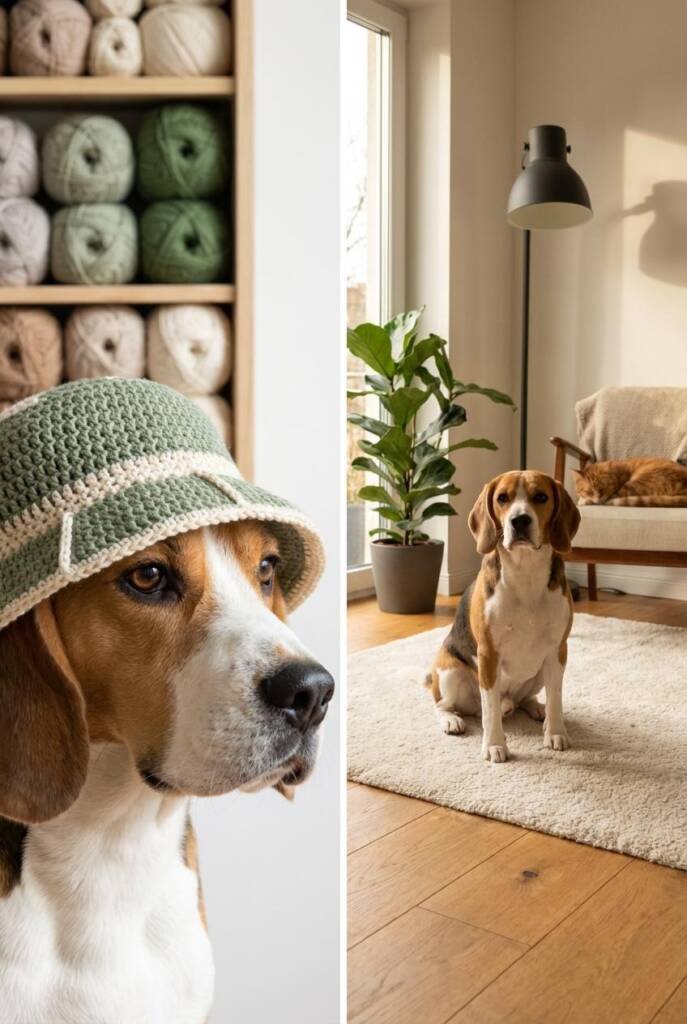
This is the hat that gets you stopped on walks because it’s unexpectedly stylish. The bucket shape provides sun protection while looking like your dog is about to drop the hottest album of 2025. Works especially well for dogs with longer snouts because the downward-angled brim doesn’t hit their nose. Bonus: the floppy brim creates shade without being stiff, so dogs adjust to wearing it faster.
The bucket construction naturally accommodates different head shapes because it’s wider at the brim than the crown. That slight taper means it sits securely without a death-grip chin strap. It’s also reversible if you use two colors—make the outside fun, make the inside a neutral that hides dirt.
- Yarn Needed: 100-150 yards worsted weight (can use two contrasting colors for reversible version)
- Time Estimate: 4-5 hours
Step-by-Step Pattern
- Crown (Start at Top): Magic ring. Round 1: 8 sc into ring, pull tight, join with slip stitch. Round 2: 2 sc in each st (16 sts). Round 3: Sc, 2 sc in next repeat (24 sts). Round 4: Sc in 2, 2 sc in next repeat (32 sts). Continue increase pattern until circle measures about 3 inches across for small dogs, 4-5 inches for large dogs.
- Straight Sides: Work even rounds (no increases) for 5-8 rounds depending on your dog’s head depth. The hat should cover from the top of the head to just above the eyes when tried on.
- Ear Hole Integration: Here’s the trick with bucket hats—the ear holes need to be slightly forward of where you’d put them on a beanie because the brim angles down. Mark where ears sit, then move your marks 1/2 inch toward the front. Chain 6-8, skip same number of stitches, continue around. Second ear hole on opposite side. Next round: sc into chain spaces.
- Brim Flare: This is what makes it a bucket hat instead of just a regular hat. Round 1: In front loops only, sc in 2, 2 sc in next repeat around. This creates the fold line and starts the flare. Rounds 2-4: Sc in each st. Round 5: Sc in 3, 2 sc in next repeat. Rounds 6-7: Sc in each st. Your brim should now angle downward naturally.
- Reversible Option: If making reversible, crochet two identical hats in different colors. Place them wrong-sides together and single crochet around the brim edge through both layers at once. This joins them and creates a finished edge.
- Chin Strap: Thread ribbon through the sides at the brim base using a yarn needle. Position where the hat naturally sits at jaw level. Tie under chin.
Style Tip: Add a small crocheted flower, patch, or embroidered initial to the side for personality. Dogs can’t accessorize themselves, so you have to do it for them.
5. The Pom-Pom Winter Hat (Maximum Cuteness Factor)

This is the hat that makes strangers stop you on walks. The oversized pom-pom is ridiculously photogenic, but it also serves a purpose—it helps the hat stay centered on the head because it creates a visual reference point for you when putting it on. Dogs with thick fur coats might not need the warmth, but dogs with thin coats or hairless breeds will genuinely appreciate this. The ribbed edges keep cold air out better than smooth edges.
The chunky pom-pom actually helps with fit—it creates a slight weight at the top that keeps the hat from sliding backward. And let’s be honest, this hat exists primarily for photos, which is a completely valid reason to make something.
- Yarn Needed: 80-100 yards worsted weight for the hat, extra 20 yards for a massive pom-pom
- Time Estimate: 2.5-3 hours plus pom-pom making (15 minutes)
Step-by-Step Pattern
- Ribbed Brim Foundation: Chain 40 (small), 50 (medium), 60 (large). Row 1: Sc in 2nd chain from hook and across. Chain 1, turn. Rows 2-5: Working in back loops only, sc across. Chain 1, turn. This creates the ribbed band. After row 5, join the two short ends together with slip stitches to form a ring.
- Transition to Crown: Now you’re working in rounds around the top opening of the ribbed band. Round 1: Sc evenly around the opening (should be 40/50/60 stitches depending on size). Place marker. Rounds 2-8: Sc in each st around. Try it on your dog around round 6—it should cover the head from between the ears to the eyebrows.
- Ear Holes: On round 9, create ear holes. When you reach the ear position, ch 6, skip 6 sts, continue sc. Repeat for second ear on opposite side. Round 10: Sc into chain spaces and continue around normally.
- Crown Decreases: Round 11: Sc in 4, sc2tog repeat around. Round 12: Sc in each st. Round 13: Sc in 3, sc2tog repeat around. Round 14: Sc in each st. Round 15: Sc in 2, sc2tog repeat around. Continue this pattern (decrease round, then even round) until opening is about 1 inch. Fasten off, weave tail through remaining stitches and pull tight to close.
- The Epic Pom-Pom: Use a pom-pom maker if you have one (4-inch size is perfect), or wrap yarn around a 4-inch piece of cardboard about 100 times. Tie tightly in the center, cut the loops, trim into a perfect sphere. This should be LARGE—bigger than you think looks reasonable. Trust the process. Attach it securely to the top center of the hat using the tie strings, weaving them through the closed top and knotting inside.
- Chin Strap: Cut two 14-inch pieces of matching ribbon. Attach to the inside of the ribbed brim at jaw level on each side. Tie under chin.
Photo Tip: The pom-pom photographs best from slightly above and to the side. Straight-on shots make it look flat. You’re welcome.
6. The Visor Cap (For Athletic Dogs)
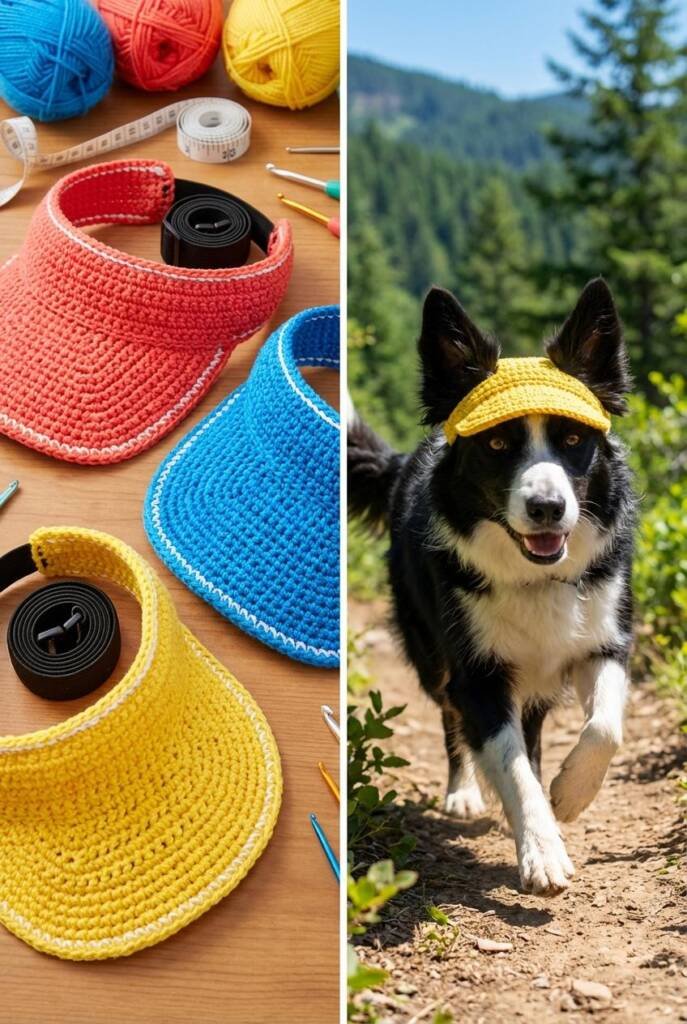
This is for dogs who actually do things—hiking, running, agility training, beach trips. A full hat gets too hot during activity, but a visor provides eye protection from sun and branches without overheating. The elastic back band stays put during movement way better than ribbon ties. This is also the easiest pattern in this entire list, so if you’re nervous about trying dog hats, start here.
Dogs who are active don’t tolerate restrictive gear. This gives them sun protection and looks sporty without interfering with their movement, hearing, or temperature regulation. The visor also keeps sun out of their eyes during car rides if they’re one of those dogs who sticks their head out the window.
- Yarn Needed: 30-40 yards worsted weight, 6 inches of elastic cord
- Time Estimate: 1 hour
Step-by-Step Pattern
- Visor Base: Chain 20 (small dog), 25 (medium), 30 (large). Row 1: Sc in 2nd chain from hook and each across. Ch 1, turn. Rows 2-4: Sc across. Ch 1, turn. This creates a rectangle that will become the visor brim. After row 4, do NOT turn.
- Brim Shaping: Continue sc around the entire perimeter of the rectangle—across the top, down the side, across the bottom, up the other side. When you reach corners, work 3 sc in the corner stitch to create a curved edge instead of a sharp angle. Slip stitch to join. This round of edging makes the brim more stable.
- Head Band: Chain 35 (small), 45 (medium), 55 (large). This will wrap around the back of the dog’s head. Attach each end of the chain to the top corners of your visor by slip stitching them securely. Try it on your dog—the band should wrap comfortably around the widest part of the head behind the ears. If it’s too loose or tight, unravel and adjust chain length.
- Elastic Upgrade: For dogs who are serious about activity, replace the crocheted band with elastic cord. Thread 6 inches of 1/4-inch elastic through the back band using a yarn needle, or attach elastic directly to the visor corners. This creates stretch that accommodates movement and head shaking.
- Reinforcement: Single crochet one more round around the entire visor edge, including where the band attaches. This prevents the attachment points from ripping out during wear.
- Size Adjustment Hack: If you’re not sure about head size, make the band longer than needed and add a small button and loop closure at the back. This makes it adjustable and means multiple dogs can share it.
Real Talk: This hat is not staying on a dog who’s swimming or doing hard zoomies. It’s for moderate activity—walks, lounging outside, car rides, casual hikes. Manage expectations.
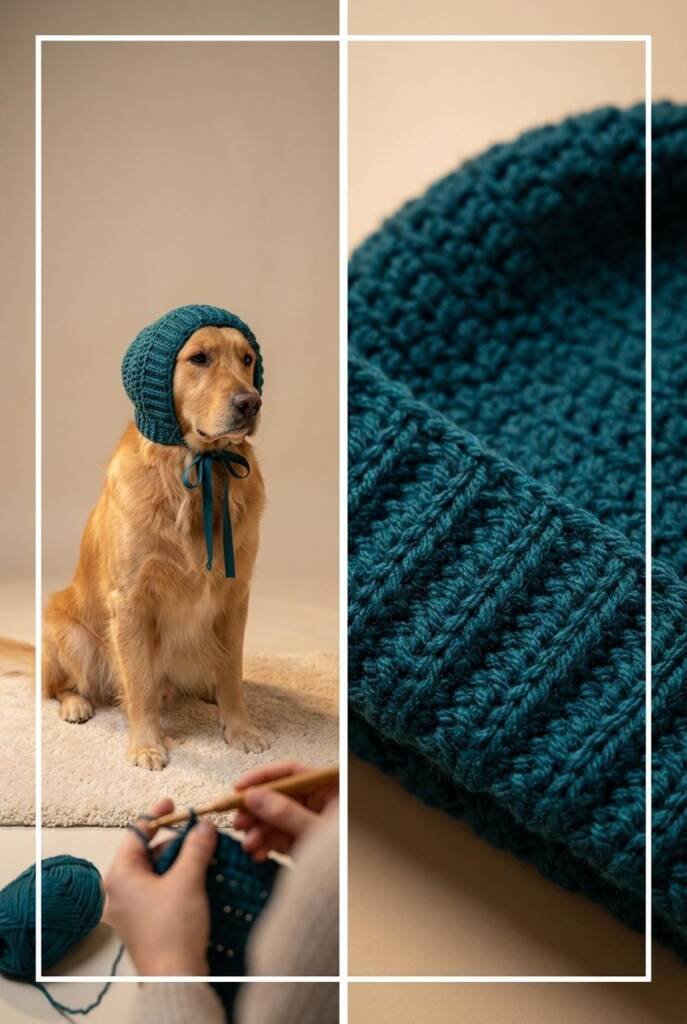
7. The Aviator Hat with Ear Flaps (Cold Weather Champion)
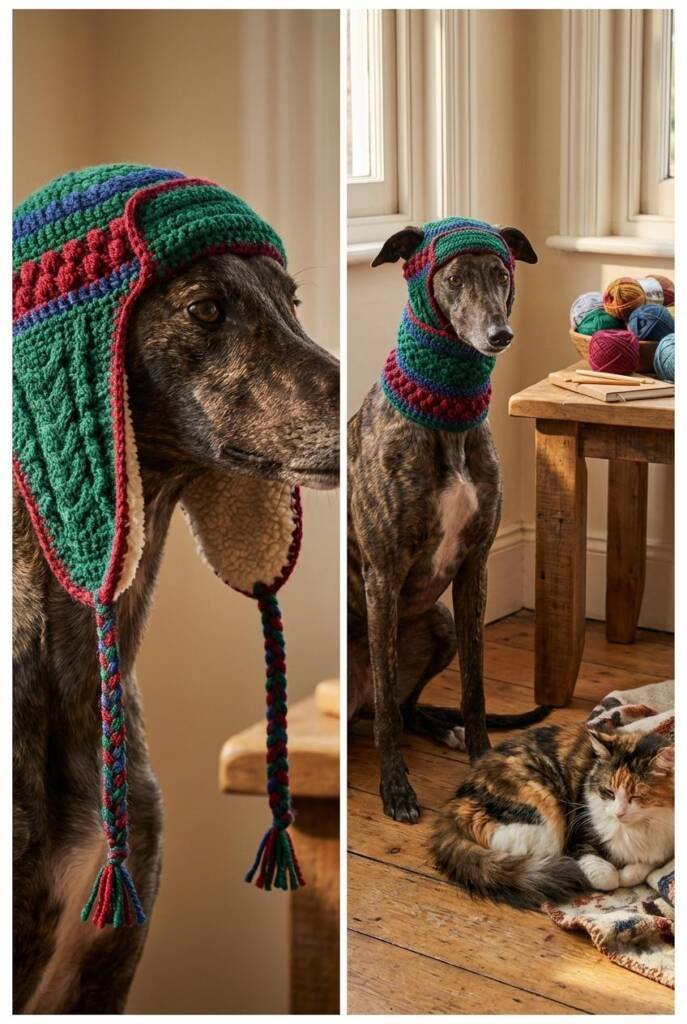
This is the warmest hat on the list because it covers ears completely instead of having holes for them to poke through. Designed for dogs with thin ear leather (like Greyhounds or Whippets) who get painfully cold ears, or any dog dealing with actual winter conditions. The ear flaps tie under the chin which looks absurd and adorable in equal measure. Fair warning: this pattern takes the most time and uses the most yarn, but it’s also the most functional for truly cold climates.
Covering ears completely prevents frostbite and keeps dogs significantly warmer than ear-hole hats. The chin ties keep everything locked in place, and the extended back panel protects the neck area where dogs lose a lot of heat.
- Yarn Needed: 125-175 yards worsted weight, soft fleece lining recommended for ear flaps
- Time Estimate: 5-6 hours
Step-by-Step Pattern
- Main Cap: Start with magic ring. Round 1: 6 sc in ring, pull tight, join. Round 2: 2 sc in each (12 sts). Round 3: Sc, 2 sc in next repeat (18 sts). Round 4: Sc in 2, 2 sc in next repeat (24 sts). Continue increase pattern until circle measures 4-6 inches across depending on dog size. This needs to be bigger than a regular hat because it’s covering the ears instead of going around them.
- Sides: Work even rounds (no increases) for 6-10 rounds. The cap should reach from the top of the head down to where the ears meet the head. Try it on frequently—too shallow and the ear flaps won’t position correctly.
- Ear Flap Placement: Identify where each ear sits against the head. You’ll create flaps that cover these spots. On the next round, when you reach the first ear position, turn your work and start working in rows instead of rounds.
- First Ear Flap: Row 1: Sc across 10-12 stitches (this width should cover the ear). Ch 1, turn. Row 2: Sc2tog, sc across until 2 sts remain, sc2tog. Ch 1, turn. Row 3: Sc across. Ch 1, turn. Row 4: Sc2tog, sc across until 2 sts remain, sc2tog. Ch 1, turn. Continue this pattern (decrease row, even row) until the flap is long enough to hang down past the jaw line—about 4-5 inches for small dogs, 6-7 inches for large dogs.
- Tie Attachment: When the flap is long enough, chain 15-20 stitches for a tie string. Fasten off. Cut yarn leaving a long tail, weave it through the flap for security.
- Second Ear Flap: Rejoin yarn at the opposite ear position on your main cap. Repeat the exact same process to create the matching ear flap with tie.
- Back Panel Extension: The area between the two ear flaps (the back of the head/neck area) needs to be extended for warmth. Rejoin yarn at the back center of the hat. Work in rows: sc across the back section, incorporating the tops of both ear flaps. Work 4-6 rows even, creating a panel that extends down the back of the neck. This protects the vulnerable neck area.
- Edging: Single crochet around the entire hat perimeter—around the face opening, down each ear flap, across the back panel. This reinforces everything and creates a finished look.
- Fleece Lining for Flaps: Cut two pieces of soft fleece fabric the same shape as your ear flaps. Hand-stitch or fabric-glue them to the inside of each flap. This feels better against dog ears and adds insulation.
- Fitting: Place hat on dog’s head with ear flaps hanging down on each side. Tie the strings under the chin—snug enough to stay but loose enough that your dog can still open their mouth fully. If they can’t pant comfortably, it’s too tight.
Critical Safety Note: Never leave this hat on an unsupervised dog. The ties and flaps can catch on things. This is for walks and supervised outdoor time only.
8. The Party Hat Cone (For Celebrations)
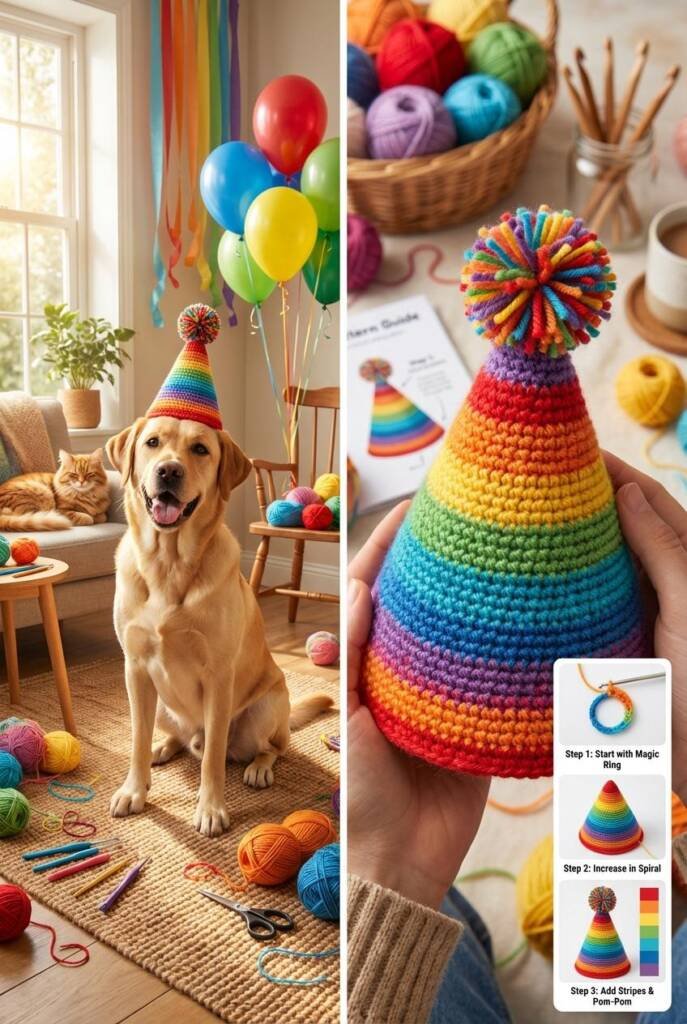
Every dog needs a birthday hat, and this one actually stays on long enough to get the photo before your dog destroys it. The cone shape is iconic “party hat,” but the elastic chin strap and internal structure keep it upright instead of floppy. Make it in bright colors, add a pom-pom to the top, and you’ve got an Instagram-worthy celebration hat that took less than an hour to create.
The cone structure is self-supporting due to the way increases create natural stiffening. Unlike felt party hats that slide around, this one is custom-fitted to your dog’s head size. It’s not meant for all-day wear—it’s for the 10 minutes of birthday photos and then your dog can go back to being a regular dog.
- Yarn Needed: 50-75 yards worsted weight in bright colors, contrasting color for decoration
- Time Estimate: 1-1.5 hours
Step-by-Step Pattern
- Cone Tip Start: Chain 4, join with slip stitch to form a ring. Round 1: 6 sc into ring, join. Round 2: 2 sc in each st around, join (12 sts). Round 3: Sc, 2 sc in next repeat, join (18 sts). Round 4: Sc in 2, 2 sc in next repeat, join (24 sts). Round 5: Sc in 3, 2 sc in next repeat, join (30 sts).
- Continuing the Cone: Keep working in joined rounds, increasing every round by working sc in next X stitches, 2 sc in next where X increases by 1 each round. The cone will naturally form a point at the top and widen as you go. Continue until the opening at the bottom measures your dog’s head circumference. For a small dog, this might be 15-20 rounds total. For a large dog, 25-30 rounds.
- Base Stabilization: When the cone opening fits around your dog’s head, work 2-3 rounds of even sc with no increases. This creates a band that sits on the head and prevents the cone from sliding.
- Pom-Pom Top: Make a small pom-pom (2-inch size) in a contrasting color. Attach it securely to the very tip of the cone. This is non-negotiable for party hat authenticity.
- Decorative Stripes: If you want the classic party hat look, before you start, plan color changes. Work 2 rounds of main color, 2 rounds of contrast color, repeat. The stripes will spiral naturally up the cone.
- Chin Strap: Cut 12 inches of thin elastic. Thread a yarn needle with the elastic and weave it through the base band on opposite sides of the cone (where the hat sits at jaw level on each side). Tie the elastic under your dog’s chin. Test the length—should be snug but not choking.
- Structural Support (Optional): If your cone is floppy, cut a circle of lightweight cardboard or fun foam the same size as the base opening. Slide it inside the cone at the base. Single crochet through the base band and the edge of the cardboard circle to secure it in place. This makes the cone stand straight up instead of slouching.
- Quick Decoration Ideas: Hot glue small pom-poms around the base band, add glitter (dog-safe only), crochet small flowers or stars and attach to the sides, write “Birthday Dog” with puffy paint.
Reality Check: Most dogs tolerate this for about 5-10 minutes max. Get your photos fast. Have treats ready to reward them for wearing it. Remove it before they shake their head so hard it goes flying across the room.
Making Your Crochet Dog Hats Last
You didn’t spend hours making these just to have them fall apart after one wear. Here’s how to keep them functional:
- Washing: Hand wash in cold water with mild detergent. Acrylic yarn can technically go in the machine, but the agitation can distort the shape. Lay flat to dry—never hang them or they’ll stretch weird. Reshape while damp if needed.
- Storage: Don’t just throw them in a drawer where they’ll get crushed. Stuff each hat lightly with tissue paper to maintain shape, or store them on a wig stand (yes, really).
- Repairs: When chin straps start looking ratty or ear holes stretch out, fix them immediately. A small problem becomes a big problem once your dog realizes they can escape the hat easily.
- Rotation: If your dog actually tolerates hats, make 2-3 different styles and rotate them. Dogs get bored of the same thing just like humans do.
Finding the Perfect Pattern for Your Dog
Not every dog needs every hat. Here’s how to choose:
- For Cold Weather Dogs: Classic Beanie (#1), Pom-Pom Hat (#5), or Aviator Hat (#7)
- For Sun Protection: Sun Hat with Brim (#2) or Visor Cap (#6)
- For Hat-Resistant Dogs: Ear Warmer Band (#3) or Visor Cap (#6)
- For Style Points: Bucket Hat (#4) or Pom-Pom Hat (#5)
- For Special Occasions: Party Hat (#8)
Start with the pattern that matches your dog’s actual needs, not just what looks cutest. A dog who tolerates a hat they find useful is way more likely to accept wearing hats in general.
Ready to Try These Crochet Hat Patterns for Dogs?
At Sweet Purrfections, we’re all about practical creativity that actually enhances life with your pets. Whether you’re a pet lover looking for your next crochet project or a home lover who wants their space to reflect the furry family members who make it complete, we’re here with ideas that work in real life.
Ready to start crocheting? Pick one pattern from this list, measure your dog properly, and give yourself an afternoon to create something they’ll actually wear. Your dog might not thank you verbally, but the photos will be worth it.