Why Homemade Cat Beds Save Money and Look Better Than Store-Bought
Cat beds at pet stores often cost anywhere from $30 to over $150. And after spending that money, there’s a good chance your cat ignores it completely and naps in a random box instead.
Making your own DIY cat bed fixes that problem. You control the size, the fabric, and the style. You can match your home decor, use materials your cat already loves, and spend a fraction of the cost. Most of these homemade cat bed projects use items you already have or can find cheaply at thrift stores.
These nine cheap cat bed ideas look beautiful enough for Pinterest, feel comfortable enough for picky cats, and won’t drain your wallet. Each cat bed tutorial below includes everything you need and simple steps to follow.
Let’s build something your cat will actually use.
1. Upcycled Vintage Suitcase Cat Bed
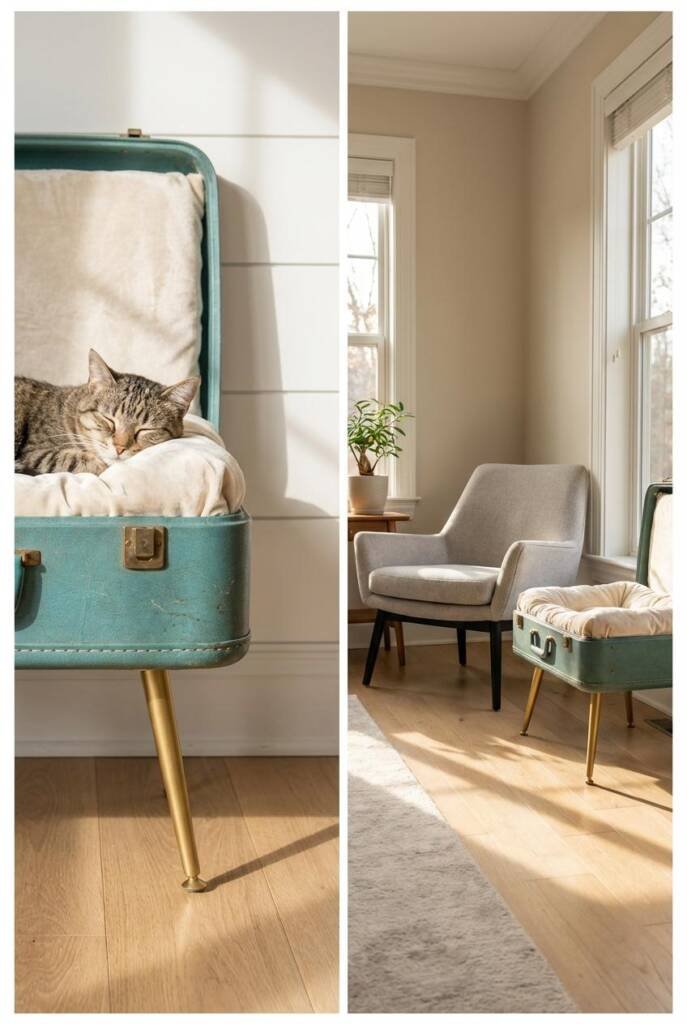
A vintage suitcase cat bed turns forgotten luggage into a stunning piece of repurposed cat furniture. This project looks expensive but costs very little, especially if you thrift the suitcase. The hard shell provides structure while the raised edges make cats feel secure.
What You Need
- Hard-shell vintage suitcase
- 4 furniture legs or wooden bun feet
- Screws and screwdriver
- Cushion or pillow to fit inside
- Sandpaper
- Paint (optional)
Step by Step
- Find a hard-shell suitcase at a thrift store, flea market, or in your attic. Look for one with interesting color or texture.
- Remove the lid by unscrewing or carefully cutting the hinges. You only need the bottom half.
- Clean the interior thoroughly. Replace damaged lining with fabric if needed.
- Flip the suitcase over and mark four spots near the corners for your furniture legs.
- Drill pilot holes and screw the legs securely into place.
- Flip it upright and check that it sits level. Adjust if it wobbles.
- Sand any rough spots on the exterior. Paint it if you want a fresh look and let it dry completely.
- Place a soft cushion inside that fits snugly against the edges.
Style this upcycled cat bed in your living room or bedroom. It doubles as decor and gives your cat a cozy enclosed space to curl up in.
2. Old Sweater Cozy Cat Bed
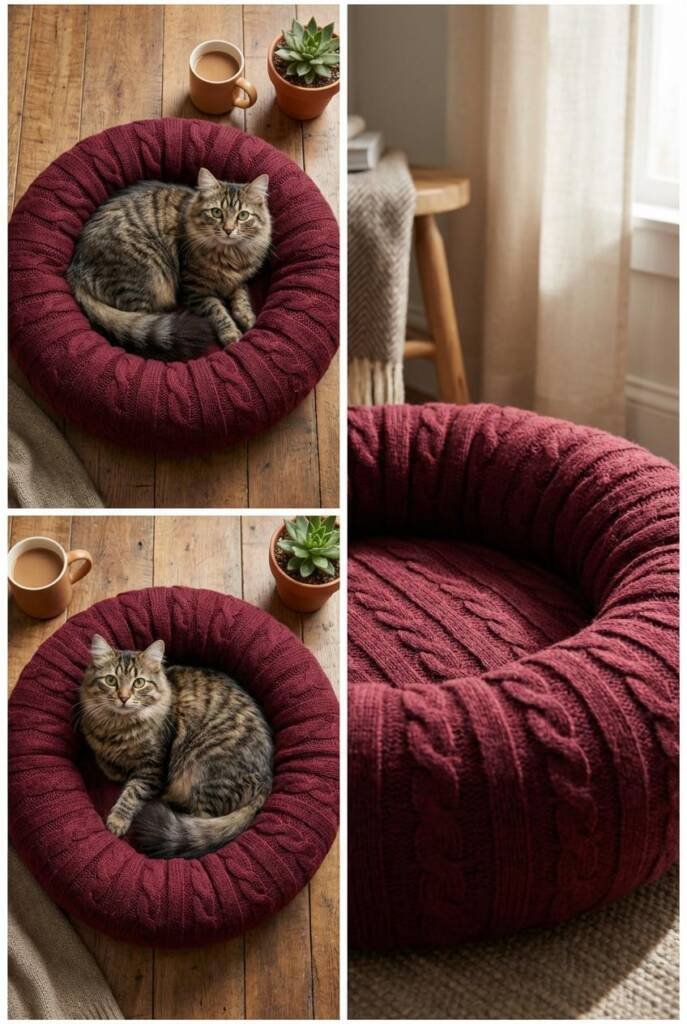
This recycled cat bed transforms a sweater you no longer wear into the coziest spot in your home. Cats love the soft knit texture and the familiar scent of their owner. This cozy cat bed DIY works with minimal sewing and costs nothing if you use what you have.
What You Need
- Old chunky sweater (wool or thick knit works best)
- Pillow stuffing or an old pillow
- Needle and thread
- Scissors
Step by Step
- Lay the sweater flat with the front facing up.
- Sew a straight line from one armpit across to the other. This separates the top portion from the body.
- Stuff the arms and chest area above your stitch line with filling. This becomes the bolster rim of the bed.
- Sew the sleeve cuffs together to form a continuous circular border.
- Stuff the body section with a pillow or loose filling. This is the main sleeping cushion.
- Fold the bottom hem inward and stitch it closed neatly.
- Attach the stuffed arms around the body opening to create a raised edge all around.
The finished sweater cat bed looks adorable in photos and feels like a warm hug for your cat. Toss it in the wash when it needs cleaning.
3. Rustic Wooden Crate Cat Bed
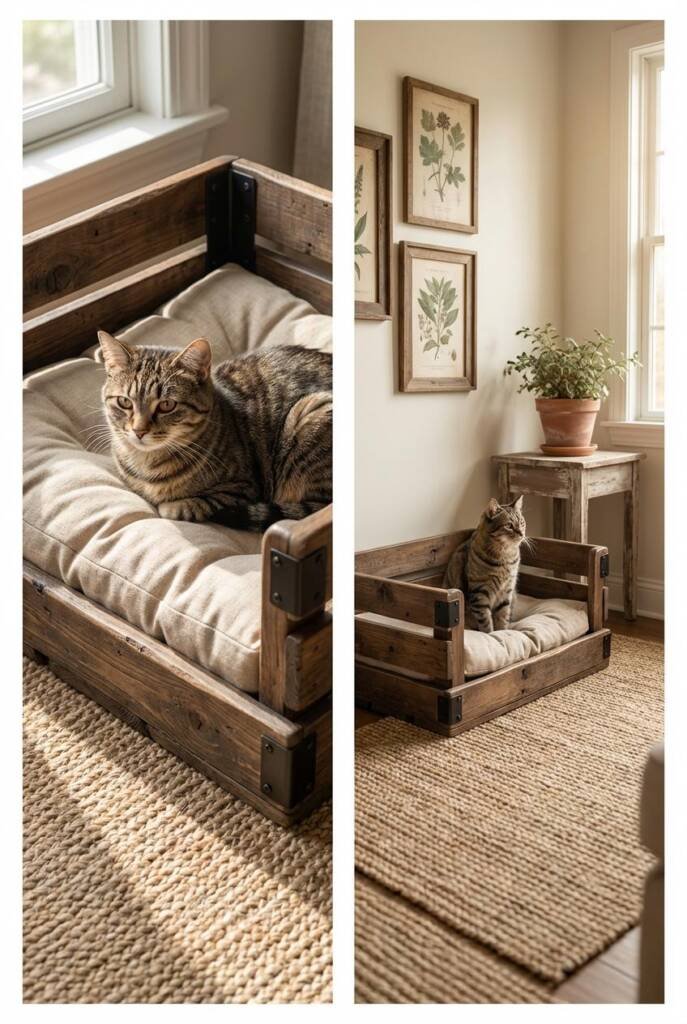
Wooden crates bring farmhouse charm to any room and make perfect sturdy frames for a rustic cat furniture piece. This project requires basic tools and works well for beginners who want a polished result.
What You Need
- Wooden crate (wine crates and apple crates work great)
- Sandpaper (medium and fine grit)
- Wood stain or chalk paint
- Soft cushion or folded blanket
- Stencils (optional for personalization)
Step by Step
- Source a wooden crate from a craft store, wine shop, or online. Check for sturdy construction.
- Sand the entire crate thoroughly inside and out. Remove all splinters and rough patches that could hurt your cat.
- Wipe away dust with a damp cloth and let it dry.
- Apply wood stain for a natural rustic look or chalk paint for a farmhouse feel. Let it dry and add a second coat if needed.
- Optional: use letter stencils to paint your cat’s name on the side.
- Position the crate on its side so the opening faces outward like a cubby.
- Add a cushion or folded blanket inside that fits the space.
This farmhouse cat bed looks great on its own or stacked with other crates for a multi-level cat corner. You can also mount it on the wall for an elevated sleeping spot.
4. Macramé Hanging Cat Hammock
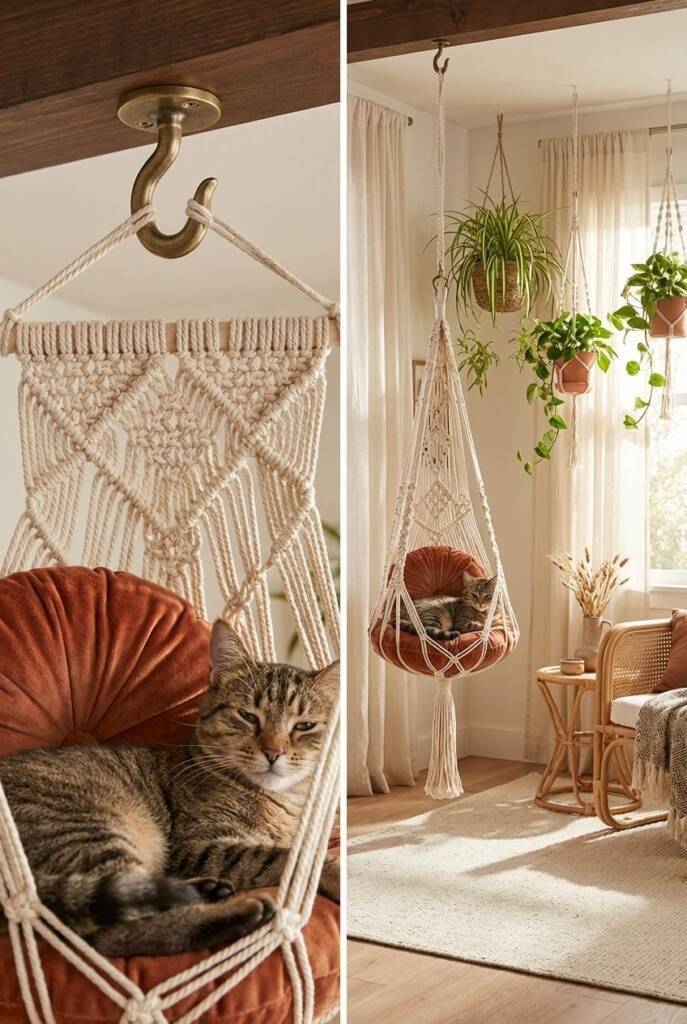
A macramé cat bed brings boho style to your space while giving your cat an elevated perch they’ll adore. This hanging cat hammock takes more time but creates a stunning statement piece worth every minute.
What You Need
- Macramé cord (approximately 100 yards of 4mm cord)
- Metal ring (10-12 inches diameter)
- Ceiling hook rated for weight
- Round cushion
- Scissors
- Measuring tape
Step by Step
- Cut 16 cords, each about 6 yards long.
- Fold each cord in half. Attach them to the metal ring using lark’s head knots, spacing them evenly.
- Divide the cords into groups of four strands each.
- Tie a row of square knots about 2 inches below the ring.
- For the next row, take two strands from one group and two from the neighboring group. Tie square knots to create a net pattern.
- Continue this staggered pattern for 12-15 inches until the net is deep enough to hold a cushion securely.
- Gather all cords at the bottom and secure them with a large gathering knot.
- Create four hanging strands by braiding or twisting cords. Attach them evenly around the top ring for balance.
- Install a ceiling hook into a stud or use a heavy-duty anchor. Test it with weight before letting your cat try it.
- Place a round cushion inside and hang at a height your cat can access.
This boho cat bed DIY photographs beautifully and keeps your cat happily swinging above the floor.
5. Mid-Century Modern Side Table Cat Bed
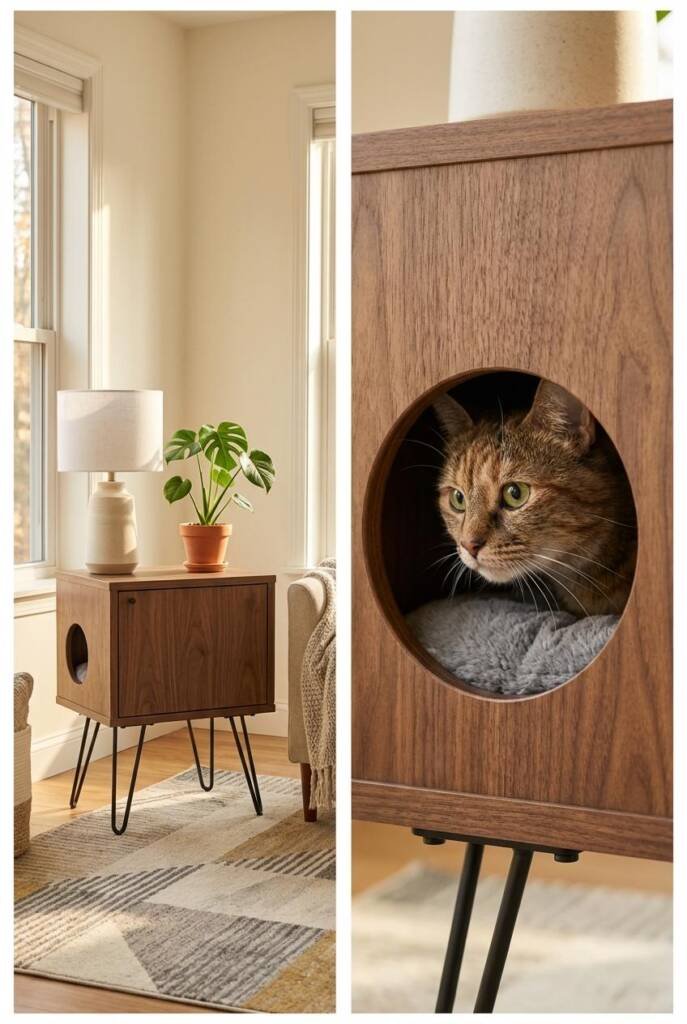
Turn a thrifted side table into sleek modern cat furniture your guests will admire. This upcycled furniture cat bed hides a cozy sleeping nook inside a functional piece of decor.
What You Need
- Mid-century style side table with open bottom or removable shelf
- Sandpaper
- Paint or wood stain
- Cushion to fit inside
- Jigsaw (if you need to cut an entry hole)
Step by Step
- Find a side table with tapered legs and clean lines at a thrift store or furniture resale shop. Look for one with an open lower section or a cabinet you can modify.
- If the table has a solid lower section, measure and mark a circular or arched entry hole on one side. Cut it out using a jigsaw.
- Sand the cut edges smooth so nothing rough touches your cat.
- Sand the entire piece lightly and wipe away dust.
- Apply paint or stain to match your room decor. Crisp white, matte black, or warm walnut all work beautifully. Let it dry.
- Measure the interior floor space and find or make a cushion that fits perfectly.
- Place the cushion inside and style the tabletop with a lamp or plant.
Your cat gets a private hideaway and you get a functional side table. This project proves that upcycled cat beds can look completely intentional and designer-level.
6. Woven Rope Basket Cat Bed
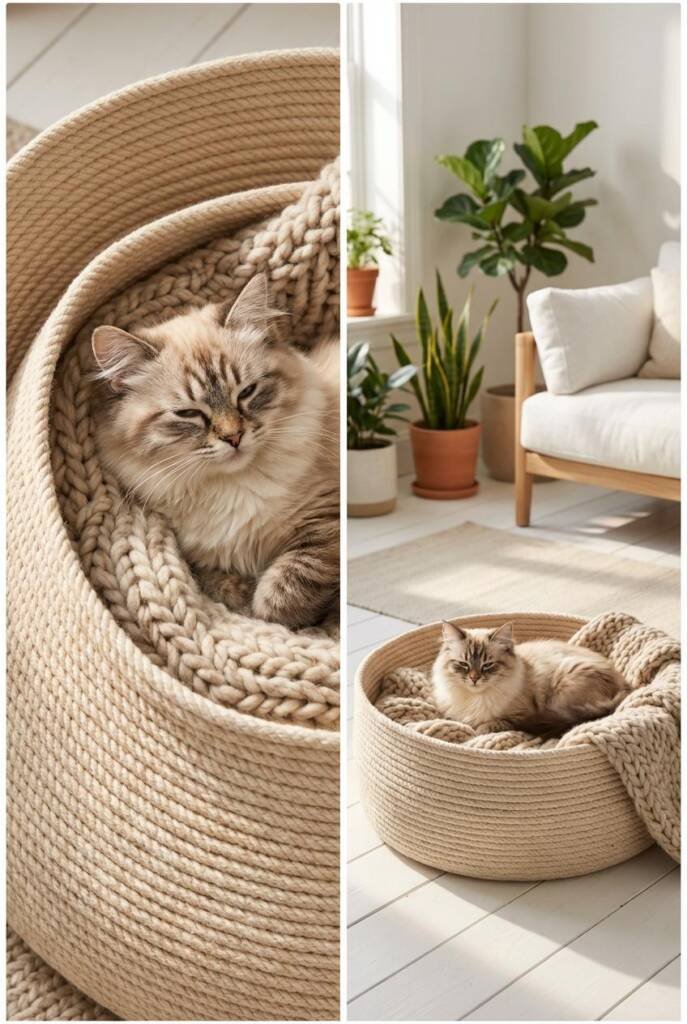
A rope basket cat bed brings clean minimalist style to any room. The natural cotton texture looks beautiful in photos and feels soft against your cat’s fur. This woven cat bed works perfectly for cat owners who want decor-friendly pet furniture.
What You Need
- Cotton rope (approximately 100 feet of 3/4 inch rope)
- Hot glue gun and plenty of glue sticks
- Circular cardboard base (about 14 inches diameter)
- Cushion or soft blanket
- Scissors
Step by Step
Cut a circular cardboard base to serve as your foundation. This keeps the bottom flat and sturdy.
- Start at the center of the cardboard. Coil the rope tightly and glue it down as you go.
- Continue coiling outward in a flat spiral until you cover the entire base.
- Once the base is complete, start building the walls by stacking coils on top of each other. Apply glue between each layer.
- Keep the coils tight and even as you build upward. Aim for walls about 4-5 inches high.
- When you reach your desired height, cut the rope at an angle and glue the end securely so it blends smoothly.
- Let everything cool and set completely before adding a cushion inside.
This minimalist cat bed DIY looks stunning in living rooms, bedrooms, or even styled on open shelving. The neutral tone matches any decor palette.
7. Boho Floor Cushion Cat Bed
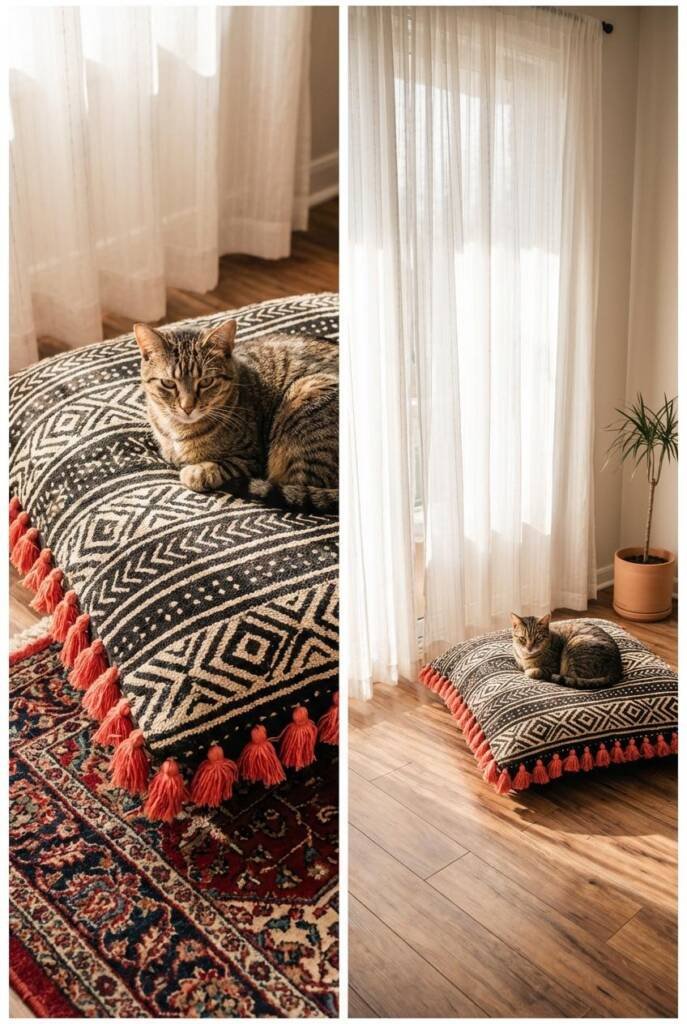
Sometimes simple wins. A boho pet bed made from an oversized floor cushion gives your cat plush comfort with zero complexity. This easy DIY cat bed works for beginners and creates a Pinterest-worthy result in under an hour.
What You Need
- Large floor cushion or pillow insert (round or square)
- Textured fabric (linen, mudcloth, or faux fur)
- Sewing machine or needle and thread
- Tassels or pom pom trim (optional)
- Scissors
- Pins
Step by Step
- Measure your cushion insert and add 2 inches on all sides for seam allowance.
- Cut two pieces of your chosen fabric to these measurements.
- Pin the fabric pieces together with the right sides facing inward.
- Sew around the edges, leaving a 6-inch opening on one side.
- Turn the cover right side out through the opening.
- Insert your cushion and hand-stitch the opening closed.
- Optional: sew tassels or pom pom trim along the edges for extra boho flair.
Place this floor cushion cat bed in a sunny corner or beside your couch. The soft texture invites napping and the style fits right into boho or eclectic spaces.
8. Rattan Planter Basket Cat Bed
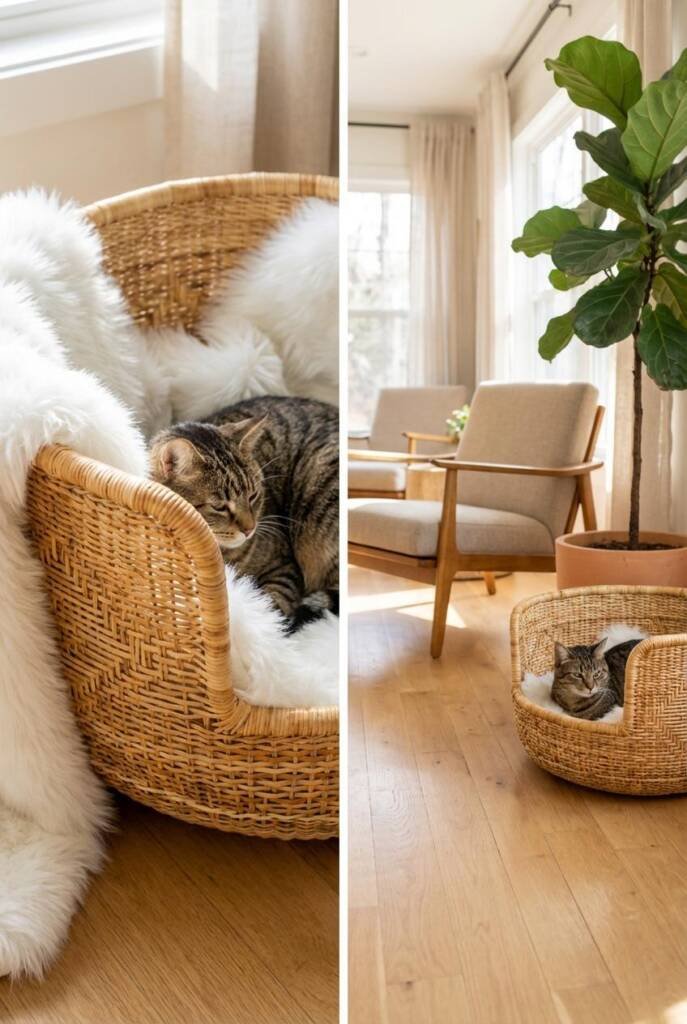
Rattan and wicker baskets made for plants double as gorgeous natural cat furniture. This rattan cat bed requires almost no DIY skill since the basket does most of the work. You simply style it into a cozy spot.
What You Need
- Large rattan or wicker planter basket (no drainage holes)
- Cushion or folded blanket
- Optional: washable liner fabric
Step by Step
- Find a rattan planter basket large enough for your cat to curl up comfortably inside. Check home decor stores, thrift shops, or online marketplaces.
- Make sure the basket has no sharp edges, loose weaving, or holes your cat could catch a claw on.
- Optional: line the inside with washable fabric to protect the basket and make cleaning easier.
- Place a cushion or thick folded blanket inside that fills the base.
- Position the basket in a quiet spot your cat already gravitates toward.
That’s it. This planter basket pet bed proves that sometimes the best DIY project is knowing when not to overcomplicate things. The natural rattan looks effortlessly chic in any room.
9. Wooden A-Frame Cat Tent
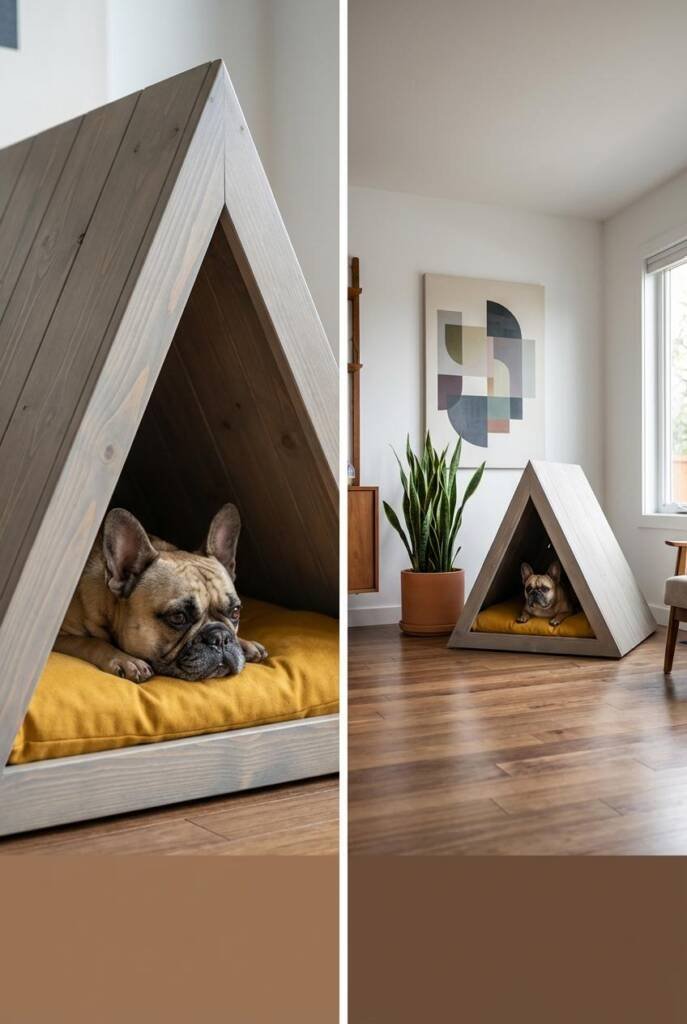
A wooden cat house with an A-frame silhouette looks modern, architectural, and completely adorable. This cat tent DIY takes a bit more effort but results in a statement piece your cat will nap in for years.
What You Need
- 5 wooden boards (pine or plywood work well)
- Wood glue
- Screws and screwdriver
- Sandpaper
- Wood stain or paint
- Soft cushion for the base
- Measuring tape and pencil
- Saw (hand saw or electric)
Step by Step
- Cut your wood into the following pieces: two equal triangular side panels, one rectangular base, and two rectangular panels for the sloped roof.
- Sand all pieces thoroughly until smooth to the touch. Round any sharp corners.
- Attach the two triangular side panels to the base using wood glue and screws. Make sure they stand upright and symmetrical.
- Attach the two roof panels to the top edges of the triangles, forming the A-frame slope. Secure with glue and screws.
- Leave the front and back open for entry and airflow, or add a small panel to the back for a cozier enclosed feel.
- Sand any rough spots from assembly and wipe away dust.
- Apply wood stain for a natural modern look or paint it white, black, or a fun color. Let it dry completely.
- Place a cushion inside that covers the entire base.
This modern cat tent looks incredible styled in minimalist homes and photographs beautifully for social media. Your cat gets an enclosed den to hide in, and you get functional decor.
Pick Your Project and Start Building This Weekend
You don’t need to spend a fortune at the pet store to give your cat a cozy stylish place to sleep. Every one of these budget-friendly cat bed projects uses accessible materials, straightforward steps, and results in something both you and your cat will love.
Whether you go for the boho macramé hammock, the sleek mid-century side table hideaway, or the simple rattan basket setup, you’re creating a handmade cat bed that fits your space and your style.
Pick the project that matches your skill level and get started this weekend. Your cat will thank you by actually sleeping in it instead of the cardboard box in the corner.
Love DIY pet projects and want more creative ideas for your furry family? Sweet Purrfections is your go-to blog for DIYers and cool pet parents who want stylish practical solutions without breaking the bank. Stick around for more tutorials, tips, and inspiration to make pet parenthood a little more fun and a lot more beautiful.
Save this post for later and pin your favorite design. Tag us when you build yours—we’d love to see what you create.