Why Outdoor Cats Need Shelter More Than You Think
You’ve seen them—those cautious shadows slipping through your neighborhood at dusk. Feral and stray cats live among us in nearly every community, silently navigating a world that wasn’t designed for their survival.
When winter storms roll in or summer heat bears down, these cats face life-threatening conditions. Hypothermia can set in when temperatures drop below 45°F, especially for cats that are wet or ill. Without shelter, outdoor cats burn precious calories just trying to stay warm—calories they can barely afford to spare.
But here’s the thing: you don’t need to be a carpenter or spend a fortune to make a real difference. Supporting feral cat care naturally starts with something as simple as offering a safe, insulated place to rest.
But here’s the thing: you don’t need to be a carpenter or spend a fortune to make a real difference.
Whether you have $10 or $100, an hour or a weekend, there’s a DIY shelter solution that can transform an outdoor cat’s chance of survival. And the satisfaction of seeing a grateful cat curl up safely in something you built with your own hands? That’s something money can’t buy.
This guide walks you through 12 proven shelter designs—from ultra-budget emergency options to premium heated houses—so you can choose what works for your skills, budget, and the cats in your area.


What Makes a Good Cat Shelter? The 5 Essential Elements
Before you grab your tools, understanding what cats actually need will save you time, money, and frustration. A good outdoor cat shelter must have these five critical features:
1. Proper Size (Smaller is Better)
This surprises most people, but bigger is NOT better for cat shelters. A space just large enough for a cat to stand, turn around, and lie down is ideal. Why? Body heat is the primary heat source, and a small space traps warmth efficiently. Think cozy den, not spacious apartment.
Size Guidelines:
- Interior dimensions: roughly 18″ wide × 24″ deep × 16-18″ tall
- Entrance hole: 5-6″ diameter (keeps out larger predators and retains heat)
- For multiple cats: create separate compartments rather than one large space
2. Insulation That Actually Works
Not all insulation is created equal, and some materials can actually harm cats. The goal is to trap air pockets that hold warmth while repelling moisture.
Best insulation materials:
- Straw (NOT hay): The gold standard. Straw is hollow, repels moisture, and provides excellent insulation
- Styrofoam: Exceptional insulation value, lightweight, but can deteriorate in sun
- Foam board: Durable, effective, easy to cut and install
- Air gaps: Double-wall construction with air space between layers
Never use:
- Blankets, towels, or fabric (absorb moisture and make cats colder)
- Hay (retains moisture, molds quickly, and can cause respiratory issues)
- Newspaper or cardboard as primary insulation (breaks down when wet)
3. Weatherproofing and Elevation
Ground-level shelters flood. Rain-soaked shelters fail. Elevation and proper waterproofing are non-negotiable.
Essential waterproofing:
- Slanted or peaked roof (water must run OFF, not pool)
- Elevated base (minimum 4-6″ off ground using bricks, pallets, or blocks)
- Drainage holes in floor (in case water does get in)
- Waterproof roof covering (tarp, shingles, metal sheeting, or thick plastic)
- Overhang or awning protecting the entrance
4. Strategic Placement
The perfect shelter in the wrong location is useless. Cats need to feel safe approaching and using the shelter.
Placement best practices:
- Away from high-traffic areas (driveways, sidewalks, loud machinery)
- Near natural cover (bushes, fences, under decks)
- Protected from prevailing winds (face entrance away from wind direction)
- Out of direct weather (under eaves, against buildings, beneath trees)
- Hidden from view of aggressive dogs or predators
- Accessible but discreet (cats won’t use shelters they don’t feel safe approaching)
5. Easy Maintenance and Cleaning
Shelters need periodic cleaning to prevent parasites, disease, and moisture buildup. Design with maintenance in mind.
Maintenance-friendly features:
- Removable or hinged roof for easy access
- Smooth interior surfaces (easier to clean than rough wood)
- Straw bedding that’s changed monthly or when damp
- Regular checks for water intrusion, damage, or pests
12 DIY Cat Shelter Ideas (From Budget to Premium)
1. The Classic Storage Bin Shelter
Cost: $15-25 | Build Time: 30-45 minutes | Difficulty: Beginner
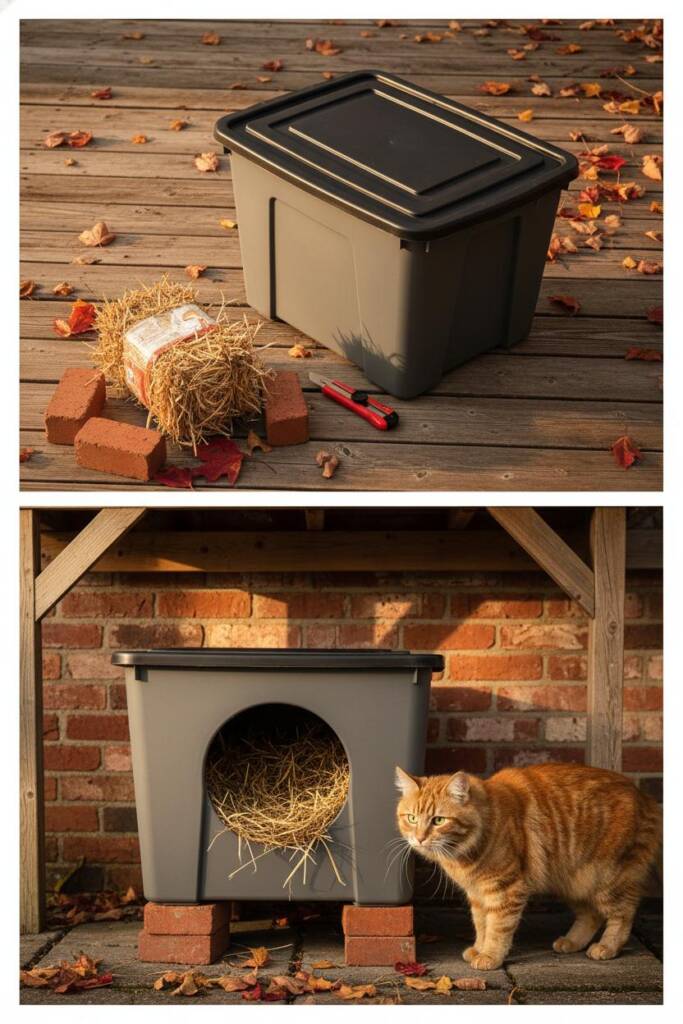
This is the gold standard for budget DIY cat shelters and the most popular design among feral cat caretakers nationwide. A simple plastic storage bin creates a weatherproof haven that keeps cats dry and protected from wind. The plastic is naturally waterproof, widely available, and requires minimal tools to transform into a lifesaving shelter.
The key to success is proper insulation and a small entrance that retains heat while keeping larger predators out. When positioned correctly and filled with straw, this humble shelter can keep cats comfortable even in sub-zero temperatures.
What You’ll Need:
- One 18-gallon plastic storage bin with lid
- Utility knife or jigsaw
- Straw (not hay) for bedding
- Duct tape or weatherproof tape
- 4-6 bricks or cinder blocks for elevation
- Optional: vinyl or rubber for door flap
How to Build:
- Step 1: Prepare Your Bin Choose an opaque bin (not clear) in a neutral color. Dark colors absorb heat in winter but can overheat in summer, so medium gray or tan works well year-round. Make sure the lid fits snugly and securely.
- Step 2: Cut the Entrance Measure and mark a circle 5-6 inches in diameter on one of the short sides of the bin, about 6 inches up from the bottom. This height prevents straw from spilling out and reduces drafts. Use a utility knife or jigsaw to cut the circle cleanly. Smooth any rough edges with sandpaper to prevent injury.
- Step 3: Create Drainage Using a drill or heated nail, create 3-4 small drainage holes (¼ inch diameter) in the bottom corners of the bin. These allow any moisture that gets inside to escape rather than pooling.
- Step 4: Add Insulation Here’s where you can upgrade this basic design. For single-wall construction, line the interior sides with foam board cut to fit, securing with non-toxic adhesive. For double-wall construction (warmer), nest a smaller bin inside the larger one, leaving a 2-3 inch gap, and fill that gap with straw or foam peanuts.
- Step 5: Add Bedding Fill the bottom of the bin with 4-6 inches of fresh, dry straw. Pack it loosely so cats can burrow and create warm pockets. Never use blankets, towels, or hay.
- Step 6: Secure the Lid Place the lid on top and secure it with bungee cords, duct tape, or heavy-duty weatherproof tape. The lid must stay on during storms but should be removable for cleaning.
- Step 7: Elevate and Position Place the entire shelter on top of 4-6 bricks or cinder blocks arranged to create a stable, elevated platform. Position the shelter in a quiet area with the entrance facing away from prevailing winds, ideally under a deck, against a building, or beneath an overhang.
Pro Tips:
- Add a vinyl flap door (cut from a placemat or floor mat) over the entrance to block wind while remaining easy for cats to push through
- Use two storage bins—one slightly smaller—to create a double-wall design with superior insulation
- Replace straw monthly or whenever it becomes damp
- In extreme cold, add a second insulated bin as an “entrance chamber” to create an airlock effect
Why This Works: Storage bins are waterproof, inexpensive, widely available, and require almost no tools or building experience. The plastic won’t rot, rust, or deteriorate quickly, and the simple design means less can go wrong. Most importantly, when properly insulated and bedded with straw, these shelters genuinely keep cats warm and dry through harsh weather.
2. Styrofoam Cooler Hideaway
Cost: $10-15 | Build Time: 20-30 minutes | Difficulty: Beginner
Styrofoam coolers are insulation champions—they’re literally designed to maintain temperature for extended periods. This makes them perfect for feral cat shelters, especially in extreme cold. The thick styrofoam walls provide excellent R-value (thermal resistance), and the lightweight construction makes these shelters easy to move or reposition as needed.
The only real downside is durability: styrofoam can deteriorate when exposed to direct sunlight and may crack in extremely cold temperatures or if roughly handled. But with proper placement and a protective outer shell, these shelters can last multiple seasons and provide exceptional warmth.
What You’ll Need:
- Large styrofoam cooler (48+ quart capacity)
- Utility knife or hot knife tool
- Large plastic storage bin or waterproof tarp
- Straw bedding
- Bungee cords or heavy objects
- Bricks for elevation
How to Build:
- Step 1: Select Your Cooler Choose the largest styrofoam cooler you can find—bigger coolers have thicker walls (better insulation). Check thrift stores, garage sales, or ask at grocery stores’ seafood departments, which often discard large shipping coolers. The cooler should be at least 48 quarts to comfortably fit an adult cat.
- Step 2: Cut the Entrance Mark a 5-6 inch diameter circle on one of the short sides, positioned about 5 inches from the bottom. Use a sharp utility knife or hot knife tool (which prevents crumbling) to cut the entrance hole smoothly. Remove any loose styrofoam bits that could be ingested.
- Step 3: Create Ventilation Using a pencil or screwdriver, poke 4-6 very small ventilation holes (¼ inch or smaller) near the top of the cooler walls. This prevents moisture buildup from cat breath without creating drafts. Don’t skip this step—poor ventilation leads to condensation, which defeats the insulation.
- Step 4: Protect from Elements Styrofoam degrades in sunlight and weather, so it needs an outer shell. Place the cooler inside a larger plastic storage bin, or wrap it completely in a waterproof tarp, leaving only the entrance exposed. Secure the tarp with duct tape or bungee cords.
- Step 5: Add Generous Bedding Fill the cooler with 4-6 inches of straw bedding. Because styrofoam is such a good insulator, cats’ body heat will be retained even more effectively than in plastic bin shelters.
- Step 6: Secure and Elevate If using a lid, secure it with bungee cords or weigh it down with rocks. Elevate the entire shelter on bricks or a wood pallet, ensuring the entrance remains accessible. Position in a shaded area to maximize cooler longevity.
Pro Tips:
- For extra protection, house the styrofoam cooler inside a plastic storage bin with a matching entrance hole
- Replace straw more frequently in styrofoam shelters as condensation can occur if ventilation is insufficient
- In very cold climates, this is one of the warmest budget options available
- Mark shelters with reflective tape if they’ll be near driveways or walkways to prevent accidental damage
Why This Works: Styrofoam provides R-5 to R-7 insulation per inch—significantly better than wood or single-wall plastic. This means cats’ body heat is trapped efficiently, creating a warm microclimate even when outdoor temperatures plummet. The lightweight design also makes these shelters easy to check, clean, and relocate as needed throughout the season.
3. Wooden Pallet Palace
Cost: $20-40 | Build Time: 2-4 hours | Difficulty: Intermediate
If you want something more permanent, aesthetically pleasing, and naturally elevated, wooden pallets offer an excellent foundation for a rustic cat shelter (great for your dog too) that can last for years. Pallets are often free from businesses, construction sites, or through online marketplaces, and their slatted design provides built-in elevation and drainage.
This option requires basic carpentry skills and tools, but the result is a sturdy, attractive shelter that blends into yards and gardens while providing superior protection. It’s particularly ideal if you’re caring for multiple cats or want something that looks intentional rather than makeshift.
What You’ll Need:
- 2-3 wooden pallets (standard 40″×48″ size)
- Plywood sheets (½” thick) for walls and roof
- Saw (circular saw or handsaw)
- Drill and screws (2-3″ exterior-grade)
- Foam board insulation
- Weatherproof wood stain or exterior paint
- Roofing material (tarp, shingles, or metal sheeting)
- Straw bedding
- Hinges (optional, for access door)
How to Build:
- Step 1: Create the Elevated Base Stack 2-3 pallets to create an elevated platform 8-12 inches off the ground. This provides excellent drainage and keeps cats away from ground moisture. Secure pallets together with screws or metal brackets to prevent shifting. Position the stack in your desired location—these shelters are heavy once complete.
- Step 2: Build the Box Frame Cut plywood to create four walls for your shelter. Recommended dimensions: 24″ wide × 24″ deep × 18″ tall interior space. The walls should sit securely on top of your pallet base. Use 2×2 or 2×4 lumber at corners for structural support if needed. Screw walls together at corners.
- Step 3: Cut Entrance and Add Insulation Cut a 6″ diameter entrance hole in the front wall, positioned 6″ from the bottom. Before attaching walls to base, line the interior of each wall with foam board insulation, secured with construction adhesive or small nails. This dramatically improves heat retention.
- Step 4: Create the Roof Cut a plywood roof that’s 2-3 inches larger than the shelter on all sides (creates overhang for rain protection). Create a slanted design by making one wall 2-3 inches taller than the other, so water runs off. Cover the plywood roof with tarp, shingles, or metal sheeting secured with roofing nails or staples.
- Step 5: Weatherproof the Wood Apply 2-3 coats of weatherproof wood stain or exterior paint to all exposed wood surfaces. This prevents rot, warping, and deterioration from moisture. Allow to dry completely before adding bedding. Choose non-toxic, low-VOC products safe for animals.
- Step 6: Add Finishing Touches Install 4-6 inches of straw bedding inside. Optional upgrades: attach hinges to the roof for easy cleaning access, add a vinyl flap door, create interior dividers for multiple cat compartments, or add decorative trim to make it look more intentional.
Pro Tips:
- Heat-treated (HT) pallets are safer than chemically-treated ones—check pallet stamps
- Create a “porch” overhang by extending the roof 6-8 inches beyond the entrance
- Paint or stain in earth tones to help it blend with your yard
- For multi-cat colonies, build divider walls inside to create 2-3 separate compartments with individual entrances
Why This Works: Wooden pallet shelters offer the best combination of durability, elevation, and aesthetics. The natural wood construction is attractive enough that neighbors won’t complain, sturdy enough to last years with basic maintenance, and elevated enough to handle flooding or snow accumulation. This is an investment-grade option that pays dividends in longevity and cat comfort.
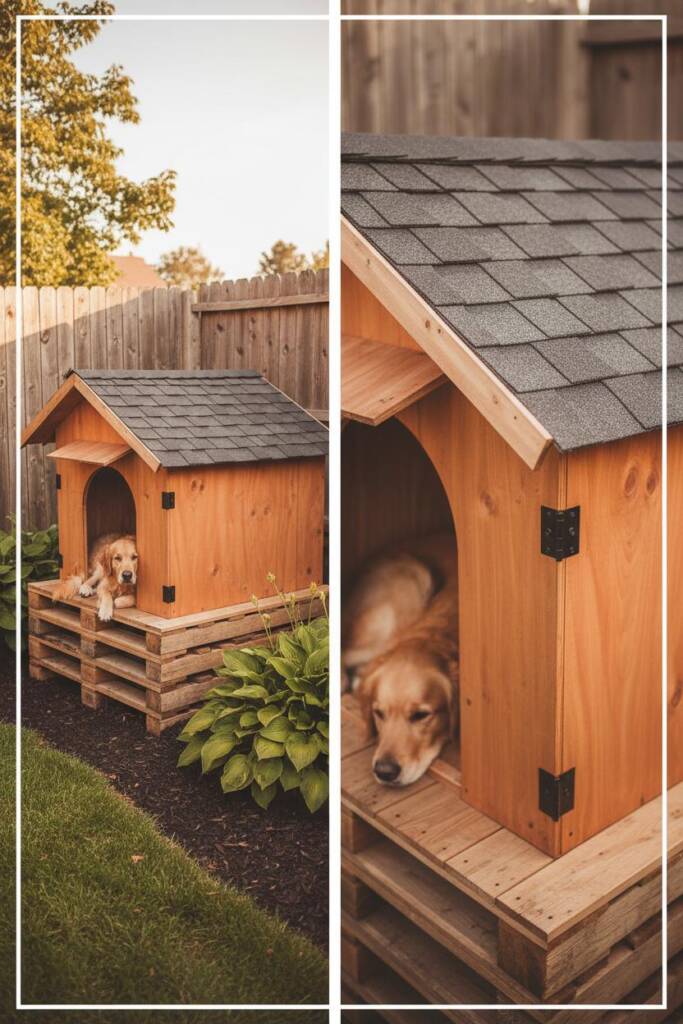
4. Insulated Dog House Conversion
Cost: $0-30 | Build Time: 1-2 hours | Difficulty: Beginner-Intermediate

If you have an old dog house collecting dust in your garage or shed, it can be transformed into a cozy cat sanctuary with just a few strategic modifications. Dog houses are already designed for outdoor use with weatherproof construction and often include features like raised floors and slanted roofs. The main challenge is right-sizing the space for cats.
Remember: cats need cozy dens, not sprawling penthouses. A dog house that’s too large will lose heat quickly, so creating interior “rooms” or walls that reduce the usable space is essential for keeping cats warm. Think of it as converting a studio apartment into efficient micro-units.
What You’ll Need:
- Small to medium dog house (ideally under 3 feet in any dimension)
- Plywood or foam board for interior dividers
- Foam board insulation panels
- Saw for cutting materials
- Construction adhesive or screws
- Vinyl or rubber flap material
- Weatherstripping tape
- Straw bedding
- Bricks or blocks for elevation (if not already raised)
How to Build:
- Step 1: Assess and Clean Inspect your dog house for damage, rot, or pest infestation. Clean thoroughly and make any necessary repairs. Check that the roof doesn’t leak by spraying it with a hose. If you find leaks, patch with roofing cement or cover with tarp before proceeding.
- Step 2: Reduce Interior Space Measure the interior and plan a divider wall that creates a cat-appropriate space roughly 20-24 inches deep. Cut plywood or thick foam board to create this divider wall, positioning it so the cat entrance leads to a smaller, more insulated area. Secure the divider with construction adhesive and/or screws. This creates an “entrance chamber” that blocks wind and a “sleeping chamber” that retains heat.
- Step 3: Insulate the Walls If the dog house walls aren’t already insulated, measure and cut foam board panels to line the interior walls. Secure with construction adhesive, ensuring no gaps remain. Pay special attention to corners where heat escapes most readily. If the dog house has thin walls (less than ½ inch), this step is critical.
- Step 4: Modify the Entrance If the existing dog door is larger than 6-7 inches, you’ll need to reduce it. Cut a piece of plywood to cover the existing opening, then cut a new 5-6 inch diameter hole in the plywood panel. Secure the panel over the original door opening with screws. This smaller entrance keeps warmth in and predators out.
- Step 5: Add Draft Protection Install a vinyl flap door over the entrance using small nails or staples along the top edge. Cut the flap from a rubber floor mat, vinyl placemat, or purchase a pet door flap. The flap should extend 1-2 inches below the door opening and be heavy enough to stay closed but light enough for cats to push through easily. Add weatherstripping around the door frame for additional draft protection.
- Step 6: Final Preparations Fill the interior with 4-6 inches of straw bedding, packing extra into corners where cats like to nest. If the dog house sits directly on the ground, elevate it on bricks or cinder blocks to prevent moisture absorption. Position in a sheltered location with the entrance facing away from prevailing winds.
Pro Tips:
- If the dog house has a removable roof, add hinges so you can open it for monthly cleaning
- Create multiple compartments if the dog house is large, giving each its own entrance
- Some dog houses have vents—block these in winter with foam inserts, but leave small gaps for air circulation
- Consider painting or staining the exterior to refresh its appearance and extend its lifespan
Why This Works: Dog houses are built to withstand weather, making them an excellent starting point. They typically feature raised floors, slanted roofs, and durable construction—all the structural elements you need. By simply right-sizing the interior space and adding insulation, you transform something designed for a 40-pound dog into a perfectly cozy haven for cats that weighs 8-12 pounds. It’s recycling at its finest, and the sturdy construction means these converted shelters can last for many years.
5. Under-Deck Cat Cave
Cost: $10-20 | Build Time: 1-2 hours | Difficulty: Beginner
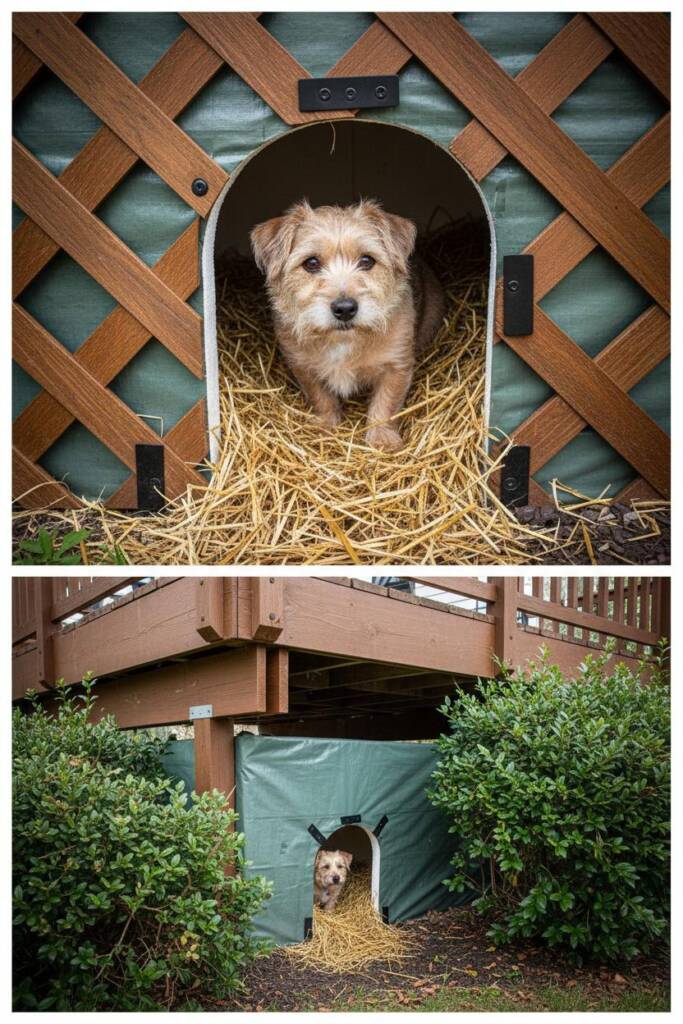
If you have a deck, porch, raised stairs, or shed with space underneath, you already have 80% of a cat shelter built. The existing structure provides a roof, protection from wind and rain, and natural concealment. All you need to do is create enclosed walls, add bedding, and ensure proper drainage.
This is one of the most discreet shelter options—neighbors might never even notice it exists. It’s also ideal for skittish cats who prefer to stay hidden and feel the security of overhead protection. The underside of your deck becomes a cat sanctuary that’s practically invisible.
What You’ll Need:
- Plywood, foam board, or lattice panels for walls
- Saw for cutting materials
- Screws or nails
- Heavy-duty tarp or plastic sheeting
- Straw bedding
- Bungee cords or zip ties
- Optional: bricks to create elevated sleeping platform
How to Build:
- Step 1: Survey Your Space Crawl under your deck or stairs and identify a corner or section that’s protected from wind, has good drainage, and isn’t prone to flooding. Look for areas where water doesn’t pool during rain. Measure the space—you’ll want to create an enclosed area roughly 2-3 feet on each side.
- Step 2: Create the Walls Cut plywood, foam board, or lattice panels to create walls that enclose your chosen corner. You’ll need 2-3 walls depending on the space configuration (the deck supports and ground form the other boundaries). Foam board is ideal because it adds insulation while being lightweight and easy to cut.
- Step 3: Install Walls Securely Attach your walls to existing deck posts or supports using screws. If there’s nothing to attach to, create a simple frame using 2×4 lumber, then attach your wall panels to that frame. Make sure walls are stable and won’t blow away in wind. The structure doesn’t need to be perfect—cats are forgiving.
- Step 4: Cut Cat Entrance In one of your walls, cut a 5-6 inch entrance hole positioned 4-6 inches from the ground. This entrance should face away from the direction of prevailing winds and heavy rain. If possible, position it so cats can approach from cover (bushes, shrubs, or other structures).
- Step 5: Add Waterproofing Even though you’re under a deck, wind can blow rain into the space. Line the interior walls with tarp or heavy plastic sheeting, creating a waterproof barrier. Secure with staples, nails, or zip ties. Ensure water has a way to drain out if it does get in—don’t create a sealed box that traps moisture.
- Step 6: Block Other Openings Check for other gaps or openings in your enclosed space that would create drafts. Use scrap wood, foam board, or rigid insulation to block these openings while maintaining some ventilation near the top to prevent moisture buildup.
- Step 7: Add Bedding and Elevation If the ground under your deck is dirt or concrete, create a raised sleeping platform using bricks or a wooden pallet. This keeps cats off the cold ground. Fill the enclosed space with 4-6 inches of straw bedding, ensuring it’s dry before use.
Pro Tips:
- Use the existing deck lattice as one wall if it’s already in place—just block gaps with smaller mesh
- Create a “porch” area just outside the entrance where you can place food and water under the deck’s protection
- In crawl spaces with dirt floors, lay down a tarp first to prevent ground moisture from rising into bedding
- Check local building codes if you’re making permanent modifications to your deck structure
Why This Works: Using existing structures leverages shelter that’s already weatherproof, elevated, and stable. You’re not building from scratch—you’re simply enclosing and insulating what’s already there. This approach saves money, time, and materials while creating one of the most secure-feeling shelters for cautious feral cats. The overhead protection, multiple escape routes, and natural camouflage make cats feel safe enough to actually use the shelter regularly.
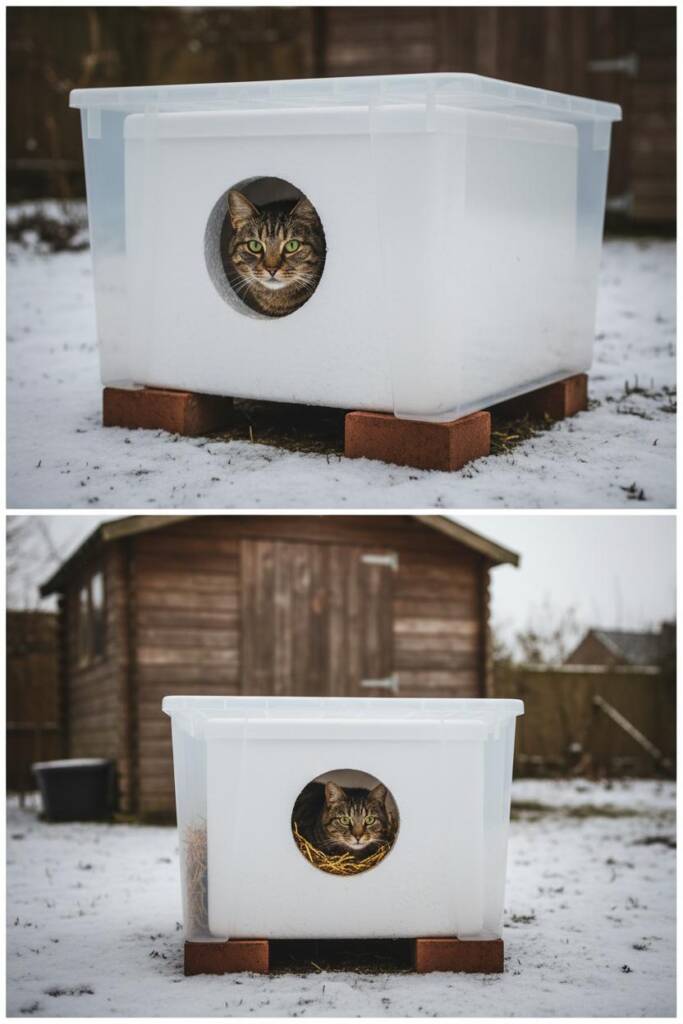
6. Rubbermaid Tote Deluxe (Double-Wall)
Cost: $25-35 | Build Time: 45-60 minutes | Difficulty: Beginner
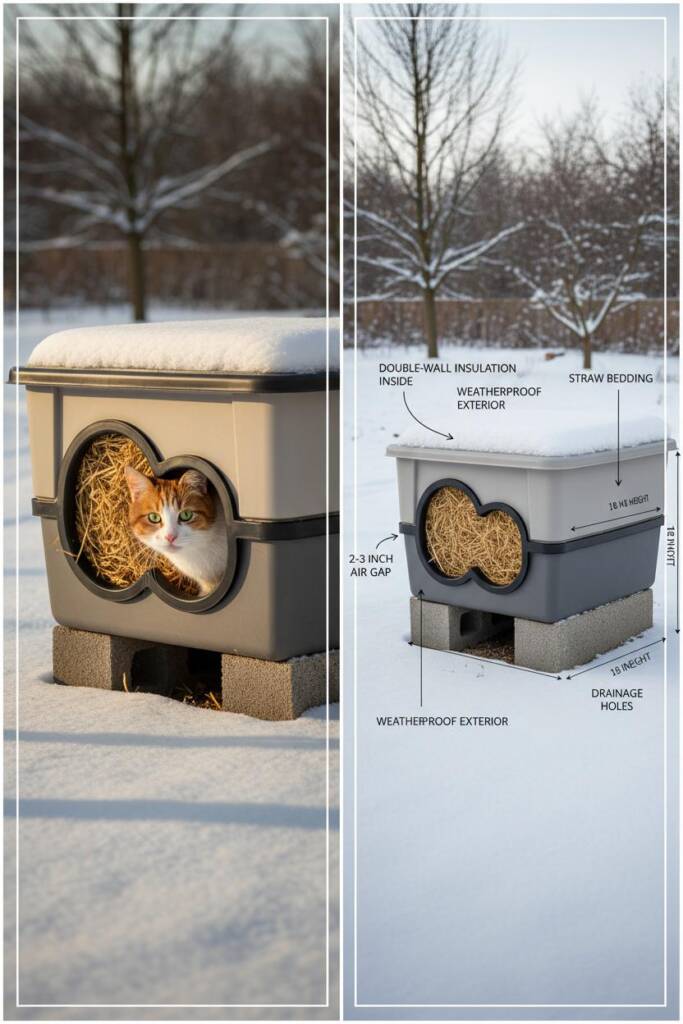
This is the upgraded, professional-grade version of the basic storage bin shelter. By nesting two totes and filling the air gap with insulation, you create a thermal barrier that dramatically improves heat retention—similar to how double-pane windows outperform single-pane. The result is a shelter that can handle extreme cold while still being affordable and easy to build.
This design is popular among TNR (trap-neuter-return) groups and feral cat caretakers because it strikes the perfect balance between cost, durability, and thermal performance. If you’re only going to build one shelter and want maximum effectiveness, this is it.
What You’ll Need:
- One 18-gallon storage tote
- One 27-gallon storage tote (must nest inside with 2-3″ gap on all sides)
- Utility knife or jigsaw
- Straw for insulation gap and bedding
- Foam board pieces or foam peanuts (alternative insulation)
- Drill for drainage holes
- Bungee cords
- Bricks or cinder blocks for elevation
How to Build:
- Step 1: Test Your Fit Before cutting anything, place the smaller tote inside the larger one. You should have approximately 2-3 inches of space between the walls all the way around. If the gap is too small (less than 1 inch), the insulation won’t be effective. If it’s too large (more than 4 inches), you’ll waste insulation material. Adjust tote sizes if necessary.
- Step 2: Cut Matching Entrance Holes Mark identical 5-6 inch diameter circles on both totes, positioned on the short side about 6 inches from the bottom. The holes must align perfectly when the totes are nested. Cut both holes carefully using a utility knife or jigsaw. Smooth all rough edges with sandpaper.
- Step 3: Create Drainage Drill 3-4 small drainage holes (¼ inch) in the bottom corners of BOTH totes. These must align when nested. This allows any moisture that penetrates the outer shell to drain through the inner chamber and out the bottom.
- Step 4: Nest the Totes Place the smaller tote inside the larger one, carefully aligning the entrance holes. The inner tote should sit centered with even spacing on all sides. If it doesn’t stay centered, use small spacers (cut pieces of foam board) at the bottom to keep it positioned correctly.
- Step 5: Fill the Insulation Gap Now comes the magic: fill the air gap between the two totes with insulation material. Straw works excellently and is most accessible—simply stuff it into the gap all around, packing it loosely but thoroughly. Alternative options include foam peanuts (the biodegradable kind), shredded paper, or cut pieces of foam board wedged vertically in the gap. Fill all the way to the top, including the lid gap.
- Step 6: Add Interior Bedding Fill the inner tote with 4-6 inches of fresh straw bedding. This is separate from the insulation straw—it’s what the cat will nest in.
- Step 7: Secure Lids Place both lids on top. Secure them together with bungee cords wrapped around the entire shelter, or use heavy-duty weatherproof tape. The lids must stay secure during storms but remain removable for maintenance.
- Step 8: Elevate and Position Place the entire double-wall shelter on an elevated platform of bricks or cinder blocks (minimum 6 inches high). Position in a protected location with the entrance facing away from prevailing winds. Consider placing it against a building wall for additional wind protection and warmth.
Pro Tips:
- Choose opaque totes in neutral colors (gray, tan, brown) to absorb some solar heat without overheating
- Mark the outside with “FERAL CAT SHELTER” and your contact info in case it’s mistaken for trash
- For extreme cold climates, add a vinyl flap door over the entrance
- Create a “porch” by placing a third, doorless tote over the entrance to create an airlock effect
- Check and replace straw bedding monthly, or more often if it gets damp
Why This Works: The double-wall design with air gap insulation mimics professional cold-weather construction techniques. The trapped air between the walls acts as a thermal buffer, preventing cold from conducting through to the interior. Cats’ body heat warms the inner chamber, and that warmth stays trapped instead of radiating through thin plastic walls. Temperature testing has shown these double-wall shelters maintain interior temperatures 15-25°F warmer than single-wall designs—a potentially lifesaving difference during polar vortex conditions or extended cold snaps.
7. Cardboard Box Emergency Shelter
Cost: $5-10 | Build Time: 20-30 minutes | Difficulty: Beginner
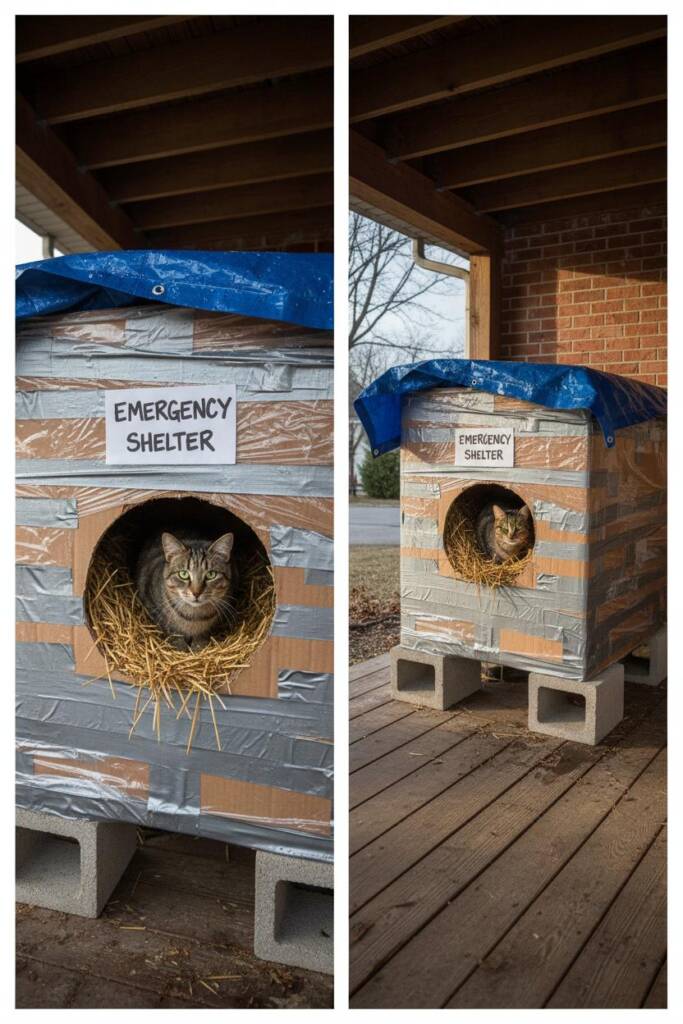
Let’s be honest: this isn’t a long-term solution. Cardboard simply can’t withstand prolonged exposure to weather. But when temperatures suddenly plummet, an unexpected cold snap hits, or you need immediate protection while building something more permanent, a properly prepared cardboard shelter can provide critical emergency warmth for outdoor cats.
Think of this as a stopgap measure—something you can build in 20 minutes with materials you probably already have at home. It won’t last more than 2-3 weeks (or less in heavy rain), but during that time, it can genuinely save a cat’s life until you can build something better.
What You’ll Need:
- Large, thick cardboard box (appliance boxes work best)
- Heavy-duty plastic garbage bags or plastic sheeting
- Duct tape (lots of it)
- Utility knife
- Newspaper or packing paper
- Straw bedding
- Tarp or additional plastic bags
- Bricks for elevation
How to Build:
- Step 1: Choose the Right Box Select the largest, thickest cardboard box you can find. Appliance boxes (refrigerator, washer, dryer) have double-wall construction that provides better insulation and structural integrity. Avoid boxes that are already wet, damaged, or have been stored in damp conditions.
- Step 2: Cut Entrance and Ventilation Cut a 5-6 inch entrance hole on one side of the box, positioned about 5 inches from the bottom. Also create 2-3 tiny ventilation holes (pencil-sized) near the top of opposite sides to prevent condensation buildup. Don’t skip ventilation—moisture is cardboard’s enemy.
- Step 3: Create Interior Waterproof Barrier Here’s the crucial step most people skip: you must waterproof from the INSIDE. Cut large plastic garbage bags open to create flat sheets. Line the entire interior of the box—floor, walls, and ceiling—with plastic sheeting, overlapping pieces and securing with duct tape. Create a seamless plastic barrier so moisture from cat breath and body heat can’t reach the cardboard. Leave the entrance and ventilation holes open.
- Step 4: Add Insulation Layer Stuff the walls of the box with crumpled newspaper, packing paper, or shredded paper, creating a 2-3 inch insulation layer between the cardboard and the plastic lining. This traps air pockets for added warmth. Don’t pack it too tightly—loose is better for insulation.
- Step 5: Waterproof the Exterior Now protect the outside. Wrap the entire exterior of the box with multiple layers of heavy plastic—garbage bags, plastic sheeting, or a tarp. Wrap it like you’re gift-wrapping a present, using generous amounts of duct tape to seal every seam and edge. Pay special attention to the top (roof) and bottom, as these are most vulnerable to water. Leave only the entrance hole exposed.
- Step 6: Add Generous Bedding Fill the interior with 6-8 inches of straw bedding—more than you’d use in a permanent shelter because cardboard offers less inherent insulation. Cats need to be able to burrow deeply into the straw to stay warm.
- Step 7: Create Weather Protection Place the box on bricks to elevate it off the ground. Then create an additional rain shield by placing a large tarp over the entire shelter, securing it with rocks or bricks on the corners. The tarp should create a “roof” several inches above the box, so rain hits the tarp and runs off before ever touching the cardboard.
- Step 8: Monitor and Replace Check this shelter DAILY. Look for signs of water intrusion, cardboard softening, or structural collapse. Have a replacement ready to build. Plan to replace this emergency shelter every 2-3 weeks maximum, or immediately after heavy rain or snow.
Pro Tips:
- Use this only as a temporary measure—start building a permanent shelter immediately
- Position the shelter under an overhang, porch, or dense tree cover for additional rain protection
- If you have multiple boxes, nest one inside another for double-wall protection
- Replace straw more frequently (weekly) in cardboard shelters due to higher moisture risk
- Write “EMERGENCY CAT SHELTER – DO NOT REMOVE” on the outside in marker
Why This Works (Temporarily): Cardboard is actually a decent insulator when dry—the corrugated air pockets trap heat similarly to more expensive materials. The problem is moisture, which is why the plastic barriers (inside and out) are absolutely critical.
When properly waterproofed and protected from direct weather, a cardboard shelter can maintain interior temperatures 10-15°F warmer than the outside air—enough to prevent hypothermia during short cold snaps. It’s not ideal, but in an emergency, it’s far better than nothing. Just remember: this buys you time to build something better, not a long-term solution.
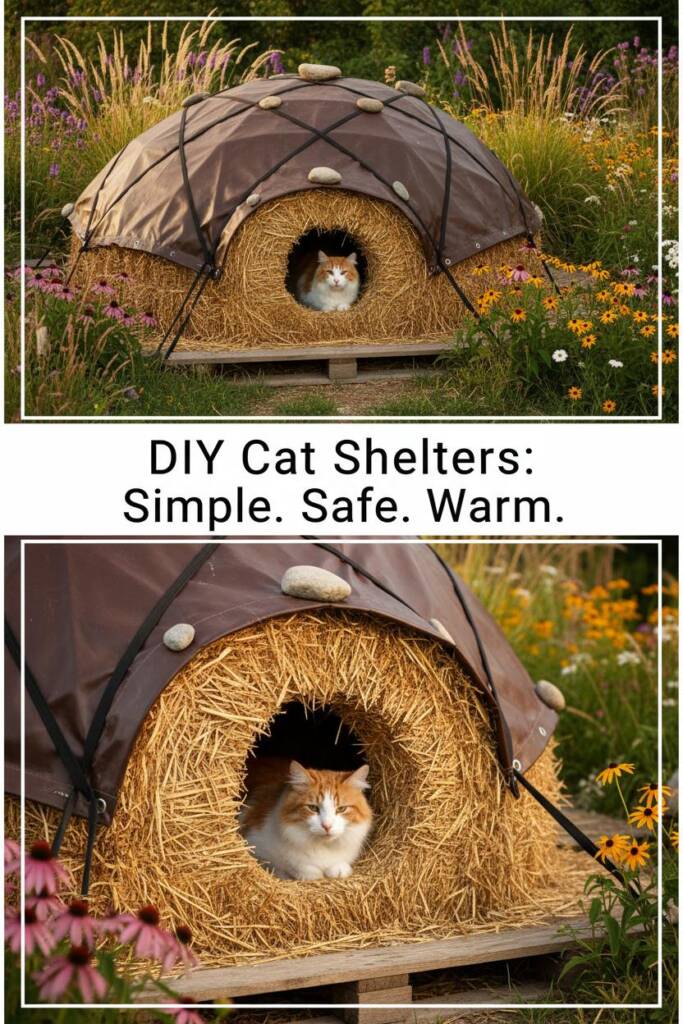
8. Igloo-Style Straw Bale Shelter
Cost: $30-50 | Build Time: 2-3 hours | Difficulty: Intermediate
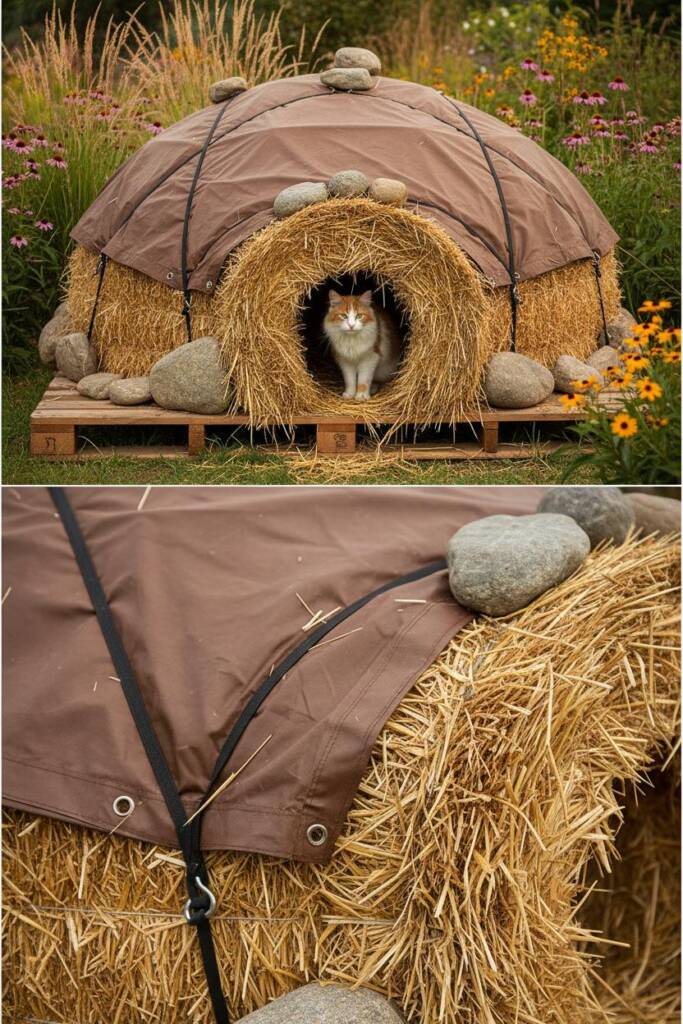
For the ultimate in natural insulation and rustic charm, straw bales create an igloo-style shelter that’s nearly indestructible and incredibly warm. This option works best if you have yard space, don’t mind a distinctive aesthetic, and want to provide shelter for multiple cats or an entire colony.
Straw bales offer unmatched insulation—farmers have used them for centuries to protect livestock from harsh winters. The thick walls (typically 14-18 inches) create a thermal mass that stays warm even in brutal cold. Bonus: when positioned thoughtfully, these shelters can look intentional and decorative, like a garden feature rather than a makeshift cat house.
What You’ll Need:
- 6-8 straw bales (not hay—check farm supply stores)
- Heavy-duty tarp (10’×12′ or larger)
- Wooden pallet or platform for base
- Additional loose straw for bedding
- Plastic sheeting for interior moisture barrier
- Rope, bungee cords, or stakes to secure tarp
- Heavy rocks or cinder blocks as weights
How to Build:
- Step 1: Create the Foundation Start with a wooden pallet or build a simple platform using 2×4 lumber. This elevates the shelter and provides drainage. Position your foundation in the final location—straw bale shelters are heavy and difficult to move once constructed. Choose a spot with natural wind protection (near a fence, building, or dense shrubs).
- Step 2: Build the Base Layer Arrange 4-5 straw bales in a square or circular formation on top of your platform, leaving a gap on one side for the entrance. The entrance gap should be about 8-10 inches wide—just enough for a cat to slip through comfortably. Make sure bales fit tightly together with minimal gaps.
- Step 3: Stack the Walls Add a second layer of straw bales on top of the first, offsetting them like bricks so the seams don’t align (this adds structural stability). Continue the circular or square pattern, gradually angling the top bales inward to begin forming a dome or peaked roof shape. The entrance should remain consistent through all layers.
- Step 4: Create the Roof For the top, place final bales across the opening, angling them to create a peaked or domed roof that will shed rain and snow. The roof doesn’t need to be perfectly sealed—small gaps actually provide necessary ventilation. The key is creating an overhang that prevents water from running down into the interior.
- Step 5: Add Interior Moisture Barrier This is critical: while straw is naturally moisture-resistant, you want to prevent ground moisture and any rain that does penetrate from reaching the interior living space. Line the interior floor and lower walls with plastic sheeting or a tarp, creating a waterproof nest area. Secure the plastic with small stakes or by tucking it under the straw bales.
- Step 6: Fill with Bedding Add 6-8 inches of loose straw bedding on top of the plastic moisture barrier. Create a generous, deep bed that cats can burrow into and arrange to their liking. The interior should feel like a cozy cave—dark, enclosed, and deeply insulated.
- Step 7: Weatherproof the Exterior Drape a large, heavy-duty tarp over the entire structure, covering it completely. The tarp protects the straw bales from direct rain and snow, significantly extending their lifespan. Secure the tarp with bungee cords, rope, or stakes, making sure it’s taut enough to shed water but not so tight it crushes the structure. Weight down the bottom edges with rocks or cinder blocks.
- Step 8: Create Ventilation Even with the tarp covering, ensure there’s a small ventilation gap near the top of the structure (not directly over the sleeping area). This prevents dangerous moisture buildup from cat breath and body heat. Good ventilation is the difference between a dry shelter and one that becomes damp and moldy.
Pro Tips:
- Straw bales settle over time—check monthly and add bales or adjust structure as needed
- For multi-cat colonies, create interior divider walls using additional bales to give cats separate spaces
- In very snowy climates, the tarp becomes buried and actually adds insulation—embrace it
- Straw bale shelters can last 2-3 years with proper maintenance and tarp replacement
- Plant native grasses or ground cover around the base to help it blend into your landscape
- These shelters stay surprisingly cool in summer due to the thermal mass, making them year-round options
Why This Works: Straw is hollow and contains thousands of tiny air pockets that trap heat while resisting moisture. The thick walls create a thermal barrier that’s far superior to thin plastic or wood. Temperature monitoring has shown straw bale shelters maintaining interior temperatures 20-30°F warmer than outside air, even without any supplemental heating. The natural materials are also non-toxic, biodegradable, and blend beautifully into outdoor settings. For colonies or multiple cats, the generous interior space accommodates several cats without feeling cramped, and the thick walls provide sound dampening that helps nervous cats feel secure.
9. Repurposed Cabinet Cat Condo
Cost: $20-40 | Build Time: 2-3 hours | Difficulty: Intermediate
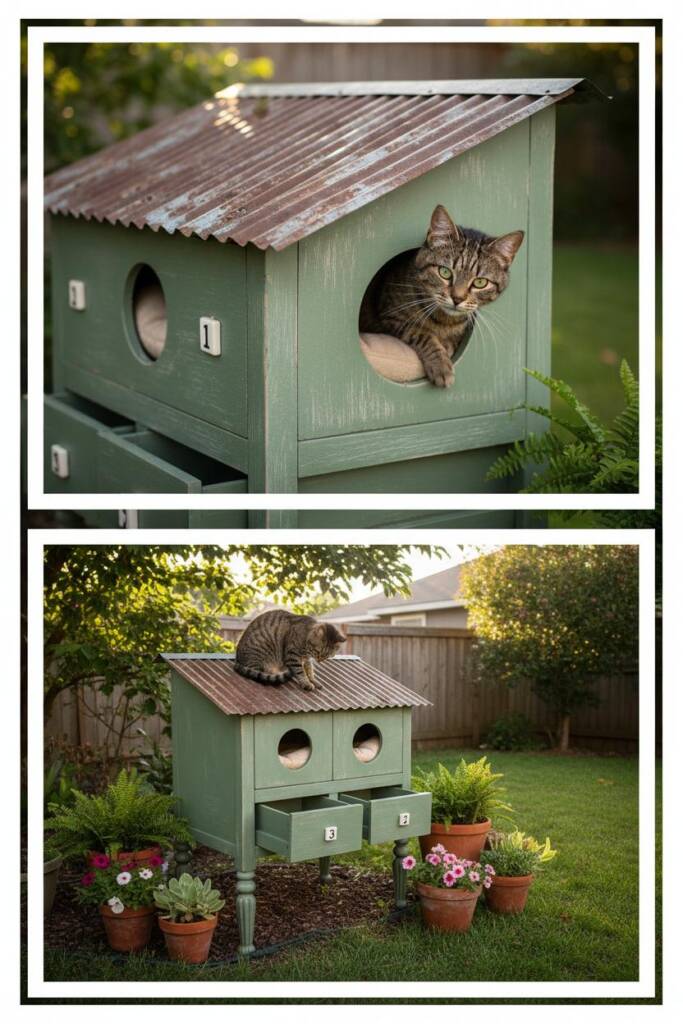
Old kitchen cabinets, nightstands, filing cabinets, or small dressers make surprisingly excellent cat shelters. They’re already enclosed, built to withstand years of use, and when properly sealed and weatherproofed, they look intentional rather than makeshift. This is the perfect option if you want a shelter that won’t draw complaints from neighbors or HOAs.
The beauty of furniture-based shelters is that they often come with multiple compartments, allowing you to create separate “apartments” for colony cats who might not get along. A three-drawer dresser becomes a three-unit cat condo. A cabinet with shelves becomes a two-story retreat.
What You’ll Need:
- Old cabinet, nightstand, dresser, or filing cabinet
- Saw or drill for cutting entrance holes
- Exterior-grade wood sealant or paint
- Caulk or wood filler for sealing gaps
- Foam board insulation (if walls are thin)
- Roofing material (shingles, metal sheeting, or waterproof panel) if top is flat
- Sandpaper
- Straw bedding
- Screws or brackets to secure doors/drawers
- Bricks or furniture legs for elevation
How to Build:
- Step 1: Source Your Furniture Check thrift stores, Craigslist free sections, curbside pickups, or your own garage for suitable pieces. Look for solid wood construction (not particleboard, which disintegrates when wet), minimal damage, and no strong chemical odors. Smaller pieces (2-3 feet in any dimension) work better than large furniture.
- Step 2: Clean and Repair Remove all hardware (handles, hinges, drawer slides). Clean thoroughly with pet-safe cleaner. Inspect for rot, pest damage, or structural issues. Make repairs using wood glue and clamps for loose joints, wood filler for holes, and sandpaper to smooth rough edges.
- Step 3: Remove or Secure Moving Parts Decide whether to remove doors and drawers entirely or secure them in a partially open position. For drawers, you can remove them and use the drawer openings as entrances, or secure them slightly open (6 inches) using blocks or brackets. For cabinet doors, either remove them or prop them open with a fixed gap. Cats need reliable access—doors that could swing shut are dangerous.
- Step 4: Cut Entrance Holes Using a jigsaw or hole saw, cut 5-6 inch diameter entrance holes in the sides, back, or existing openings. If using a dresser with drawers, you might cut holes in the sides of the dresser to access each drawer compartment. Sand all cut edges smooth. Position entrances to face away from prevailing winds.
- Step 5: Seal All Gaps and Joints This step is critical for furniture shelters. Use exterior-grade caulk to seal every seam, joint, crack, and gap in the furniture. Pay special attention to corners, where the back meets the sides, and around any removed hardware holes. The goal is to create a waterproof seal that prevents drafts and moisture intrusion.
- Step 6: Add Insulation (If Needed) If your furniture has thin walls (less than ½ inch), line the interior with foam board insulation cut to fit and secured with construction adhesive. This is especially important for metal filing cabinets, which conduct cold without insulation. Leave the floor uninsulated if the furniture has a built-in bottom.
- Step 7: Weatherproof the Exterior Apply 2-3 coats of exterior-grade wood stain, paint, or waterproof sealant to all exposed wood surfaces. For metal furniture, use rust-preventing spray paint. Allow each coat to dry completely before applying the next. Choose colors that blend with your yard or garden—earth tones, forest green, or barn red work well.
- Step 8: Create or Improve the Roof If your furniture has a flat top, water will pool and eventually leak through. Build a slanted roof by attaching a piece of plywood cut 2-3 inches larger than the furniture top, angled to shed water. Cover this roof with shingles, metal sheeting, or heavy-duty tarp secured with roofing nails or staples. If the furniture already has a slanted or peaked top, simply ensure it’s properly sealed.
- Step 9: Elevate and Add Bedding If the furniture doesn’t have legs, attach furniture legs or place the entire unit on bricks or cinder blocks (minimum 4 inches elevation). Fill each compartment with 4-6 inches of straw bedding. If you’ve created multiple compartments, each gets its own bedding and entrance.
- Step 10: Position Strategically Place your cabinet shelter against a building wall, fence, or under an overhang for additional protection. The back of the shelter (which is solid) should face the direction of prevailing winds. Consider adding decorative elements like potted plants nearby to help it blend into your yard aesthetic.
Pro Tips:
- Nightstands with drawers removed create perfect single-cat shelters
- Filing cabinets can house 2-4 cats if you create entrances to each drawer space
- Add house numbers or decorative painting to make it look like intentional yard art
- Attach a small porch roof over the entrance using scrap wood and brackets
- For colony cats, create separate entrances for each compartment to reduce conflicts
- Check furniture regularly for wood swelling or deterioration—reseal as needed
Why This Works: Furniture is designed to be durable and protect contents from environmental factors—qualities that translate perfectly to cat shelters. The solid construction provides excellent wind protection, the enclosed design feels secure to cats, and the professional appearance means neighbors see an interesting garden feature rather than a “homeless cat shelter.” Multi-compartment furniture also solves the challenge of housing multiple cats who need separate spaces, effectively creating a cat apartment building from a single piece of furniture. With proper weatherproofing and maintenance, furniture-based shelters can last 5-10 years, making them excellent long-term investments.
10. PVC Pipe Frame + Tarp Tent
Cost: $25-40 | Build Time: 1-2 hours | Difficulty: Beginner-Intermediate
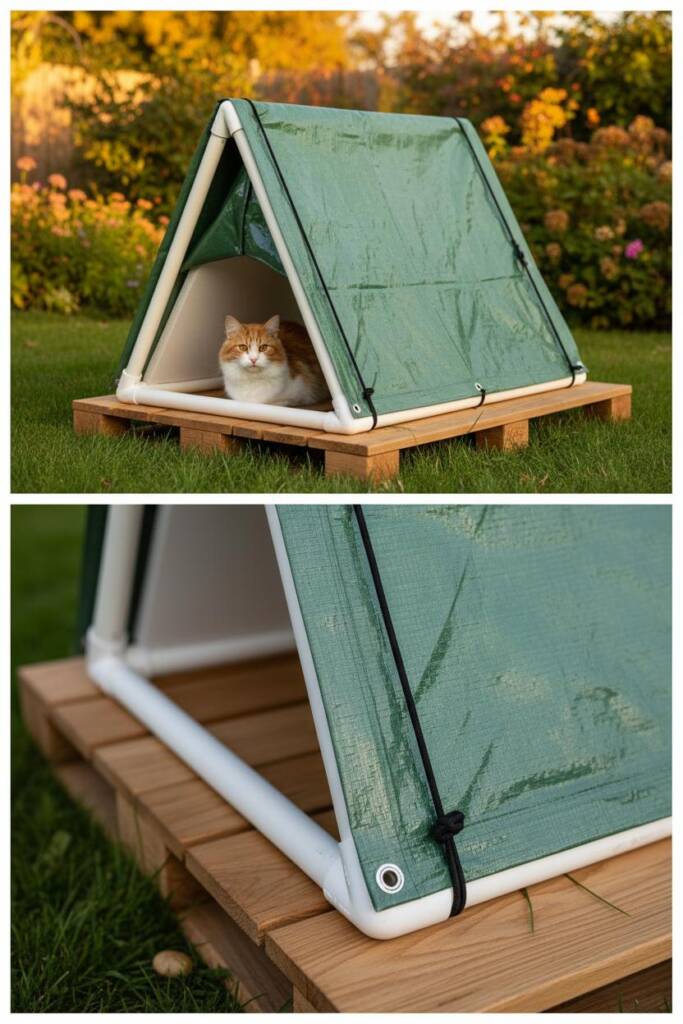
This shelter mimics camping tent construction and offers flexibility that rigid shelters can’t match. You can customize the size, create different shapes (A-frame, hoop house, dome), and easily disassemble it for cleaning or storage. It’s particularly useful if you need something temporary, portable, or adjustable for different seasons.
The PVC frame provides structure without requiring advanced carpentry skills, and the tarp covering creates weatherproof protection. While not as insulated as double-wall plastic or straw bale options, this design works well in moderate climates or as a three-season shelter with added insulation.
What You’ll Need:
- PVC pipes (½” or ¾” diameter): six 3-foot sections and four 2-foot sections
- PVC corner connectors (90-degree elbows and T-joints)
- PVC cement (optional for permanent assembly) or zip ties for temporary
- Heavy-duty waterproof tarp (8’×10′ minimum)
- Foam board insulation panels
- Bungee cords or spring clamps
- Zip ties or heavy-duty clips
- Straw bedding
- Stakes or weights to secure frame
- Wooden pallet or plywood base
How to Build:
- Step 1: Design Your Frame Decide on your shelter shape. A-frame is simplest: two triangular ends connected by a ridge pole. Hoop house uses curved PVC creating a tunnel shape. Decide based on your space and how many cats you’re sheltering. For this guide, we’ll build an A-frame design suitable for 1-2 cats.
- Step 2: Assemble the Frame Ends Create two identical triangular frames for the ends. Each triangle uses: two 3-foot PVC pipes for the slanted sides, one 2-foot pipe for the base, and three corner connectors. Connect the pipes using PVC cement for permanent assembly (recommended for durability) or just friction-fit them for a temporary, adjustable shelter.
- Step 3: Connect the Frame Stand your two triangular ends upright, parallel to each other, about 2 feet apart. Connect them using two 2-foot PVC pipes—one at the peak (ridge pole) and one along the bottom of each side. Use T-joint connectors at the peaks and corners. Your frame should now look like a small tent skeleton.
- Step 4: Secure and Stabilize Place the entire frame on top of a wooden pallet or plywood base. Secure it by zip-tying the bottom pipes to the pallet, or by driving stakes through the corner connectors into the ground if placed on soil. The frame must be stable and unable to tip in wind.
- Step 5: Add Insulation Layer Cut foam board panels to fit inside the frame, creating insulated walls. You can lean panels against the PVC frame or attach them using zip ties through pre-drilled holes. Cover three sides (back and both slanted walls), leaving the front open for the entrance. This insulation layer is what makes this design viable for winter use.
- Step 6: Drape and Secure Tarp Lay your heavy-duty tarp over the entire frame, ensuring it covers all sides and extends to the ground. The tarp should be large enough to create an overhang at the front (entrance) and drape several inches onto the ground on the other three sides. Secure the tarp to the frame using bungee cords wrapped around the PVC pipes, spring clamps, or zip ties. Make sure the tarp is taut enough to shed water but not so tight it tears.
- Step 7: Close the Back and Sides Use additional tarp pieces, heavy plastic, or secured foam board to close the back and side walls of the tent, leaving only a small entrance opening at the front. You want one opening just large enough for a cat to enter (5-6 inches), positioned to face away from wind and weather. Overlap tarp pieces and secure with clips or duct tape to prevent gaps.
- Step 8: Create Entrance Flap Cut a vertical slit in the front tarp (or leave a small opening) for the cat entrance. Attach a vinyl or rubber flap over this opening using zip ties or duct tape along the top edge. The flap blocks wind but allows cats to push through easily.
- Step 9: Anchor and Weatherproof Stake down the bottom edges of the tarp using tent stakes or weigh them down with rocks or bricks. This prevents wind from getting under the tarp and lifting the shelter. Check that all tarp seams are overlapped and secured—wind-driven rain can penetrate surprisingly small gaps.
- Step 10: Add Bedding Fill the interior of your tent shelter with 4-6 inches of straw bedding. Because this design has more air space than compact bin shelters, you want generous bedding that cats can burrow deeply into to create warm pockets.
Pro Tips:
- Paint or wrap PVC pipes with camo tape to make the shelter less conspicuous
- In extreme climates, add a second tarp layer with an air gap between layers for extra insulation
- Create a “front porch” by extending the tarp overhang 12 inches beyond the entrance
- This design is easily expandable—make it longer by adding more frame sections
- Disassemble and store during off-season to extend material lifespan
- For snow-prone areas, reinforce the frame with additional PVC cross-supports to prevent collapse
Why This Works: PVC construction is lightweight, inexpensive, doesn’t rot or rust, and requires no specialized tools beyond a saw for cutting pipes to size. The modular nature means you can adjust dimensions based on your space and cat population. The tarp covering is completely waterproof, and when combined with foam board insulation, creates a surprisingly warm microclimate. This design is also one of the easiest to clean—simply remove the tarp, dump out old straw, sanitize the frame with a hose, and reassemble with fresh bedding. For caretakers managing multiple feeding stations or colony locations, the ability to build identical, standardized shelters quickly is invaluable.
11. Heated Outdoor Cat House (Premium Option)
Cost: $80-150 | Build Time: 1-2 hours (assembly) | Difficulty: Beginner
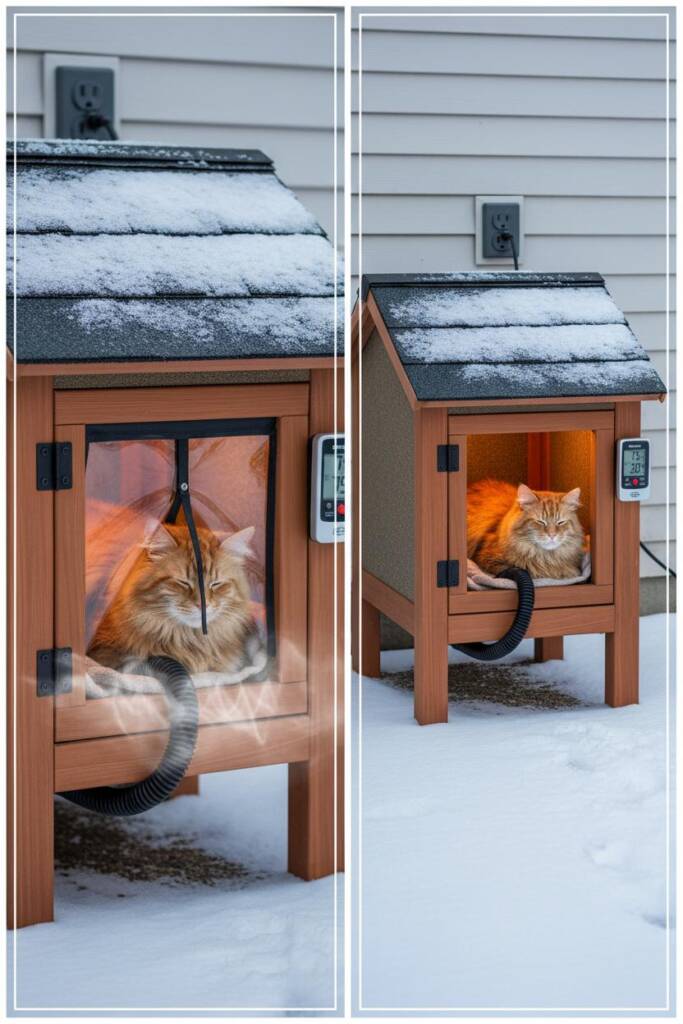
For those willing to invest in premium protection, a purpose-built heated cat house with thermostatically controlled heating provides the ultimate winter solution. These commercial shelters combine professional construction, quality insulation, and safe, low-wattage heating elements that maintain comfortable temperatures even during extreme cold snaps.
While significantly more expensive than DIY options, heated houses eliminate worry during dangerous weather and are particularly valuable for elderly cats, those with health issues, or in climates where temperatures regularly drop below 20°F. The peace of mind alone is worth the investment for many caretakers.
What You’ll Need:
- Insulated outdoor cat house (cedar, heavy-duty plastic, or composite material)
- Outdoor-rated heated pet pad (20-40 watts with thermostat)
- Outdoor-rated extension cord (if needed)
- GFCI-protected outdoor electrical outlet
- Straw bedding (yes, even with heating)
- Platform or elevation materials
- Vinyl door flap (if not included)
- Cable protector or conduit for cord safety
How to Build/Assemble:
- Step 1: Choose the Right Heated House: Not all heated cat houses are created equal. Look for thick insulation (at least 1 inch of foam), weatherproof construction using treated wood or waterproof plastic, an elevated floor or legs, removable roof for cleaning, entrance positioned to minimize heat loss, and appropriate sizing for cats rather than oversized dog houses. Popular quality brands include K&H Pet Products, Petmate, and Trixie—avoid ultra-cheap models that lack proper insulation or use unsafe heating elements.
- Step 2: Select the Proper Heating Pad: Safety is critical here. Use only outdoor-rated heated pads specifically designed for pets with low wattage (20-40 watts), built-in thermostats that activate around 40°F, MET or UL safety certification, chew-resistant cords with steel reinforcement, and appropriate pad sizing that covers one-third to half the floor space. Never use human heating pads or electric blankets—these lack proper temperature controls and create fire and burn risks.
- Step 3: Prepare the Electrical Setup: Your outdoor outlet must be GFCI-protected (those outlets with test and reset buttons). GFCI protection prevents electrocution if moisture contacts electrical components—if your outdoor outlets aren’t GFCI, hire an electrician to install one. Use only outdoor-rated extension cords kept as short as possible, run cords along walls or through conduit, and never run them across high-traffic areas or where they could be chewed.
- Step 4: Position and Elevate: Place your heated house against a building wall for wind protection and added insulation, under an overhang or eave for rain protection, away from areas where snow slides off roofs, and with the entrance facing away from prevailing winds. Elevate on built-in legs or place on a platform, pallet, or bricks for additional ground clearance.
- Step 5: Install the Heating Pad: Place the heated pad flat on the floor toward the back or center of the shelter. Route the power cord through the designated cord port or drill a small pass-through hole, then seal around the cord hole with weatherproof caulk to prevent drafts. Do not cover the pad with straw initially—cats need direct contact for warmth and will naturally lie on the pad.
- Step 6: Add Strategic Bedding: Add 2-3 inches of straw around (not on top of) the heating pad to create a nest arrangement with the pad accessible at the bottom. Cats will arrange straw to their preference and can choose between direct pad heat or insulated straw depending on temperature.
- Step 7: Install Door Flap: Cut vinyl, rubber, or heavy canvas to fit over the entrance with 1-2 inch overlap and attach along the top edge only using small nails, staples, or adhesive. The flap should be heavy enough to stay closed but light enough for cats to push through easily—this is crucial for heat retention.
- Step 8: Protect the Power Cord: Run the cord through protective conduit or cable covers and secure with cable clips along walls. Check regularly for chewing, damage, or wear, and replace immediately if compromised as damaged cords are fire hazards.
- Step 9: Test and Monitor: Plug in and test that the pad functions, though most thermostatic pads won’t activate until temperatures drop below 40°F. Check daily during the first week to ensure the pad heats properly when cold, no moisture accumulates inside, cats are using the shelter, the cord remains secure and undamaged, and the GFCI outlet hasn’t tripped.
- Step 10: Establish Maintenance Routine: Check daily during extreme cold to ensure heating element functions, inspect cord weekly for damage, replace straw monthly or when soiled, clean the house thoroughly at the end of each season, test the heating pad before each winter season, and unplug and store the pad during warm months to extend its lifespan.
Pro Tips:
- Place a “CAUTION: ELECTRIC HEATING” sign near the shelter to alert others
- Keep manufacturer instructions and warranty info accessible
- Consider a timer that only powers the pad during coldest hours (midnight-8am) to save electricity
- Some heated pads have dual thermostats—use the lower setting unless temperatures drop below 10°F
- For multi-cat colonies, one heated house per 2-3 cats prevents crowding and fighting
- Cedar houses naturally repel fleas and other pests better than plastic
- Keep a backup non-heated shelter available in case of power outages
Energy Costs: A 40-watt heated pad running 24/7 for 30 days uses approximately 29 kWh. At an average electricity rate of $0.13/kWh, this costs about $3.75 per month. However, thermostatic pads only heat when needed, typically reducing costs by 50-70%. Expect $1.50-$2.50 per month in added electricity costs per heated shelter during winter months.
Why This Works: Heated houses eliminate the biggest variable in DIY shelters — how effective they are during extreme cold. A thermostatically controlled pad maintains safe temperatures (around 70-80°F on the pad surface) without overheating or wasting energy. For cats with health issues, advanced age, or those recovering from illness or injury, this consistent warmth can be lifesaving.
The professional construction also means these shelters last 5-10+ years with basic maintenance, ultimately providing better value than building and replacing multiple DIY shelters. Most importantly, heated houses work in conditions where even the best-insulated DIY shelters struggle—during extended deep freezes, ice storms, or when cats are wet from snow or rain.
12. Multi-Cat Colony Shelter (Large Scale)
Cost: $50-100 | Build Time: 4-6 hours | Difficulty: Advanced
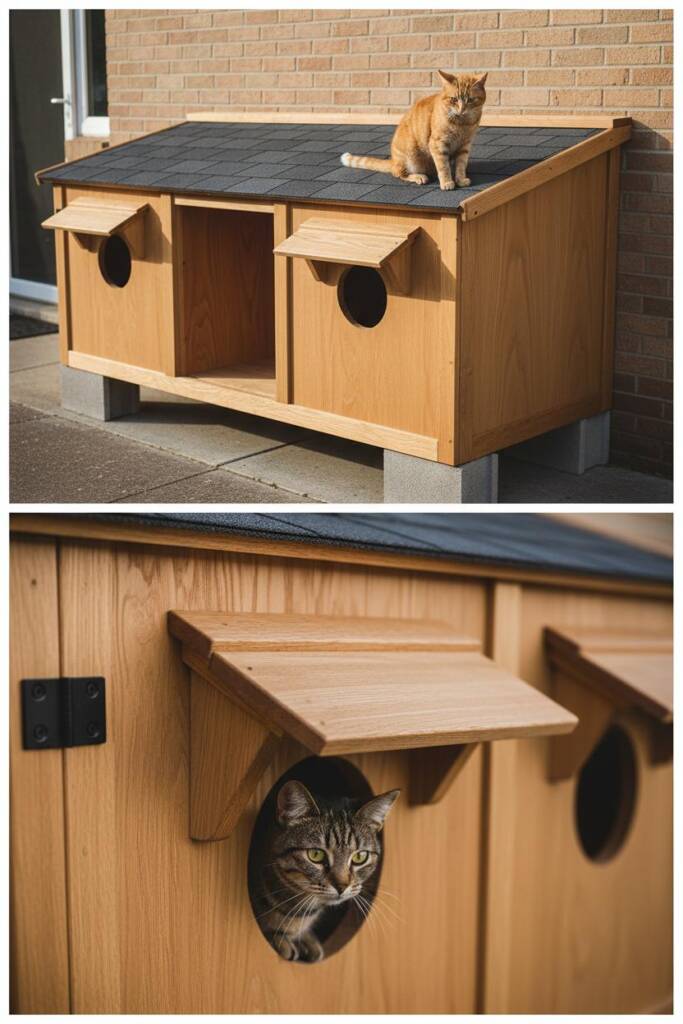
If you’re caring for a colony of 3-6+ cats, building one larger shelter with multiple compartments is more efficient, cost-effective, and cat-friendly than scattering many small individual shelters. Colony shelters create a communal space while still offering individual “rooms” that reduce stress and territorial conflicts among cats with different temperaments and social hierarchies.
This is the most ambitious project in this guide, but for dedicated colony caretakers, it’s an investment that pays dividends in cat safety, reduced maintenance, and better space utilization. One well-built colony shelter can replace 4-6 individual shelters while being easier to monitor and maintain.
What You’ll Need:
- Lumber: 2×4s for frame, ¾” plywood for walls/floor/roof
- Saw (circular or miter saw)
- Drill and assorted screws (3″ exterior-grade)
- Foam board insulation (2″ thick sheets)
- Roofing shingles, metal sheeting, or heavy-duty tarp
- Construction adhesive
- Exterior wood stain or paint
- Caulk/weatherproofing sealant
- Heavy-duty stapler or roofing nails
- Hinges for access doors
- Straw bedding
- Cinder blocks or pressure-treated 4×4s for elevation
How to Build:
Step 1: Design Your Colony Layout Sketch your design before cutting any wood. A standard colony shelter houses 3-4 cats comfortably in a structure approximately 4 feet wide × 3 feet deep × 2 feet tall. Interior compartments should each be roughly 20″×20″—cozy enough to retain individual cat’s body heat. Create divider walls between compartments to give each cat a semi-private space.
Critical design elements:
- Each compartment gets its own entrance (reduces conflicts at entry points)
- Entrances face different directions when possible (allows subordinate cats escape routes)
- Central dividing walls provide insulation and privacy
- Roof has access panels or hinges for each compartment for cleaning
- Entire structure is elevated on a platform for drainage and ground moisture protection
Step 2: Build the Platform Base Create an elevated platform using cinder blocks and pressure-treated lumber, or build a frame from 2×4s and plywood. The platform should be 6-8 inches off the ground minimum, measure slightly larger than your planned shelter footprint (for overhang), and have proper drainage if using solid plywood (drill drainage holes).
This platform is the foundation—take time to make it level, stable, and sturdy enough to support the entire structure plus the weight of multiple cats and snow load.
Step 3: Construct the Floor Cut ¾” plywood to your shelter dimensions (example: 48″×36″). Attach insulation board to the underside using construction adhesive and staples—this prevents ground cold from conducting up through the floor. Place the insulated floor on top of your platform base and secure with screws through the platform into the floor.
Step 4: Frame the Walls Build a 2×4 frame for the perimeter walls and interior divider walls. For a three-compartment design, you’ll create:
- Four corner posts (24″ tall)
- Two interior divider walls running front-to-back
- Horizontal top and bottom plates connecting everything
Cut entrance holes in the frame before attaching plywood—mark locations so each compartment has its own 6″ diameter entrance, positioned on different walls when possible to minimize competition and conflict.
Step 5: Add Wall Insulation and Exterior Before covering the frame with exterior plywood, fill the wall cavities with foam board insulation. Cut pieces to fit snugly between the 2×4 studs and secure with construction adhesive. Then attach ¾” plywood exterior walls over the frame and insulation, screwing through the plywood into the 2×4 frame every 8-12 inches. Make sure entrance holes in the plywood align with your frame cutouts.
Step 6: Create Interior Dividers Build dividing walls inside the shelter using ¾” plywood. These walls separate the large interior into 3-4 individual compartments. Each compartment should be roughly 18-24″ square—large enough for a cat to comfortably turn around and stretch, but small enough to retain body heat effectively.
The divider walls don’t need to extend all the way to the roof—leaving 2-3 inches of gap at the top provides air circulation while still creating visual barriers and privacy for the cats.
Step 7: Build the Roof Construct a slanted roof (not flat) using plywood and 2×4 supports. The slant should run from front to back with at least a 15-degree angle so water and snow shed properly. Cut the roof panels 2-3 inches larger than the shelter walls to create an overhang that protects the walls and entrances from rain.
For cleaning access, either hinge the entire roof or create removable roof panels above each compartment. Attach hinges along one long edge using exterior-grade screws. Install a simple latch or hook-and-eye closure to keep the roof secured during storms.
Step 8: Insulate and Weatherproof Roof Attach foam insulation board to the underside of the roof plywood using construction adhesive and staples. Then cover the exterior roof surface with roofing felt/tar paper as a base layer. Top this with shingles, metal roofing panels, or heavy-duty rubberized roofing material. Secure using roofing nails or screws with rubber washers.
Extend the roofing material slightly beyond the plywood overhang to ensure water drips away from the structure rather than running back under the eaves.
Step 9: Seal and Paint Use exterior-grade caulk to seal every seam, joint, and gap in the structure. Pay special attention to:
- Where walls meet the floor
- Corner joints between walls
- Around entrance holes
- Where the roof meets the walls
- Any screw or nail holes
Apply 2-3 coats of exterior wood stain or paint to protect the wood from moisture, UV damage, and rot. Choose earth-tone colors that help the shelter blend into your landscape.
Step 10: Add Entrance Overhangs Create small “awnings” over each entrance using scrap wood or additional plywood pieces angled to shed rain away from the openings. These miniature roof extensions (6-8 inches deep) keep rain from blowing directly into entrances and help retain heat.
Step 11: Fill with Bedding Add 4-6 inches of fresh straw bedding to each compartment. Don’t skimp—in a larger shelter with more air volume, generous bedding is essential for warmth. Cats will arrange and compress the straw to create their preferred sleeping spots.
Step 12: Create a Feeding Station If space allows, extend the roof overhang on one side to create a covered feeding area adjacent to the shelter. This keeps food dry and creates a “front porch” where cats can eat without having to venture into open, exposed areas. Mount a simple shelf or platform under this extended roof for food and water bowls.
Pro Tips:
- Install small solar-powered motion lights near entrances so cats can navigate safely at night
- Create “escape hatches”—second smaller exits in back walls that allow cats to flee if threatened
- Number or name each compartment and keep records of which cats prefer which spaces
- For very large colonies (8+ cats), build two separate shelters rather than one massive structure
- Add ventilation near the roof peak—small gable vents prevent moisture buildup
- Consider building modular sections that can be expanded if your colony grows
- Place the shelter in a fenced area or against a building where possible for added security
- In areas with harsh winters, position the entrance side against a building wall for wind protection
Maintenance Schedule:
- Weekly: Check for damage, ensure entrances are clear, verify structure integrity
- Monthly: Change straw bedding in all compartments, inspect for moisture or pest issues
- Seasonally: Thoroughly clean all compartments, check roof for leaks, touch up paint/stain
- Annually: Reapply weatherproofing caulk, reinforce any loose joints, assess structural condition
Why This Works: Colony shelters address the unique challenges of caring for multiple cats with different social dynamics. By providing separate but adjacent spaces, you accommodate cats who tolerate proximity but not direct contact. The multiple entrances prevent dominant cats from “guarding” the shelter and blocking subordinate cats from using it—a common problem with single-entrance designs.
From a practical standpoint, one large shelter is easier to maintain than several small ones. You make one trip to change bedding instead of visiting multiple locations. You monitor one structure instead of tracking the condition of half a dozen scattered shelters. The initial investment of time and money is higher, but the long-term efficiency and effectiveness make colony shelters the professional choice for serious feral cat caretakers.
Temperature testing shows that insulated multi-compartment shelters maintain interior temperatures 15-20°F warmer than outside air, even without heat
Getting Started: Your Action Plan
Feeling overwhelmed? Start here:
- This Weekend: Build one basic storage bin shelter (Shelter #1). Total time: 30-45 minutes. Total cost: $15-25. Place it near where you see cats regularly. Success breeds motivation.
- Next Weekend: If cats are using your first shelter, build 1-2 more. Experiment with different designs from this guide. Learn what works best for your climate and cat population.
- This Month: Establish a maintenance routine. Check shelters during your regular feeding times. Make notes about what’s working and what needs adjustment.
- This Season: Expand your efforts. Build more sophisticated shelters. Connect with local cat advocates. Share your knowledge with neighbors who are also feeding cats.
- This Year: You’ll have created a network of safe havens that will serve cats for years to come. You’ll have prevented suffering you’ll never fully see, but that exists nonetheless.
Essential Supplies: Your Cat Shelter Building Shopping List
Whether you’re building your first storage bin shelter or tackling a more ambitious project, these core supplies will get you started. Each item is versatile enough to work across multiple shelter designs in this guide.
1. Heavy-Duty Storage Bins (18-27 Gallon)
The foundation of the most popular and effective budget shelter design. Choose opaque bins in neutral colors (gray or tan) with secure-fitting lids. You’ll want at least two sizes that nest together for the superior double-wall insulated design. These bins are waterproof, durable, widely available, and require almost no tools to transform into lifesaving shelters. A pair of bins can create a shelter that lasts multiple winters for under $25.
Why you need it: The easiest, fastest, most beginner-friendly shelter option that actually works in harsh weather.
2. Straw Bales (Not Hay)
This is non-negotiable—the single most important supply for any cat shelter. Straw (the yellow, hollow stalks) provides insulation, repels moisture, and keeps cats warm and dry. One bale costs $5-15 and provides enough bedding for 4-6 shelters with plenty left for monthly replacements. Never substitute with hay (retains moisture and molds), blankets (absorb moisture and freeze), or towels. Straw is what keeps cats alive in freezing temperatures.
Why you need it: The difference between a shelter that works and one that fails—proper insulation and bedding in one affordable material.
3. Foam Board Insulation Panels (1-2 Inch Thick)
Rigid foam insulation dramatically improves any shelter’s heat retention. These lightweight panels are easy to cut with a utility knife, fit into storage bin gaps, line wooden shelter walls, or create custom insulated barriers. A single 4×8 foot sheet costs $15-25 and provides enough insulation for multiple shelters. Look for foil-faced or moisture-resistant varieties for best outdoor performance.
Why you need it: Transforms basic shelters into winter-proof havens by trapping cats’ body heat and blocking cold from penetrating walls.
4. Heavy-Duty Waterproof Tarp (10×12 feet minimum)
Protection from rain and snow is essential for shelter longevity. Tarps cover wooden structures, wrap cardboard emergency shelters, create roof protection for pallet builds, and provide weatherproofing for virtually any design. Choose thick, reinforced tarps with grommets for easy securing. One large tarp can protect 2-3 shelters or be cut to size for multiple projects.
Why you need it: Keeps moisture out, extends shelter life by years, and provides emergency weatherproofing when you need it most.
5. Outdoor-Rated Heated Pet Pad with Thermostat (20-40 Watts)
For those investing in premium protection, a quality heated pad is the single upgrade that makes the biggest difference during extreme cold. Look for outdoor-rated models with automatic thermostats (activates around 40°F), chew-proof cords, and safety certifications (MET or UL listed). Brands like K&H Pet Products are trusted by feral cat caretakers nationwide. One pad costs $30-50 but can be the difference between survival and hypothermia during brutal cold snaps.
Why you need it: Provides reliable, safe warmth during extreme weather when even the best insulation isn’t enough—especially critical for elderly or ill cats.
6. Outdoor Vinyl or Rubber Door Flap Material
Heat retention depends on blocking drafts at the entrance. Heavy vinyl floor mats, rubber placemats, or purpose-made pet door flaps create flexible barriers that cats can push through but that stay closed against wind. One flap costs $5-15 and can be cut to fit any entrance size. This simple addition can increase interior shelter temperature by 10-15 degrees by preventing heat from escaping.
Why you need it: The finishing touch that transforms a drafty box into a cozy den—blocks wind while remaining cat-accessible.
Final Thoughts: Small Actions, Enormous Impact
Building cat shelters isn’t glamorous work. It won’t trend on social media. You won’t get awards or recognition. The cats themselves will likely remain wary and distant.
But here’s what you will get: the quiet knowledge that you saw a problem and chose action over indifference. That when winter arrived with its icy grip, the cats in your neighborhood had options because of something you built with your own hands.
In a world that often feels too large and too complicated to change, cat shelters are beautifully simple. They’re tangible proof that individual action matters. That compassion doesn’t require grand gestures. That a few hours and a few dollars, applied thoughtfully, can mean everything to a creature who has so little.
So grab that storage bin. Cut that entrance hole. Fill it with straw. Place it where cats can find it. And know that somewhere, on a cold night you’ll never witness, a cat will curl up in the warmth and safety you created—and survive because you cared enough to try.
That’s not just building a shelter. That’s building a more compassionate world, one cat at a time.
At Sweet Purrfections, we celebrate the quiet heroes, the people who see an animal in need and refuse to look away. Whether you’re feeding strays in your neighborhood, fostering kittens, or building shelters in your backyard, you’re part of a community that believes love is an action, not just a feeling.
We’re honored to stand alongside pet parents and animal advocates who go the extra mile, create solutions from scratch, and prove every single day that kindness changes lives. Here’s to you, the builders, the feeders, the caretakers—the ones who make the world warmer, one whisker at a time. 🐾