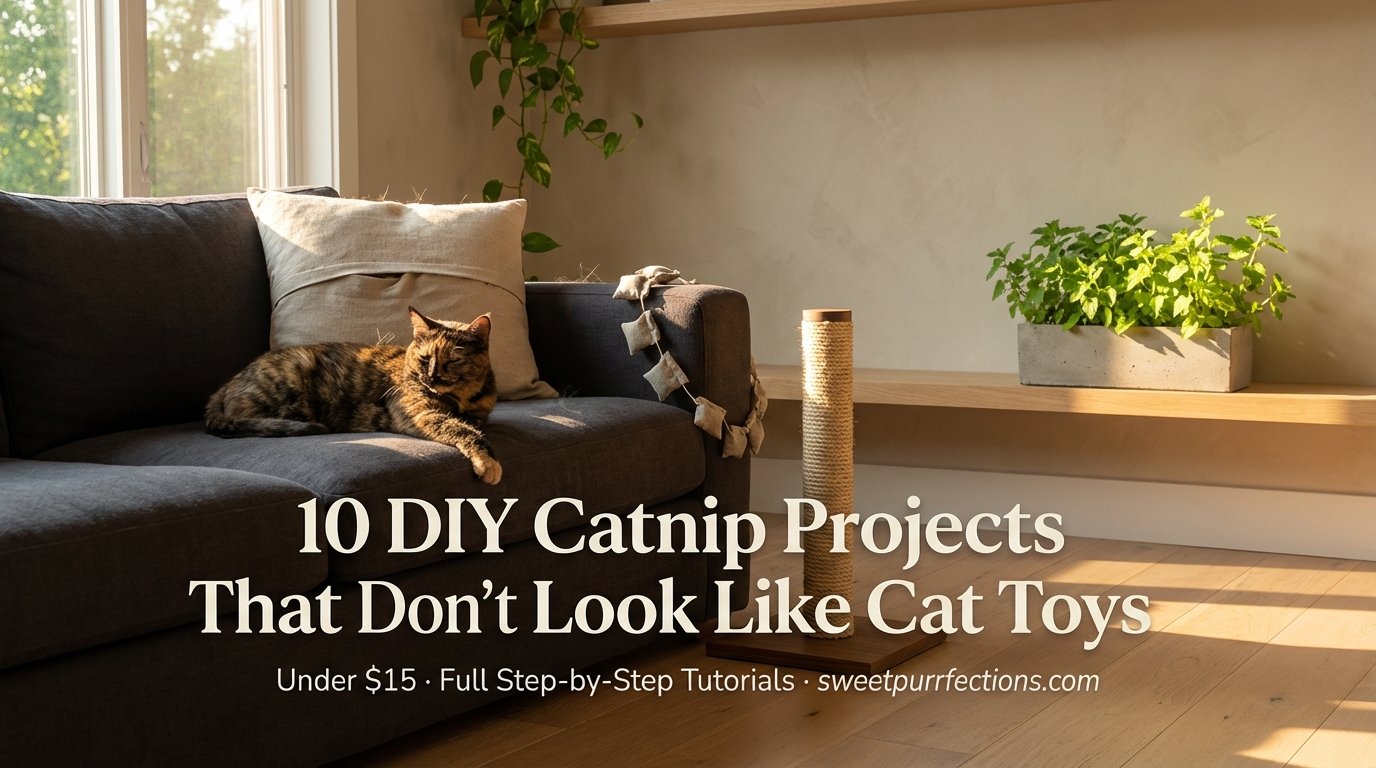
The DIY Catnip Projects That Finally Pull Double Duty
A simple cat toy stuffed with catnip costs about two dollars and lasts about two days before it’s a sad, flattened thing collecting dust bunnies under your couch — but the same herb, used more creatively, can become wall art, planters, pillows, and sculptural pieces that look like they belong in a design-forward home. These ten projects take catnip out of the basic muslin pouch and put it to work across your entire living space, using materials like raw concrete, vintage linen, sisal rope, and macramé cord that you’d find in any boho or minimalist interior.
Every idea on this list comes with a full step-by-step DIY breakdown, so you’re not just pinning a pretty photo and guessing at measurements. We’re talking specific supplies, techniques for sealing catnip inside decorative pieces so the scent lasts for weeks, and honest notes on which projects hold up to aggressive chewers versus gentle sniffers. Most of these clock in under fifteen dollars and a Saturday afternoon.
Whether you’re working with a tiny apartment windowsill or an entire craft room, there’s something here that pulls double duty — genuinely useful or beautiful for your space, genuinely irresistible for your cat. Let’s get into it.
1. The Catnip Sachet Garland That Doubles as Boho Wall Decor
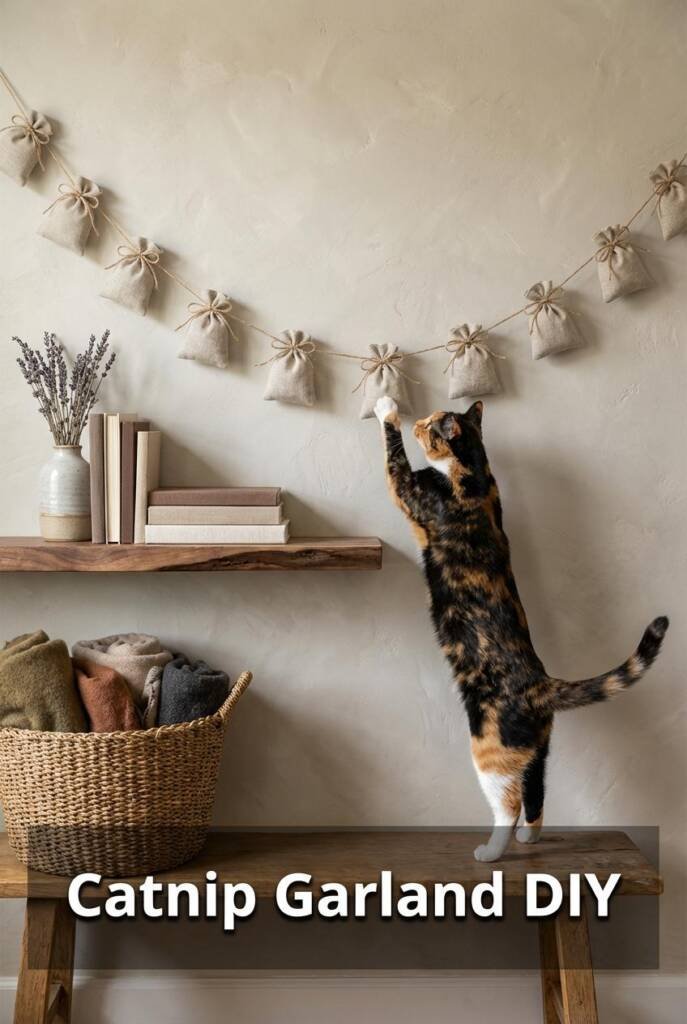
Finally, a DIY catnip sachet project that earns a spot on your wall instead of getting kicked under the couch.
String a row of catnip-stuffed linen sachets along a length of jute twine, hang it at cat-reaching height, and you’ve got a garland that looks like it belongs in an Anthropologie catalog — except your cat will actually use it. The natural linen and earth-tone twine give it that effortless boho-meets-farmhouse vibe, and because each sachet is individually tied, your cat can bat, bunny-kick, and nose-bump them without pulling the whole thing down.
The magic here is airflow. Unlike a sealed cat toy, loose-weave linen lets catnip oils waft through the room, which means your cat picks up the scent from across the house. Use organic catnip like SmartyKat Organic Catnip ($4.49 on Chewy) for a potent fill — about a tablespoon per sachet keeps things plump without overstuffing. Hang the garland 2–3 feet off the ground so your cat can reach it during zoomies but it still reads as decor when guests walk in.
Swap the linen for muslin in different prints and you’ve got a seasonal rotation — florals for spring, warm plaids for fall — all for the cost of a fat quarter and fifteen minutes at the sewing machine.
How to Sew a Boho Catnip Sachet Garland for Under $12
- Cut and sew the sachets: Cut natural linen into 3″x6″ rectangles, fold each in half, and sew two sides shut with a ¼” seam allowance — a pack of linen fat quarters from Joann runs about $3.
- Fill with catnip and close: Spoon 1 tablespoon of dried catnip into each pouch, then whip-stitch or hot-glue the open end shut.
- String onto jute twine: Cut 4–5 feet of jute twine ($2 at Dollar Tree) and tie each sachet on at 6-inch intervals, leaving loops at both ends for hanging.
- Hang at cat height: Mount two small adhesive hooks 2–3 feet off the ground and drape the garland between them with a slight swag.
- Budget move: Six sachets on a single garland costs roughly $9–$11 total, and replacing just the catnip refill every few months runs under $5.
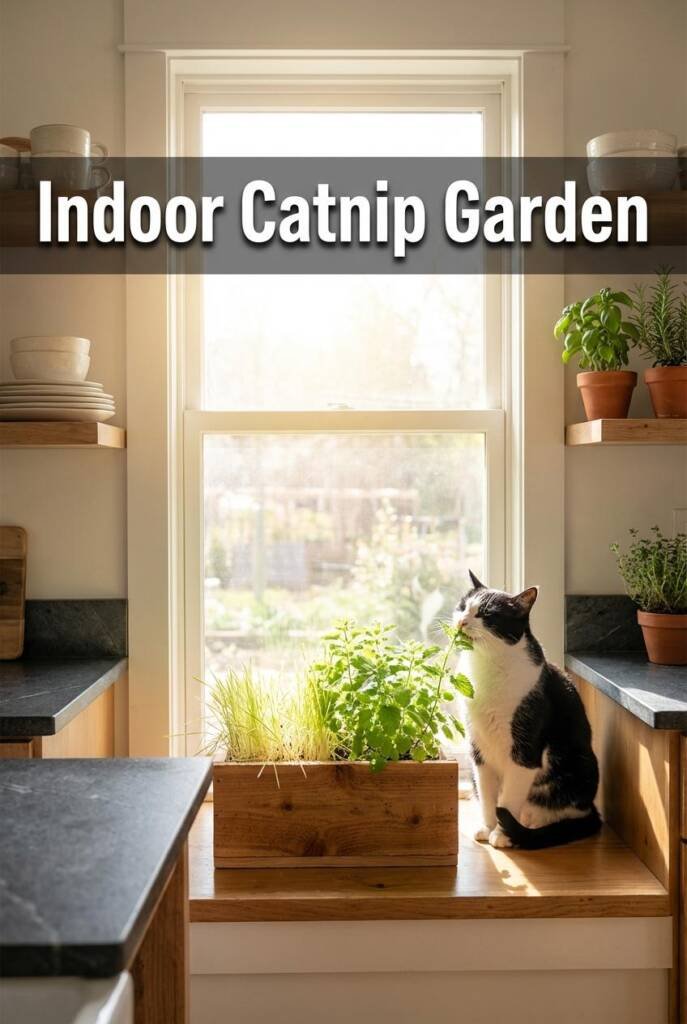
2. A Concrete Catnip Planter Your Cat Can Graze From
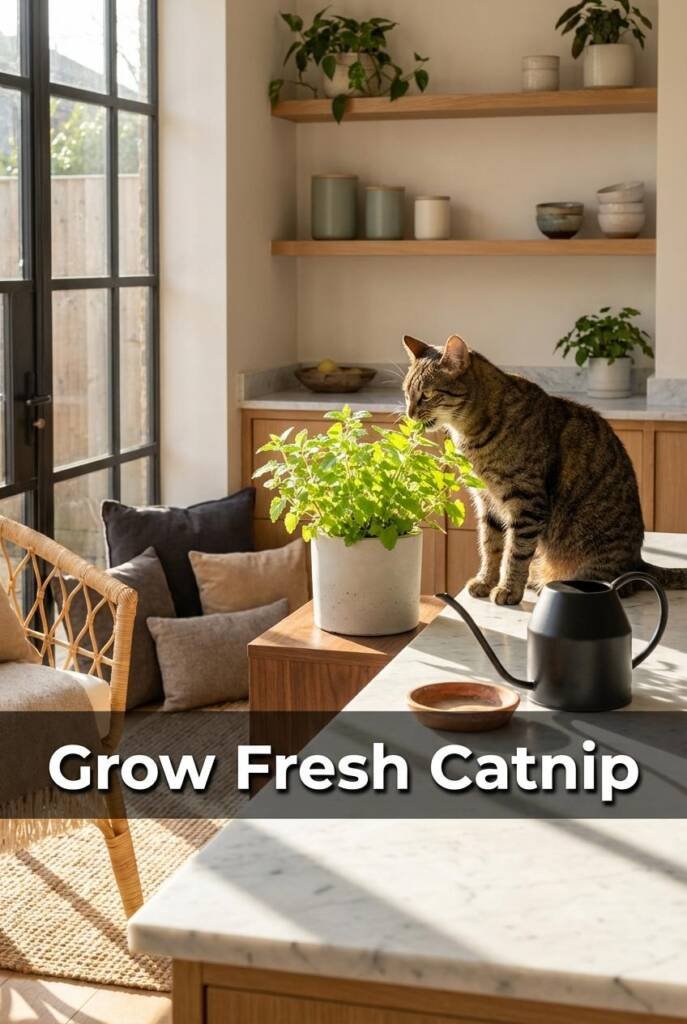
Pour a modern concrete planter using a Quikrete mold, grow organic catnip, and let your cat self-serve fresh greens from a piece that looks gallery-worthy.
The words “cat planter” usually conjure a ceramic fish shape from TJ Maxx — this is not that. A hand-poured concrete planter has the kind of raw, minimalist weight that looks at home on a windowsill next to your monstera, and when it’s growing a lush mound of fresh catnip, it reads as an intentional herb display until your cat comes barreling across the room to bury their face in it.
Fresh catnip hits differently than dried. The volatile oils in living leaves are significantly more potent, which means even cats who shrug at packaged catnip toys will go full chaos mode over a live plant. Concrete is the ideal vessel because it’s heavy enough that your cat can’t tip it over during an enthusiastic face-rub session, and the neutral tone works in literally every interior. Use a Quikrete Countertop Mix ($8.99 at Home Depot) for a smooth, dense finish that doesn’t need sealing. A cardboard box nested inside a larger cardboard box makes a perfect free mold — pour between the two, let it cure 48 hours, and you’ve got a planter with clean modern lines.
Start your catnip from a starter plant rather than seeds if you want something your cat can interact with immediately — a 4-inch pot from a local nursery runs about $3-4 and transplants easily. Within two weeks of settling in, you’ll have a full, bushy plant your cat will visit like it’s their personal snack bar.
How to Pour a Concrete Catnip Planter for Under $15
- Make your mold: Find two cardboard boxes where one fits inside the other with about 1.5 inches of space on all sides. Hot-glue the inner box in place, weigh it down with rocks, and coat the inside surfaces lightly with cooking spray so the concrete releases cleanly.
- Mix and pour: Mix Quikrete Countertop Mix to a thick peanut-butter consistency and pour it into the gap between the boxes to about 4 inches tall. Tap the sides firmly to release air bubbles, then let it cure undisturbed for 48 hours.
- Demolish the mold and finish: Tear away the cardboard, sand any rough edges with 80-grit sandpaper, and drill two drainage holes in the base using a masonry bit. Wipe with a damp cloth and let it dry completely another 24 hours before planting.
- Plant and position: Add a layer of gravel for drainage, fill with organic potting mix, and transplant your catnip starter. Set it on a sunny windowsill your cat already frequents — they’ll find it within the hour.
- Budget move: The Quikrete mix makes enough for three or four planters, so your per-planter cost drops to around $5 once you’ve got the bag — gift the extras to fellow cat owners with a starter plant tucked inside.
3. The Catnip-Infused Sisal Scratching Post That Looks Like Sculpture
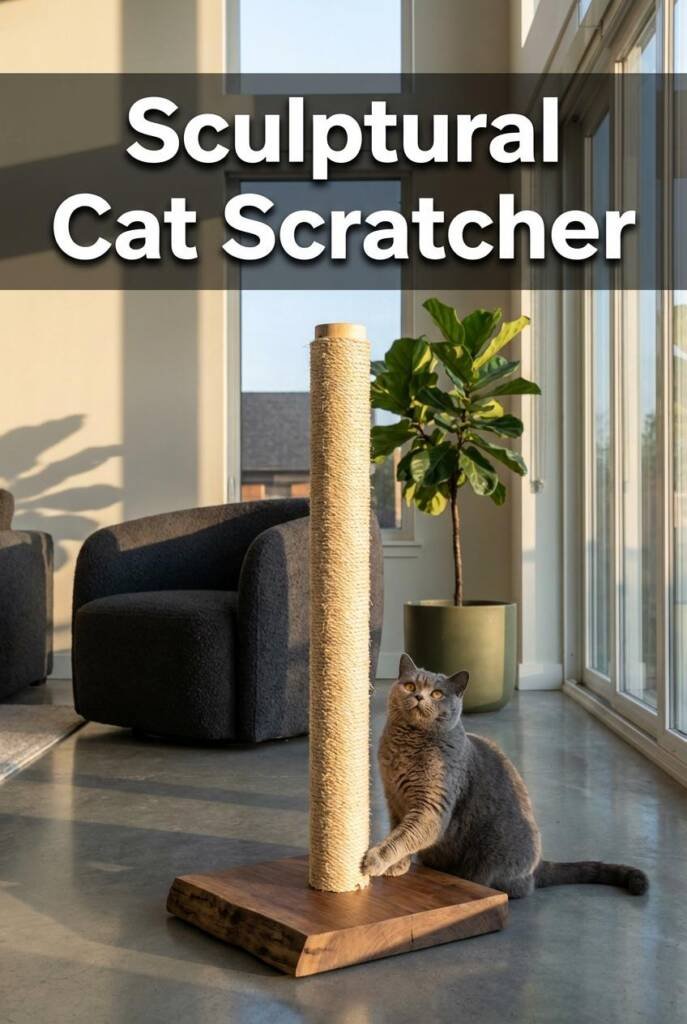
Your cat’s scratching post shouldn’t be the thing you shove behind the couch when company comes over.
A birch dowel wrapped in catnip-soaked sisal, mounted on a walnut base — this scratching post looks like something from a mid-century design catalog, not a pet store. The clean vertical line and warm wood tones make it a genuine accent piece, the kind of thing guests notice before they realize it’s for your cat.
Cats are drawn to vertical scratching surfaces, and sisal rope gives them exactly the resistance their claws crave. Soak your rope in a catnip oil solution before wrapping and you’ve built in a magnet they can’t ignore. We love SmartyKat Organic Catnip Oil Spray ($6.99 on Amazon) for this — a few spritzes reactivate the scent for months. Use a 24-inch birch dowel (1.5″ diameter) for the ideal height-to-stability ratio, and attach it to a walnut board with a heavy-duty flange mount so the whole thing stays planted when your cat goes full stretch on it.
How to Build a Sculptural Catnip Scratching Post for $25
- Prep the base: Cut a walnut board to 10″×10″×¾” and sand it to 220 grit. Attach a 1.5″ iron floor flange dead center using four #10 wood screws.
- Soak the sisal: Submerge 100 feet of ¼” sisal rope in warm water mixed with 15-20 drops of catnip essential oil for 2 hours, then let it dry completely overnight.
- Wrap the dowel: Thread the 24″ birch dowel into the flange, then hot-glue the rope end at the base and wrap tightly upward, adding a dab of glue every 8-10 rows to keep it locked.
- Finish and seal: Tuck the top rope end under itself with a dab of wood glue, then apply one coat of food-safe mineral oil to the exposed walnut base for a rich, gallery-worthy finish.
- Budget move: Swap walnut for a $3 poplar board stained with Minwax Dark Walnut and you’ll cut your total cost to around $18.
4. Catnip Kicker Toys Sewn From Vintage Fabric Scraps
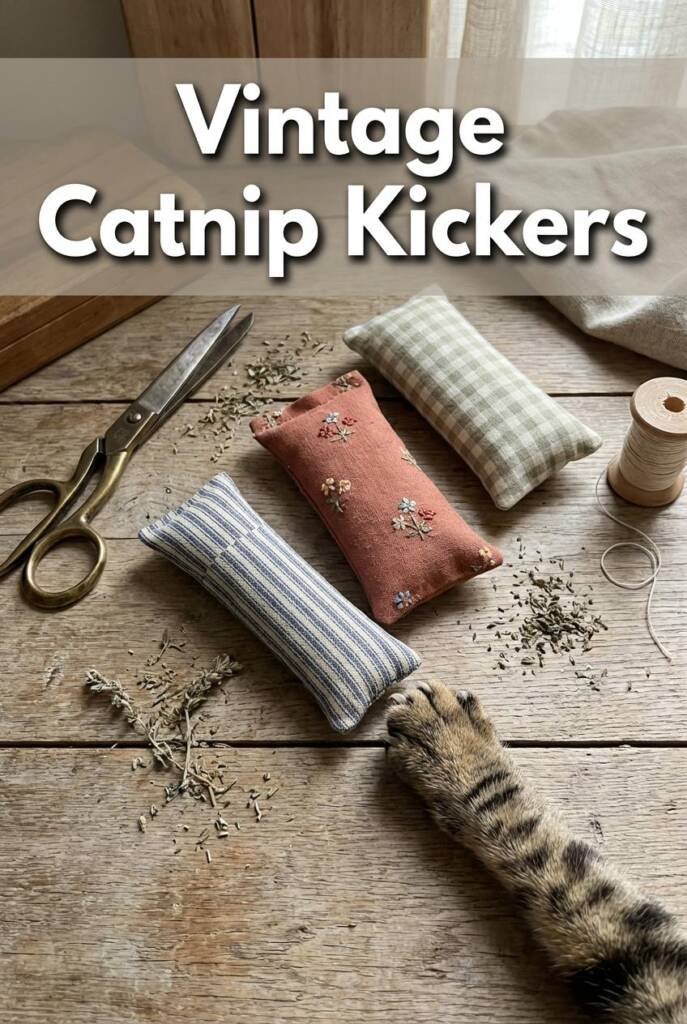
That pile of fabric scraps you feel guilty about throwing away? Your cat would like a word.
Catnip kicker toys are those long, pillow-shaped toys cats grab with their front paws and absolutely demolish with their back legs — and they’re ridiculously easy to sew from fabric you already own. Cut up a retired flannel shirt, a thrift-store curtain panel, or that stack of quilting scraps you’ve been hoarding since 2019. The mismatched vintage prints give each kicker a one-of-a-kind look that’s honestly more charming than anything mass-produced.
Cats go feral for kickers because the elongated shape mimics prey they can wrestle. Stuff yours with a blend of polyfill and potent loose catnip — we love SmartyKat Organic Catnip ($4.49 for 1 oz, enough for 6+ kickers). The ideal size is roughly 4″ wide by 12″ long, big enough for full bunny-kick engagement without being unwieldy. A simple straight stitch on a machine takes five minutes, or you can hand-sew with a backstitch if you’re working on the couch.
Bonus: these make killer gifts for cat-owning friends. Tie three together with twine and a sprig of dried lavender, and you’ve got a handmade present that looks like it came from an Etsy shop charging $18 a pop.
How to Sew Vintage-Fabric Catnip Kicker Toys for Under $3 Each
- Cut your fabric: Cut two rectangles of fabric at 5″ × 13″ — this gives you a half-inch seam allowance for a finished 4″ × 12″ kicker.
- Sew and flip: Pin right sides together and sew around three sides plus half of the fourth, leaving a 3″ opening. Flip right-side out through the gap.
- Stuff with catnip and fill: Layer polyfill and 1-2 tablespoons of SmartyKat Organic Catnip, alternating so the catnip distributes evenly throughout the toy.
- Close it up: Fold the raw edges inward and whip-stitch or ladder-stitch the opening closed — takes about 90 seconds by hand.
- Budget move: Thrift-store fabric remnants run $1-$2 per bag at Goodwill, making each finished kicker cost well under $3 even with store-bought catnip.
5. A Catnip-Scented Linen Throw Pillow Your Cat Will Claim Immediately
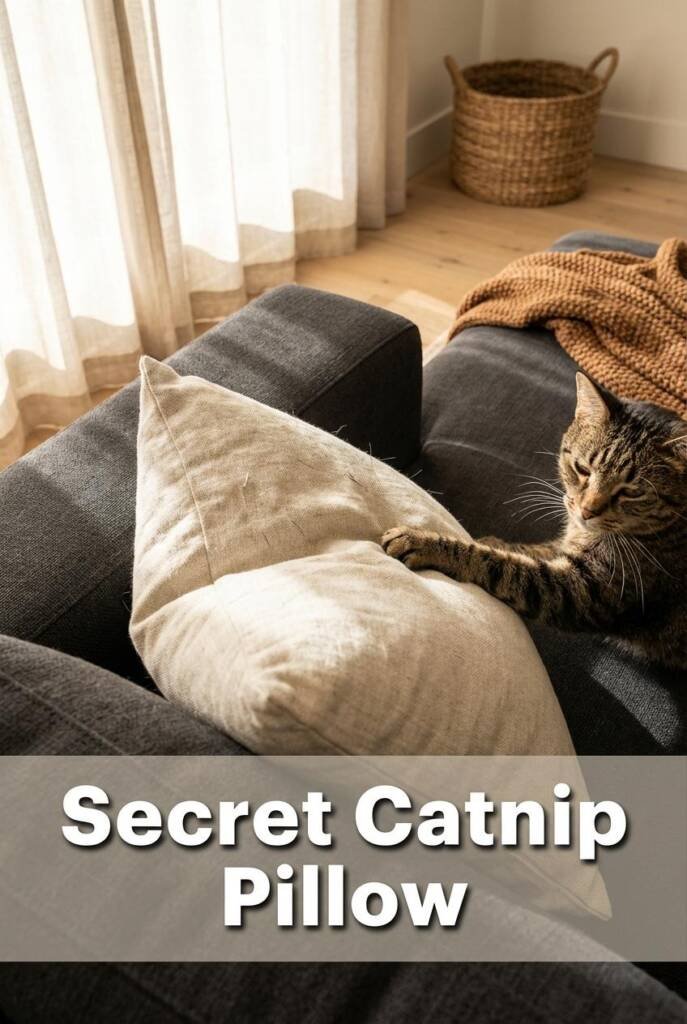
A throw pillow with a secret catnip compartment — your cat will pick this over every bed you’ve ever bought them.
This is the project that makes non-cat-people say “wait, that’s for the cat?” You’re sewing a simple 18×18″ linen throw pillow with one secret upgrade: a hidden internal pocket that holds a muslin sachet of dried catnip. From the outside, it’s a beautiful, textured linen pillow that belongs on your sofa. From your cat’s perspective, it’s the best thing in the house. The sachet slides in and out through a discreet opening in the inner seam, so you refresh the catnip whenever potency fades — no washing, no disassembly.
Cats respond to this one hard because linen breathes, letting the nepetalactone scent pass through the weave naturally. It’s subtle enough that your cat gravitates toward the pillow without going full destroy-mode the way they might with a concentrated catnip toy. For the outer cover, grab a half-yard of medium-weight linen from JOANN ($8.99/yard for their house brand) — oatmeal and flax tones hide fur like a dream. Fill your sachet with about two tablespoons of organic catnip from our Sweet Purrfections catnip collection, which stays potent significantly longer than grocery-store brands.
The removable sachet design also means you can skip the catnip entirely when guests come over and your cat’s suddenly performing WWE moves on the couch cushions.
How to Make a Catnip-Pocket Linen Throw Pillow for $15
- Cut & Sew the Outer Cover: Cut two 19×19″ linen panels (allows for ½” seam allowance) and sew three sides plus a zipper or envelope closure on the fourth for easy washing.
- Create the Inner Sachet Pocket: Sew a 4×4″ muslin pocket to the inside center of the back panel, leaving the top open — this is where your catnip sachet slides in and out.
- Make the Catnip Sachet: Fill a 3×3″ muslin drawstring bag with 2 tablespoons of dried catnip, tie it closed, and tuck it into the pocket.
- Stuff & Finish: Insert an 18×18″ pillow form ($4.99 at IKEA), close the cover, and place it where your cat already likes to lounge — they’ll claim it within minutes.
- Budget move: Use a thrifted linen shirt ($2-3) instead of buying yardage and you can finish this entire project for under $10.
6. Hanging Macramé Catnip Toy Your Cat Will Leap For
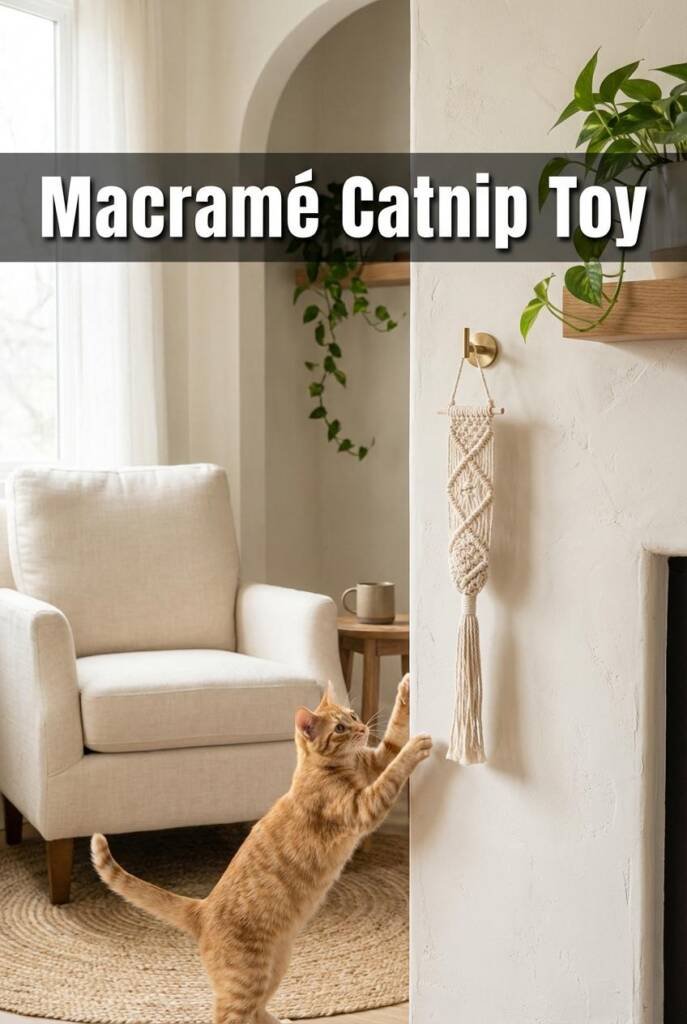
Your cat doesn’t need another floor toy — they need something worth jumping for.
A macramé catnip toy hanging from a shelf bracket or doorframe gives your cat vertical enrichment that doubles as boho decor. The dangling tassel end swings unpredictably when batted, and because it’s mounted overhead, it encourages the leaping and stretching that indoor cats desperately need. You’ll use just two knots — the spiral knot and the square knot — so even total macramé beginners can pull this off.
Cats are hardwired to swat at things above them (thank their bird-hunting ancestors), which makes a hanging toy far more engaging than something sitting on the floor. Stuff the tassel end with Yeowww! organic catnip ($5.99 for a 1 oz tub) for the kind of potency that actually holds their attention. Mount it at a height where your cat needs a small jump to reach it — usually about 4–5 feet off the ground — so they get real exercise every time they play.
The beauty of this project is that you control the aesthetic. Natural jute gives you that earthy look, while dyed cotton cord in mustard or terracotta makes it a legitimate decor piece. Either way, it looks intentional hanging next to your plants — not like cat clutter.
How to Knot a Hanging Macramé Catnip Toy in 20 Minutes
- Cut and Prep Your Cord: Cut six 4-foot lengths of 4mm natural cotton macramé cord (Ganxxet brand, $8.99 per 100-yard spool). Fold them in half and loop them onto a 1-inch wooden ring using a lark’s head knot.
- Knot the Body: Alternate between square knots and spiral knots for about 12 inches — this creates the textured hanging section your cat will grab onto.
- Stuff and Form the Tassel: About 2 inches from the bottom, tie a tight gathering knot, stuff a tablespoon of Yeowww! catnip into the pocket above it, then let the remaining cord ends fan out into a 4-inch tassel.
- Mount It: Loop the wooden ring over a Command hook ($4.99 for a 2-pack) on a shelf edge or doorframe, positioning the tassel about 4–5 feet from the floor so your cat has to leap for it.
- Budget move: The whole project runs under $6 if you already own a spool of macramé cord, since the catnip and Command hook total about $5.50 combined.
7. Catnip-Infused Felt Ball Garland for the Bookshelf
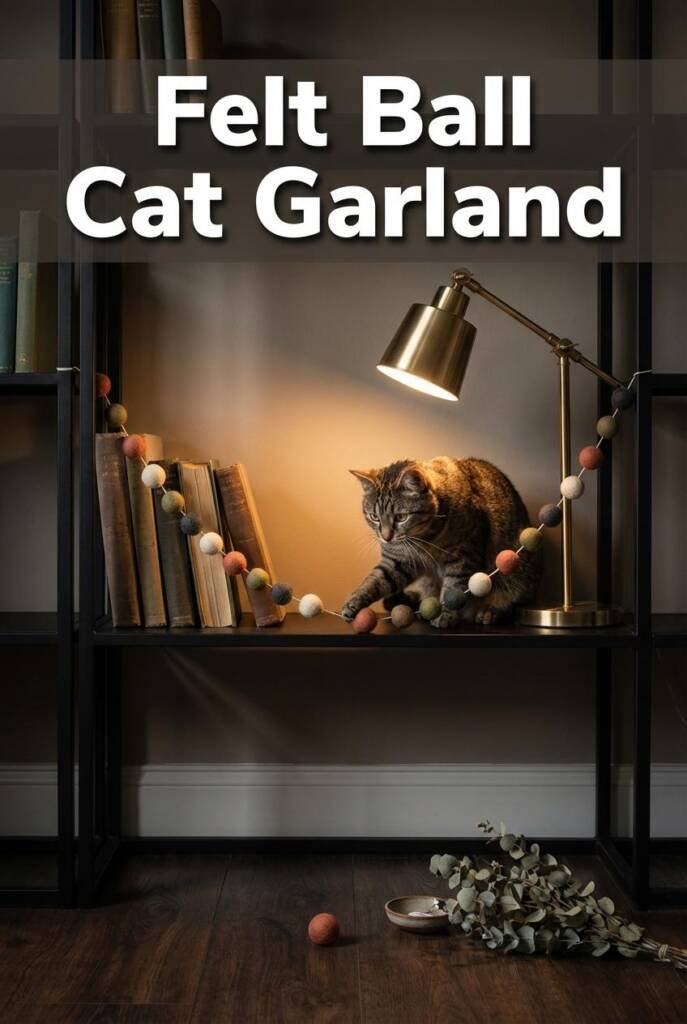
Your bookshelf is already your cat’s favorite perch — now give it a reason to stay and play.
Needle-felted wool balls infused with catnip oil, strung on jute twine across your bookshelf — it reads as boho decor, but your cat knows it’s a playground. The dangling balls invite batting and bunting while the natural wool fibers hold catnip essential oil for weeks, slowly releasing scent every time a paw makes contact. Style them in muted earth tones or dyed jewel tones to match your shelf vignette, and suddenly your IKEA Kallax looks intentional.
Wool is the ideal carrier here because the fibers are porous enough to absorb and slowly diffuse catnip oil without going rancid or breaking down. Pick up a bag of 2cm wool felt balls from Glaciart One on Amazon ($9.99 for 50 pieces) and a bottle of SmartyKat Catnip Essential Oil ($6.49). The felt balls are dense enough to withstand teeth and claws but light enough that a swipe sends them swinging — exactly the kind of unpredictable motion that triggers your cat’s hunting instinct.
Bonus: when the scent fades after a few weeks, just add two more drops of oil per ball and you’ve got a refreshed toy without making anything new.
How to Felt a Catnip Ball Garland for Your Shelves
- Infuse the Balls: Place 8-10 wool felt balls in a zip-lock bag with 15-20 drops of catnip essential oil. Seal and let them absorb for 24 hours, shaking occasionally.
- String the Garland: Cut a 4-foot length of natural jute twine and thread each ball on using a large tapestry needle, spacing them about 5 inches apart. Tie a knot on each side of every ball to keep it in place.
- Secure to the Shelf: Use small Command hooks ($3.99 for a pack of 8) on each end of the shelf to anchor the garland, letting it drape with a slight sag so the balls can swing freely when batted.
- Test the Height: Position the garland so the lowest ball hangs about 2 inches above where your cat can comfortably reach while standing on the shelf — just high enough to encourage a stretch and swat.
- Budget move: The whole garland costs under $10 if you already have twine, since 50 felt balls and one bottle of catnip oil together run about $16 and you’ll have supplies left for five more garlands.
8. A Window Box Catnip Garden That Brings the Outdoors In
Your cat already owns that windowsill — now give them a reason to never leave it.
An interior-mounted cedar window box planted with catnip and cat grass transforms your cat’s favorite sunny ledge into a living sensory garden — and it looks genuinely beautiful doing it. The mix of silvery-green catnip leaves alongside bright wheatgrass gives off herb-garden-on-the-windowsill energy, except this one’s designed entirely for your cat. Visitors will compliment it before they realize it’s a cat toy.
Cats engage with this differently than a stuffed catnip mouse. They’ll nibble the cat grass (great for digestion), rub their faces in the catnip foliage, and park themselves at the window for hours cycling between snacking and sunbathing. Grab a Greenes Fence cedar window box from Home Depot — they run about $10 for the 16-inch size, and the untreated cedar is pet-safe out of the box. Pair it with a $3 packet of organic catnip seeds and a cat grass growing kit and you’ve got a self-refreshing enrichment station that costs almost nothing to maintain.
The real magic is the combo planting. Cat grass sprouts in about 5 days, giving your cat something to interact with immediately, while the catnip takes 10–14 days to establish — built-in novelty that keeps them coming back as the box fills in.
How to Build an Indoor Catnip Window Box for Under $20
- Prep the box: Line the inside of a 16-inch untreated cedar window box with a cut piece of plastic sheeting to protect your windowsill, and drill three small drainage holes in the bottom of the liner.
- Plant in zones: Fill with organic potting mix to about 1 inch below the rim, then sow catnip seeds on one half and cat grass seeds on the other, pressing them lightly into the soil surface.
- Mount at perch height: Secure the box to your windowsill or attach it to the wall using L-brackets ($4 for a pack at any hardware store), positioning it right at your cat’s existing favorite window spot.
- Water and rotate: Mist the soil daily until seeds sprout, then water lightly every 2–3 days — replant the cat grass side every 3 weeks since cats will mow it down fast.
- Budget move: A $10 cedar box, $3 seed packet, and a $5 bag of potting soil gets the whole project done for under $18 with leftover supplies.
9. Reusable Catnip Tea Bags Your Cat Will Bat Around for Days
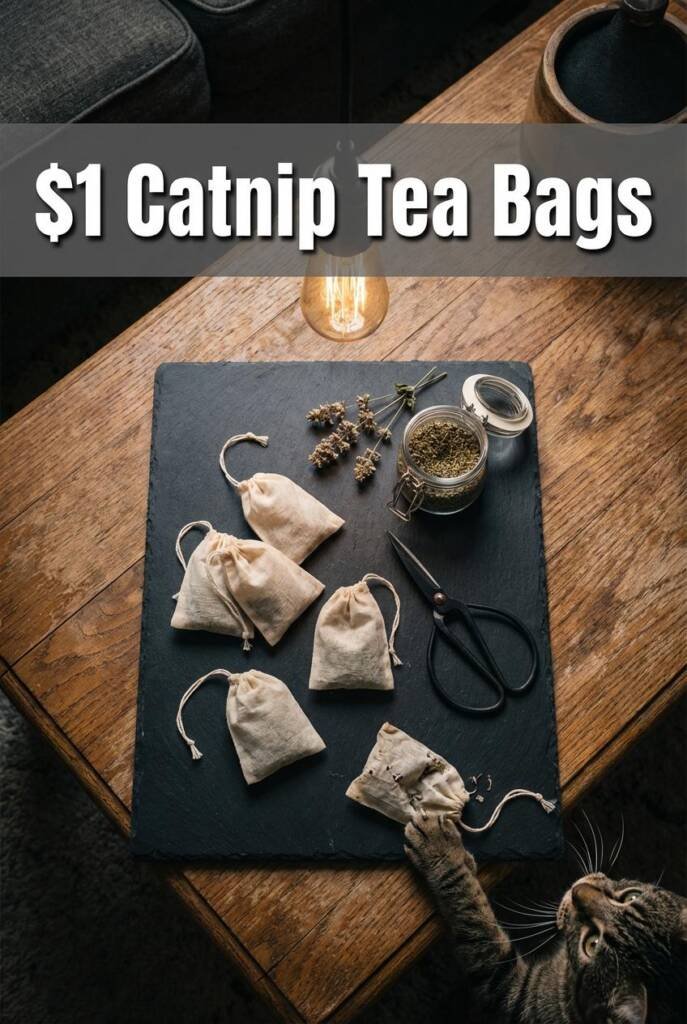
The fanciest cat toy in your house might end up looking like something from a tea shop.
These tiny muslin pouches look like miniature tea bags, and cats lose their minds over them. The crinkly texture, the lightweight toss-ability, the catnip scent seeping through the weave — it’s the perfect storm of feline obsession. They slide across hardwood floors like hockey pucks, tuck neatly under paws for bunny-kicking, and fit in every nook your cat loves to fish things out of.
The secret is using unbleached muslin rather than regular cotton fabric. The loose weave lets the catnip oils permeate without spilling, and the slightly rough texture gives cats something satisfying to chew. A yard of unbleached muslin from Jo-Ann Fabrics runs about $3.49 and yields 30+ tea bags. Pair that with a bag of Yeowww! organic catnip ($7.99 for 1 oz on Chewy) and you’ve got a small army of toys. Swap the catnip every 2-3 weeks to keep them potent — just untie, dump, refill.
These also make absurdly good cat-party favors or shelter donation items. Batch out a dozen in under 20 minutes and stuff them in a mason jar for a gift any cat owner will actually use.
How to Make Catnip Tea Bag Toys for Literally $1
- Cut Your Squares: Cut muslin into 3×3-inch squares using pinking shears to reduce fraying. You’ll get about 36 squares from a single yard of fabric.
- Fill and Shape: Place a teaspoon of dried catnip in the center of each square, then gather the corners up to form a pouch.
- Tie It Off: Wrap the neck tightly with a 4-inch piece of undyed cotton kitchen twine and double-knot it. Trim any excess string to under half an inch so there’s nothing long enough to swallow.
- Fluff and Deploy: Gently squeeze the pouch to release the catnip oils through the muslin, then toss it on the floor and get out of the way.
- Budget move: One yard of muslin ($3.49) plus one ounce of organic catnip ($7.99) gives you 30+ toys — roughly $0.38 each.
10. A Catnip-Stuffed Draft Stopper That Actually Earns Its Keep
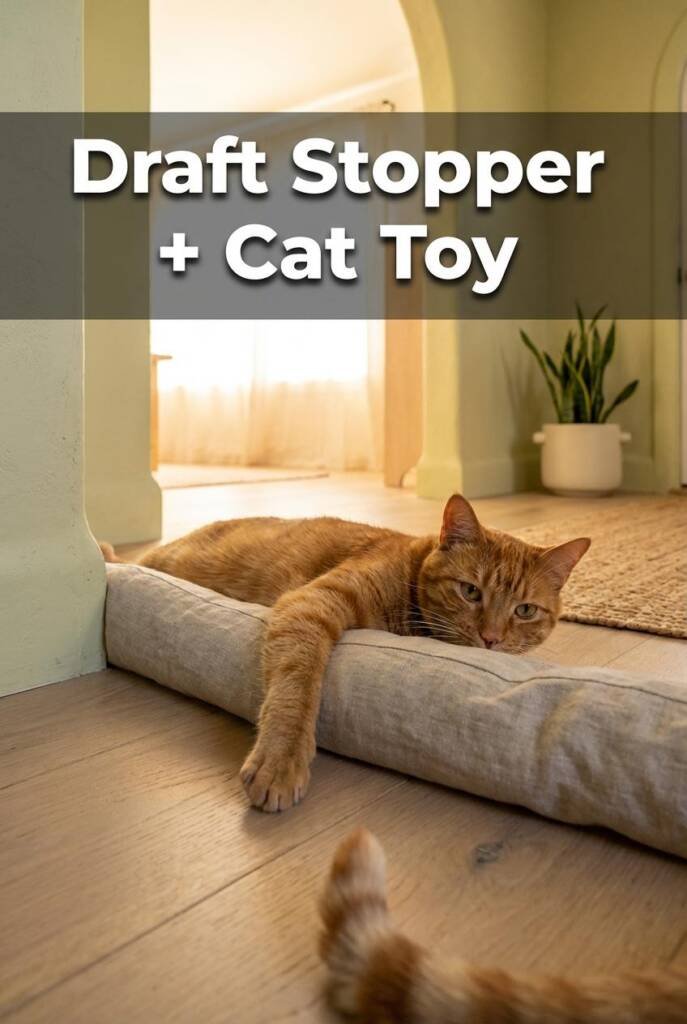
Finally, a cat-friendly home hack that your landlord would actually approve of.
A catnip draft stopper is the rare DIY that solves an actual household problem while doubling as cat entertainment. Sew a long tube from natural linen or heavy cotton, fill it with a mix of rice for weight and dried catnip for irresistibility, and you’ve got something that looks like a thoughtful home accessory — not a cat toy. Position it at the base of a drafty door, and it earns its keep year-round while your cat periodically rolls over to nuzzle it.
The rice gives the stopper enough heft to stay put (most of the time), while the catnip scent slowly diffuses through the linen weave. Use organic catnip from The Cat Ladies (about $10 for 2 oz on Amazon) for potency that lasts months instead of weeks. When the scent fades, just open one end, refresh the catnip, and re-stitch. Your cat gets a low-key enrichment station right in their patrol path, and you get a functional piece that actually blocks cold air instead of collecting dust in a craft drawer.
How to Sew a Catnip Draft Stopper That Does Double Duty
- Cut and sew the tube: Cut a piece of medium-weight linen to 38″ × 8″ (or measure your door width and add 2 inches). Fold lengthwise with the right side in, sew the long edge and one short end with a ½” seam allowance.
- Fill with rice and catnip: Turn the tube right-side out and fill it with roughly 3 cups of white rice mixed with 1–2 tablespoons of dried catnip. Shake gently to distribute evenly.
- Close and finish: Fold the raw edge inward ½” and hand-stitch closed with a slip stitch, or use a sewing machine set to a tight straight stitch for extra durability.
- Place and refresh: Set it snug against your door base. Every 2–3 months, open one end, add a fresh teaspoon of catnip, and re-stitch.
- Budget move: A single stopper costs under $8 total if you use fabric from your stash and a $4 bag of bulk rice.
Cat Toy That Welcome Pets
That’s ten projects, ten excuses to hit the craft store, and ten ways to scatter catnip throughout your home without it looking like you’ve surrendered your entire aesthetic to a four-legged roommate. The real magic of these DIYs is that none of them read as a cat toy at first glance — they read as intentional decor choices that happen to make your cat absolutely lose it in the best way.
If you tackled even two or three of these, you’d have a home where every room offers your cat something enriching and offers you something worth looking at. Mix the sculptural scratching post with the felt ball garland and the linen throw pillow, and suddenly your space has a cohesive, handmade thread running through it that guests will compliment before they even notice the cat hair.
Here at Sweet Purrfections, we create content at the intersection of cool home decor and real life with pets. Because we believe your home should look like it belongs in a design magazine AND work for the furry family members who actually run it.