Why Make DIY Dog Beds Instead of Buying?
Your dog spends 12-14 hours sleeping every day, so why settle for an expensive store-bought bed when you can create something better? These 10 DIY dog bed projects range from simple no-sew options to sturdy raised platforms, each designed to give your pup maximum comfort while matching your home’s style.
Whether you’re working with a $20 budget or have woodworking skills to spare, you’ll find a project that fits your needs. Each idea includes a complete materials list and step-by-step instructions so you can start building today.
1. DIY Raised Dog Bed with PVC Pipe Frame
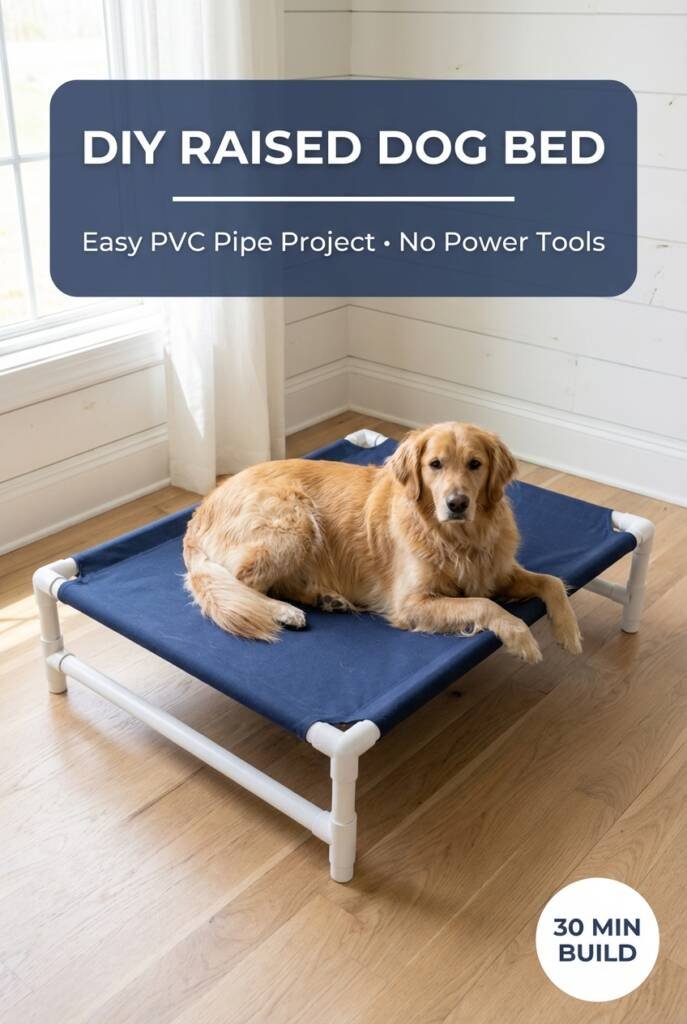
Difficulty Level: Beginner-Intermediate
Best For: Medium to large dogs, senior dogs with joint issues, outdoor use
Time Required: 1-2 hours
Estimated Cost: $25-40
Materials Needed:
- 4 PVC pipes (1-inch diameter): two 36″ pieces, two 24″ pieces
- 4 PVC elbow connectors (1-inch)
- 1 yard outdoor fabric or canvas
- Scissors
- Measuring tape
- PVC pipe cutter or saw
Why Your Dog Will Love It:
Elevated beds keep your dog cool by allowing air circulation underneath, reduce pressure on joints, and keep them off cold or damp floors. Perfect for arthritis-prone or senior dogs.
Step-by-Step Instructions
- Cut the PVC pipes to create a rectangle frame: two 36-inch pieces for length, two 24-inch pieces for width. Adjust measurements based on your dog’s size (add 6-12 inches to their lying-down length).
- Connect the frame using elbow connectors at each corner. Press firmly until each joint is secure. Test stability by pressing down on all sides.
- Measure and cut fabric to 40″ x 28″ (4 inches larger than frame on all sides). Use durable outdoor fabric or canvas that can support your dog’s weight.
- Create fabric sleeves by folding fabric over the long PVC pipes. The fabric should drape over the frame with tension, creating a hammock effect.
- Secure the fabric by wrapping the excess around the pipes and using zip ties, Velcro strips, or sewing a pocket on each end that slides over the pipe.
- Test the bed by pressing down firmly in the center. The fabric should have some give but not sag to the ground.
Pro Tips:
- Use schedule 40 PVC for heavier dogs (30+ lbs)
- Add rubber caps to pipe ends for floor protection
- Create a removable cover by sewing Velcro strips onto the fabric
- For outdoor use, choose UV-resistant fabric
2. No-Sew Fleece Tie Dog Bed
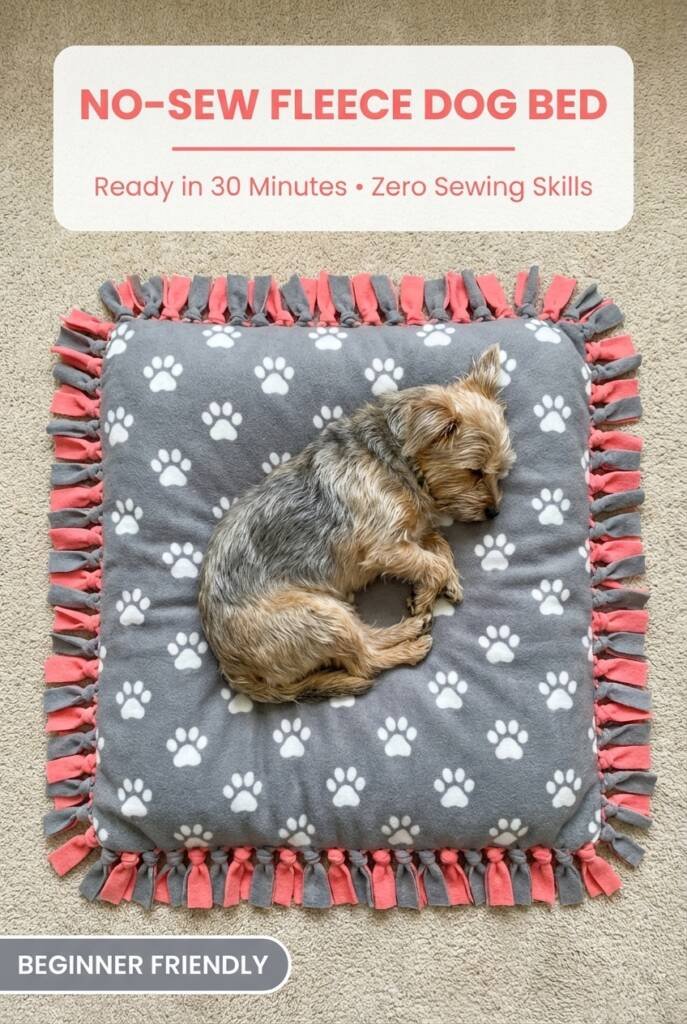
Difficulty Level: Beginner
Best For: Small to medium dogs, first-time DIYers, quick weekend project
Time Required: 30-45 minutes
Estimated Cost: $15-25
Materials Needed:
- 2 yards fleece fabric (top layer – your choice of color/pattern)
- 2 yards fleece fabric (bottom layer – contrasting or matching)
- 1 bag polyester fiber fill (32 oz) or old pillows for stuffing
- Fabric scissors
- Ruler or measuring tape
- Fabric chalk or marker
Why Your Dog Will Love It:
Fleece is naturally soft, warm, and machine washable. This bed requires zero sewing skills and can be completed while watching TV.
Step-by-Step Instructions
- Layer the fabric by placing both fleece pieces on top of each other, wrong sides facing out. Smooth out any wrinkles.
- Cut a 6-inch square from each corner of the stacked fabric. This creates the foundation for your ties.
- Mark the fringe by drawing a line 1 inch from the edge around all four sides. Then mark vertical lines every 1 inch along all edges to create strips.
- Cut the fringe through both layers, creating 1-inch wide strips around the entire perimeter. You should have about 6 inches of fringe depth.
- Tie the layers together starting at one corner. Take one strip from the top and one from the bottom, tie them together with a double knot. Continue around three full sides.
- Add the stuffing through the open side. Distribute fiber fill evenly, creating a 3-4 inch loft. Use more stuffing than you think you need—it will compress.
- Finish tying the remaining side closed. Double-check all knots are secure.
- Fluff and shape the bed, redistributing stuffing until it’s even throughout.
Pro Tips:
- Pre-wash fleece to prevent shrinkage
- Use anti-pill fleece for longer-lasting softness
- Make ties longer (1.5 inches wide) for easier handling
- Create two beds and swap them during washing
3. Repurposed Suitcase Dog Bed
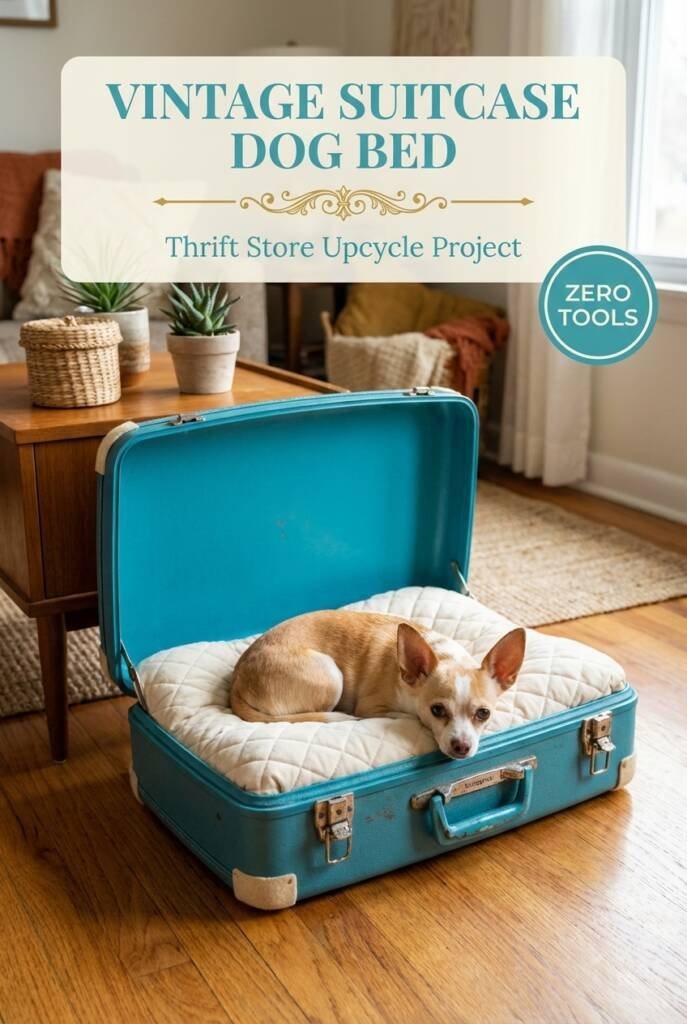
Difficulty Level: Beginner
Best For: Small dogs under 20 lbs, vintage decor lovers, travel-themed homes
Time Required: 20-30 minutes
Estimated Cost: $10-20 (if suitcase is already owned)
Materials Needed:
- 1 hard-shell vintage suitcase (check thrift stores or amazon for a new one)
- 1 foam cushion or pillow (sized to fit suitcase interior)
- Fabric to cover cushion (optional)
- Sandpaper (medium grit)
- 4 furniture felt pads
- Decorative paint (optional)
Why Your Dog Will Love It:
The enclosed sides create a den-like environment that satisfies your dog’s natural nesting instinct. Small dogs especially love the security of defined boundaries.
Step-by-Step Instructions
- Clean the suitcase thoroughly inside and out. Check for sharp edges, broken hardware, or musty odors. Air out for 24 hours if needed.
- Sand rough edges around the opening and any interior sharp spots. Wipe clean with a damp cloth.
- Remove the lid if it has hinges that could close on your dog, or secure it open with a decorative ribbon tied to something heavy behind the bed.
- Add felt pads to the bottom corners to protect your floor and prevent sliding.
- Measure and cut foam to fit snugly inside the suitcase. The foam should be 3-4 inches thick for comfort.
- Cover the foam with washable fabric if desired. Fleece or cotton works well. Use fabric glue or safety pins to secure underneath.
- Place cushion inside and let your dog test it out.
Pro Tips:
- Choose suitcases with low front edges for easy entry
- Paint or decorate the exterior to match your room
- Add your dog’s name with vinyl letters
- Use multiple small pillows instead of one cushion for easy washing
4. Wooden Pallet Dog Bed with Cushion

Difficulty Level: Intermediate
Best For: Large dogs, rustic or farmhouse decor, DIYers with basic tools
Time Required: 2-3 hours
Estimated Cost: $30-50
Materials Needed:
- 1 wooden pallet (heat-treated, marked HT not MB)
- Sandpaper (80-grit and 220-grit) or electric sander
- Wood stain or paint (pet-safe, zero VOC)
- Polyurethane sealant (water-based)
- 4 furniture leg caps or casters (optional)
- Foam mattress or dog bed cushion sized to pallet
- Paintbrush or foam applicator
- Safety goggles and mask
Why Your Dog Will Love It:
Pallets provide natural elevation, keeping your dog off cold floors while creating an industrial-chic look. The slatted design allows airflow and prevents moisture buildup.
Step-by-Step Instructions
- Inspect the pallet for the HT stamp (heat-treated). Never use MB (methyl bromide) pallets as they contain toxic chemicals. Check for protruding nails, splinters, or cracks.
- Sand thoroughly starting with 80-grit sandpaper for rough spots, then finish with 220-grit for smoothness. Pay extra attention to edges and corners. Wear a mask to avoid inhaling dust.
- Remove or hammer down any protruding nails. Fill large gaps between slats with wood filler if needed.
- Apply wood stain or paint in a well-ventilated area. Use pet-safe products only. Apply thin, even coats and let dry completely between coats (4-6 hours).
- Seal with polyurethane once stain is dry. This protects the wood from accidents and makes cleaning easier. Apply 2-3 thin coats.
- Add leg caps or casters to bottom corners to raise it slightly and protect floors. This also makes it easier to clean underneath.
- Let cure for 48-72 hours before adding the cushion to ensure all fumes dissipate.
- Place cushion on top and secure with Velcro strips if needed to prevent sliding.
Pro Tips:
- Smaller pallets (36″ x 36″) work better for indoor use
- Create a headboard by attaching a second pallet vertically
- Add storage underneath by attaching fabric or crates
- Source free pallets from hardware stores or grocery stores
5. DIY Dog Bed Frame from Reclaimed Wood

Difficulty Level: Intermediate
Best For: All dog sizes, modern/minimalist homes, woodworking enthusiasts
Time Required: 3-4 hours
Estimated Cost: $40-70
Materials Needed:
- 4 pieces reclaimed wood boards: two 40″ x 6″, two 28″ x 6″ (1-inch thick)
- 4 wood corner braces (3-inch)
- 16 wood screws (1.5-inch)
- Sandpaper or electric sander
- Wood glue
- Stain or paint
- Drill with bits
- Measuring tape and pencil
- Foam mattress cut to size (36″ x 24″)
Why Your Dog Will Love It:
A proper frame keeps the bed off the ground, protects the mattress from wear, and elevates your dog’s sleeping area. The clean lines work with any decor style.
Step-by-Step Instructions
- Measure your dog lying down fully stretched. Add 6 inches to length and width. Adjust board measurements accordingly if your dog is larger or smaller than average.
- Sand all boards until smooth, paying attention to corners and edges where your dog might bump. Start with 80-grit, finish with 220-grit.
- Arrange the frame on a flat surface creating a rectangle with the boards on their edges (6-inch side up). The two longer boards should overlap the shorter boards at corners.
- Mark screw placement at each corner. Place corner braces on the inside of the frame and mark where screws will go through the brace into the wood.
- Pre-drill holes at each mark to prevent wood splitting. Use a drill bit slightly smaller than your screw diameter.
- Apply wood glue to corner joints before attaching braces. This adds extra stability.
- Attach corner braces with screws, ensuring the frame is square. Check corners with a carpenter’s square before fully tightening.
- Stain or paint the frame with pet-safe products. Allow 48 hours to cure completely.
- Add the mattress once frame is dry. The foam should fit snugly inside the frame with sides supporting it.
Pro Tips:
- Add a plywood base if your dog is heavy (50+ lbs) for extra support
- Round the inside corners with a router for easier cushion placement
- Use leftover wood to create a matching raised food bowl stand
- Distress painted wood with sandpaper for a shabby-chic look
6. Tire Dog Bed (Upcycled & Eco-Friendly)
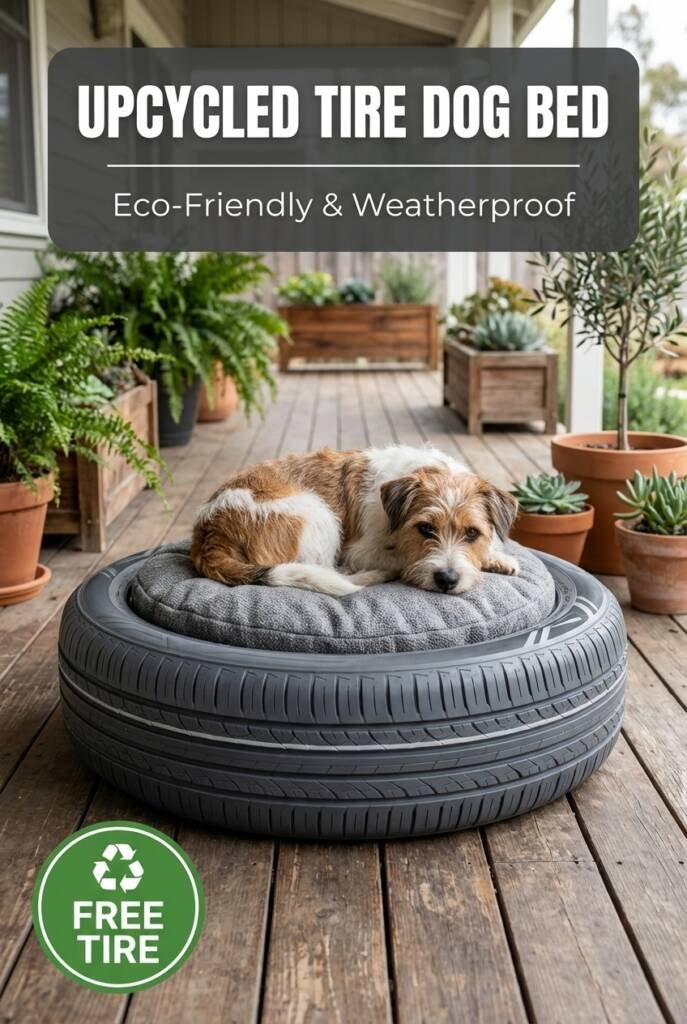
Difficulty Level: Beginner
Best For: Small to medium dogs, outdoor spaces, eco-conscious pet owners
Time Required: 1-2 hours
Estimated Cost: $10-20
Materials Needed:
- 1 clean tire (car tire for small dogs, truck tire for medium dogs)
- Outdoor spray paint (multiple colors optional)
- Painters tape for designs (optional)
- 1 round cushion or pillow to fit inside tire
- Dish soap and scrub brush
- Power washer or garden hose
- Cardboard for base (optional)
Why Your Dog Will Love It:
The circular shape mimics a natural den, the rubber walls provide support for leaning, and the weight keeps the bed stable. Rubber is naturally water-resistant for covered porch use.
Step-by-Step Instructions
- Source a clean tire from a tire shop (many give them away free), mechanic, or your own vehicle. Avoid tires with deep cracks or exposed steel belts.
- Deep clean the tire using dish soap, hot water, and a stiff brush. Scrub the entire surface, including treads and sidewalls. Rinse thoroughly with a power washer or hose.
- Dry completely in the sun for 24 hours. This also helps dissipate any rubber smell.
- Tape off design if creating patterns. Geometric designs, stripes, or color blocking work well. Use painters tape to create clean lines.
- Spray paint the tire in a well-ventilated outdoor area. Hold can 6-8 inches away and apply light, even coats. Let dry 2 hours between coats. Apply 2-3 coats total.
- Remove tape once the final coat is dry to the touch but still slightly tacky for cleanest lines.
- Let cure for 48 hours before use to ensure paint is fully hardened and fumes are gone.
- Add cushion that fits snugly inside the tire opening. Measure the interior diameter before purchasing or making a cushion.
Pro Tips:
- Cut tire in half horizontally for a lower-profile bed (requires a reciprocating saw and safety gear)
- Add a plywood base underneath for indoor use
- Use marine-grade paint for longer-lasting color
- Stuff with a waterproof outdoor cushion for patio use
- Stack two painted tires for larger dogs
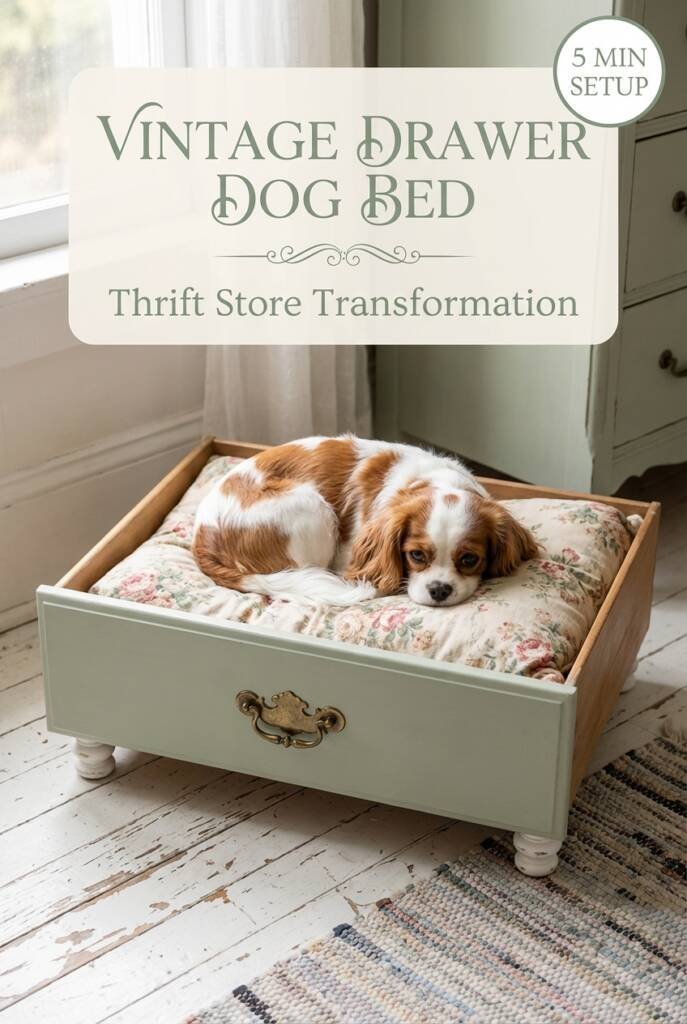
7. Drawer Dog Bed (Repurposed Furniture)
Difficulty Level: Beginner
Best For: Small to medium dogs, vintage decor, apartment dwellers
Time Required: 45 minutes
Estimated Cost: $15-30 (if drawer is already owned)
Materials Needed:
- 1 wooden drawer from old dresser or nightstand
- Sandpaper (medium grit)
- Paint or stain (optional)
- 4 furniture felt pads or decorative feet
- Cushion or pillow sized to fit drawer
- Wood filler (if needed)
- Tack cloth
Why Your Dog Will Love It:
The three raised sides create security and privacy while the open front allows easy access. Dogs naturally seek enclosed spaces that feel safe and protected.
Step-by-Step Instructions
- Select the right drawer based on your dog’s size. They should be able to turn around comfortably. Deeper drawers (6-8 inches) work better than shallow ones.
- Remove hardware including drawer pulls, slides, and any metal brackets. Fill screw holes with wood filler and let dry.
- Sand the entire drawer inside and out, paying special attention to corners and edges. Remove all dust with a tack cloth.
- Check for stability by placing drawer on the floor. If it wobbles, add felt pads to level it or trim one leg slightly.
- Paint or stain if desired. Chalk paint works well for a matte vintage look. Let dry completely (24 hours minimum).
- Add decorative feet to the bottom corners if the drawer sits too low. Pre-drill holes and screw feet in securely, or use adhesive felt pads for a simpler option.
- Seal painted surfaces with a clear water-based polyurethane for easy cleaning and durability.
- Add bedding once fully dry. Use a fitted cushion or layer with blankets your dog can nest in.
Pro Tips:
- Look for drawers at thrift stores, estate sales, or curbside finds
- Add your dog’s name with vinyl lettering or stencils
- Attach the original drawer pull back on the front as a decorative touch
- Use multiple small drawers to create a “bunk bed” system for multiple small dogs
- Line the inside with waterproof fabric before adding cushion
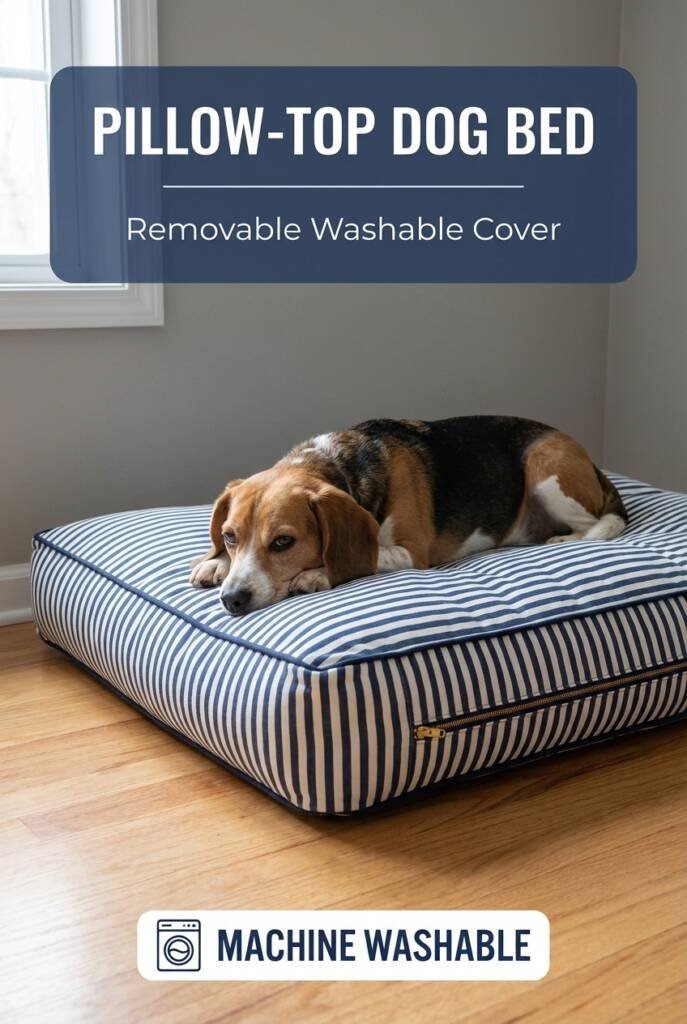
8. Pillow-Top Dog Bed with Removable Cover
Difficulty Level: Intermediate (requires sewing)
Best For: All dog sizes, those with sewing machines, washability-focused owners
Time Required: 2-3 hours
Estimated Cost: $30-45
Materials Needed:
- 2 yards durable fabric (canvas, denim, or upholstery fabric)
- 1 yard coordinating fabric for piping or trim (optional)
- High-density foam (4 inches thick, cut to 30″ x 40″ for large dogs)
- Heavy-duty zipper (30 inches minimum)
- Thread matching fabric
- Sewing machine with heavy-duty needle
- Pins and fabric scissors
- Measuring tape
Why Your Dog Will Love It:
Custom sizing ensures a perfect fit, high-density foam provides orthopedic support, and the removable cover means their bed always smells fresh. Quality fabric holds up to scratching and digging.
Step-by-Step Instructions
- Measure your foam and add 1 inch to each dimension for seam allowance. For a 30″ x 40″ foam piece, cut fabric to 31″ x 41″.
- Cut fabric pieces: You’ll need two pieces for the top and bottom, plus a long strip for sides (the “boxing”) measuring 8 inches wide by the perimeter of your bed plus 2 inches.
- Install the zipper on one short end of the boxing strip. Cut the boxing strip in half lengthwise, sew the zipper between the two pieces, then sew the ends together to create one continuous loop.
- Pin boxing to top panel with right sides together. Start at one corner and work around, clipping corners to ease tension. Use lots of pins.
- Sew boxing to top panel using a 1/2-inch seam allowance. Backstitch at corners for strength. Go slowly around curves.
- Pin and sew bottom panel to the boxing strip the same way, leaving the zipper partially open so you can turn the cover right-side out.
- Turn cover right-side out through the zipper opening. Push out corners fully.
- Insert foam through the zipper opening. Work the foam into corners, ensuring it fills the entire cover evenly.
- Close zipper and fluff the bed, evening out the foam distribution.
Pro Tips:
- Pre-wash all fabric to prevent shrinkage after first wash
- Use a walking foot on your sewing machine for thick fabrics
- Add piping or trim between the boxing and panels for a professional look
- Make the cover 1-2 inches smaller than foam for a tight, tufted appearance
- Create two covers so you always have a clean one ready
- Use upholstery-grade thread for extra durability
9. Crate Cushion Dog Bed (Perfect Fit)

Difficulty Level: Beginner
Best For: Crate-trained dogs, puppies, travel, multiple dog households
Time Required: 30 minutes
Estimated Cost: $20-35
Materials Needed:
- Memory foam topper or egg crate foam (2-3 inches thick)
- Fabric for cover (fleece or canvas)
- Scissors or electric knife for cutting foam
- Measuring tape
- Fabric glue or safety pins
- Permanent marker
Why Your Dog Will Love It:
Custom-cut cushions eliminate gaps where bedding bunches up, provide proper support in confined spaces, and are portable for travel. Memory foam conforms to your dog’s body shape.
Step-by-Step Instructions
- Measure the crate floor precisely. Measure length and width of the interior bottom, not the exterior dimensions. Write down measurements.
- Mark the foam using a permanent marker and straight edge. Measure twice to ensure accuracy.
- Cut the foam using sharp scissors for thin foam or an electric knife for thicker foam (2+ inches). Cut straight down in one smooth motion for clean edges.
- Test the fit by placing cut foam in the crate. It should fit snugly without buckling. Trim any areas that stick up.
- Measure fabric at 4 inches larger than foam on all sides. For a 24″ x 36″ cushion, cut fabric to 28″ x 40″.
- Wrap the foam like a present. Place foam in the center of fabric, fold one long side over, then fold the opposite side over that, overlapping in the middle.
- Secure the fabric along the overlap with fabric glue or safety pins spaced every 3 inches. For washability, use Velcro strips instead of glue.
- Fold and secure the ends by tucking the fabric under like wrapping a gift. Glue or pin in place.
- Place in crate with the seam side down. Let your dog test it out.
Pro Tips:
- Buy a full memory foam topper and cut multiple cushions for several crates
- Use waterproof fabric or add a waterproof liner underneath for puppies
- Skip the cover and use the foam alone for dogs who destroy bedding (supervision required)
- Cut foam slightly smaller (1/2 inch) on all sides for easier crate cleaning
- Make seasonal cushions: fleece for winter, cooling fabric for summer
- Label cushions with dog names if you have multiple pets
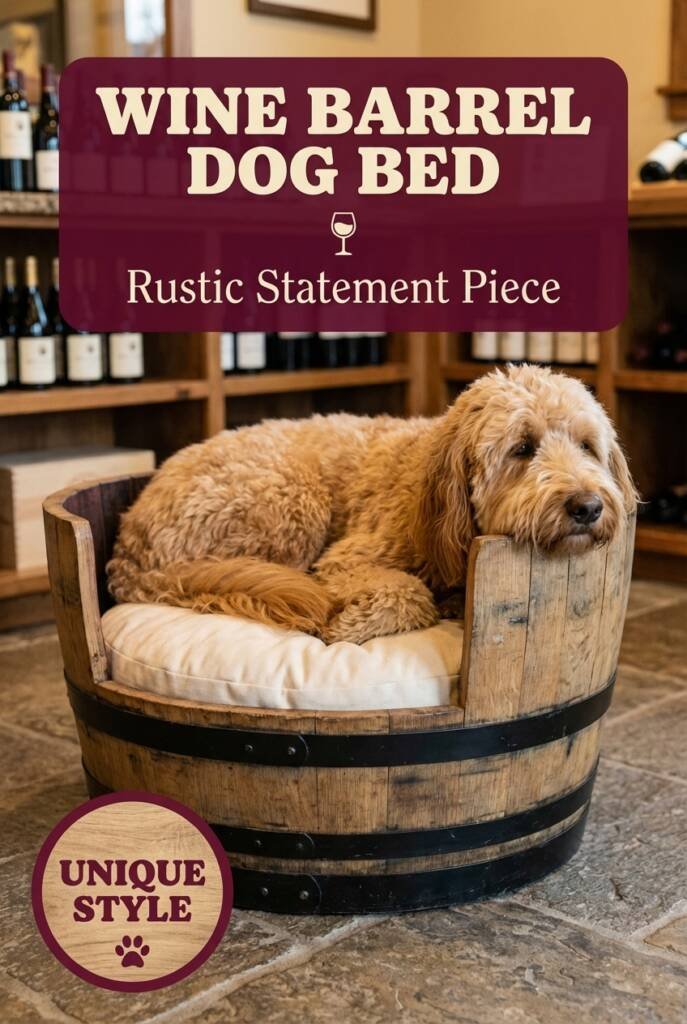
10. Wine Barrel Dog Bed (Rustic & Unique)
Difficulty Level: Intermediate
Best For: Medium to large dogs, wine lovers, statement piece furniture
Time Required: 2-4 hours
Estimated Cost: $50-80 (barrel costs vary)
Materials Needed:
- 1 oak wine barrel (half barrel or full barrel cut in half)
- Sandpaper (80-grit and 220-grit)
- Wood stain or sealant
- Jigsaw or reciprocating saw (if cutting full barrel)
- Round cushion to fit barrel interior
- Rubber mallet
- Safety goggles and gloves
- Measuring tape
Why Your Dog Will Love It:
The curved walls create a cave-like sanctuary that appeals to dogs’ denning instincts. The solid construction is virtually indestructible, and the barrel shape naturally contains bedding.
Step-by-Step Instructions
- Source a wine barrel from wineries, homebrew shops, or online retailers. Half barrels are easier to work with than cutting a full barrel yourself.
- Clean the barrel thoroughly to remove wine residue and sediment. Rinse multiple times with hot water and let dry in the sun for 2-3 days.
- If using a full barrel, mark a cutting line around the circumference at the midpoint. Use a jigsaw to cut carefully along the line. This requires two people for stability.
- Sand the cut edge if you cut the barrel yourself. Use 80-grit sandpaper to remove splinters, then finish with 220-grit for smoothness.
- Check metal bands and tighten if loose. Tap with a rubber mallet to reseat any bands that have shifted. Ensure no sharp edges protrude.
- Sand the interior lightly to remove rough spots while preserving the rustic character. You want it smooth but not polished.
- Apply sealant to protect the wood from accidents and moisture. Use a pet-safe, water-based polyurethane. Apply 2 thin coats, letting each dry completely.
- Let cure for 72 hours in a well-ventilated area before adding bedding.
- Measure and cut cushion to fit the curved interior. Round cushions work best, but you can also use multiple smaller pillows to fill the space.
- Add the bedding and let your dog claim their new barrel.
Pro Tips:
- Half whiskey barrels are wider and work better for larger dogs than wine barrels
- Add furniture pads to the bottom rim to protect floors
- Keep the natural finish for authentic rustic look, or paint the metal bands for a pop of color
- Line the interior with a waterproof liner before adding the cushion
- Place near a window or fireplace for the ultimate cozy spot
- Use as dual-purpose: dog bed by day, decorative planter by the door when guests arrive (just kidding—your dog won’t share)
Choosing the Right DIY Dog Bed for Your Pup
Before starting your project, consider these factors to ensure you build the perfect bed:
- Size Matters: Measure your dog lying down in their most stretched-out sleeping position. Add 6-12 inches to both length and width. Dogs need space to sprawl and reposition throughout the night.
- Sleeping Style: Does your dog curl up in a ball or stretch out flat? Cuddlers prefer beds with raised edges (suitcase, drawer, barrel), while sprawlers need flat platforms (pallet, frame, raised bed).
- Age and Health: Senior dogs and those with arthritis benefit from orthopedic memory foam and raised beds that reduce joint strain when getting up. Puppies need indestructible materials they can’t destroy during teething.
- Climate: Hot climates call for elevated beds with airflow (raised PVC bed, pallet). Cold climates need insulating materials like fleece and foam (no-sew fleece bed, pillow-top).
- Your Skill Level: Be honest about your abilities. Starting with a simple project (tire bed, suitcase) builds confidence before tackling intermediate projects (wood frame, sewn cover).
- Available Tools: Some projects require only scissors and basic supplies, while others need power tools, sewing machines, or woodworking equipment. Choose based on what you have or can borrow.
- Indoor vs. Outdoor: Outdoor beds need weather-resistant materials (PVC, treated wood, waterproof fabric). Indoor beds can use softer, less durable materials that prioritize comfort over weatherproofing.
Essential Tips for All DIY Dog Bed Projects
- Material Safety First: Never use pressure-treated wood, toxic paints, or materials containing formaldehyde. Look for pet-safe, zero-VOC finishes and natural fabrics. If you can smell strong chemical odors, it’s not safe yet—let it cure longer.
- Wash Before Use: Pre-wash all fabrics to remove manufacturing chemicals and prevent shrinkage. Let wooden projects cure for 48-72 hours after staining or painting before allowing your dog access.
- Sharp Edge Check: Run your hand over every surface your dog will contact. Sand down splinters, file rough metal edges, and cover exposed screws with wood filler or caps.
- Proper Measurements: Measure twice, cut once. A bed that’s too small is uncomfortable; too large wastes materials and looks disproportionate in your space.
- Removable Covers Win: Whenever possible, make covers removable and washable. Dogs bring dirt, shed fur, and have accidents. Easy cleaning extends the bed’s life significantly.
- Weight Distribution: Ensure the bed can support your dog’s full weight. Test by pressing firmly before letting your dog use it. Add support boards under foam for dogs over 50 pounds.
- Introduce Gradually: Place treats or favorite toys on the new bed. Let your dog investigate at their own pace. Some dogs need time to trust new furniture.
- Regular Maintenance: Inspect beds monthly for wear, loose screws, torn fabric, or compressed foam. Small repairs prevent bigger problems and keep your dog safe.
FAQ Section
1. What is the best filling for a DIY dog bed?
High-density foam (4+ inches thick) provides the best support for most dogs. Memory foam works well for senior dogs with joint issues, while polyester fiber fill is budget-friendly and works for small dogs. Avoid cheap foam that compresses flat within weeks—it provides no support. For orthopedic benefits, choose foam rated at 4-5 pounds per cubic foot density.
2. How do I make a DIY dog bed washable?
Use removable covers with zippers or Velcro closures. Choose machine-washable fabrics like canvas, denim, or fleece that can withstand frequent washing at hot temperatures. Make two covers so you always have a clean one ready. For foam bases, use waterproof liners between the foam and cover to protect against accidents.
3. Are raised dog beds better for dogs?
Raised beds benefit dogs with arthritis, joint problems, or hip dysplasia by reducing the effort needed to stand up. They also improve air circulation in hot weather and keep dogs off cold floors in winter. Senior dogs and large breeds particularly benefit from elevation. However, very small dogs or puppies may prefer ground-level beds for easier access.
4. What materials should I avoid in DIY dog beds?
Avoid pressure-treated lumber (contains toxic chemicals), MB-stamped pallets (methyl bromide treatment), particle board (contains formaldehyde), cheap foam that off-gases, fabrics treated with flame retardants, and any wood with exposed nails or sharp edges. Skip materials with strong chemical smells—if you can smell it, so can your dog’s sensitive nose.
5. How much does it cost to make a DIY dog bed?
Simple projects like the no-sew fleece bed or tire bed cost $10-25. Mid-range projects using wood and foam run $30-50. More elaborate builds with quality materials cost $50-80. This compares to $80-300+ for comparable store-bought beds, making DIY both economical and customizable.
Conclusion
Your dog deserves a comfortable, supportive bed that matches their unique needs and your home’s style. These 10 DIY dog bed projects offer something for every skill level, budget, and living situation—from quick weekend builds to impressive furniture pieces that become conversation starters.
The best project is the one you’ll actually complete. Start with something matching your current skills, then challenge yourself with more complex builds as your confidence grows. Your dog won’t judge your carpentry skills; they’ll just appreciate having a cozy spot built with love.
At Sweet Purrfections, we’re all about helping DIY pet parents create amazing things for the furry friends they adore. Whether you’re crafting custom beds, whipping up homemade treats, or building the ultimate cat tower, we’ve got your back with projects that actually work.
Pick your favorite design, gather your materials, and spend a few hours creating something special. Your four-legged friend will thank you with years of comfortable naps in their custom bed.