Your garage is probably the most underutilized room in your house — and your dog knows it. While you’re stacking bins on top of bins and tripping over rakes, your pup is navigating an obstacle course of sharp edges and toppling tools just to get to their bed. Good garage organization isn’t just about tidiness or impressing the neighbors. For pet owners, it’s about reclaiming real, usable square footage where your dog can move freely, stay safe, and actually enjoy hanging out with you while you tinker.
Here’s the thing most organization guides miss: dogs live in the bottom three feet of your world. Every cord on the floor, every leaning shovel, every open container of chemicals — that’s all at nose level or paw level for them. When you reorganize your garage with your dog in mind, you’re not sacrificing style or function. You’re just being smarter about both. The ideas ahead work whether you’ve got a Great Dane who needs room to sprawl or a curious terrier who investigates every single thing on the ground.
Each of the seven ideas below comes with a full DIY breakdown — materials, estimated cost, and step-by-step instructions you can knock out in a weekend or less. No contractor required, no special skills assumed. Just practical upgrades that look sharp and give your dog the breathing room they deserve. Let’s get into it.
1. The Ceiling-Mounted Storage System That Doubles Your Dog’s Floor Space Overnight
Your dog deserves more than a 2-foot lane between the lawnmower and a tower of Christmas bins.
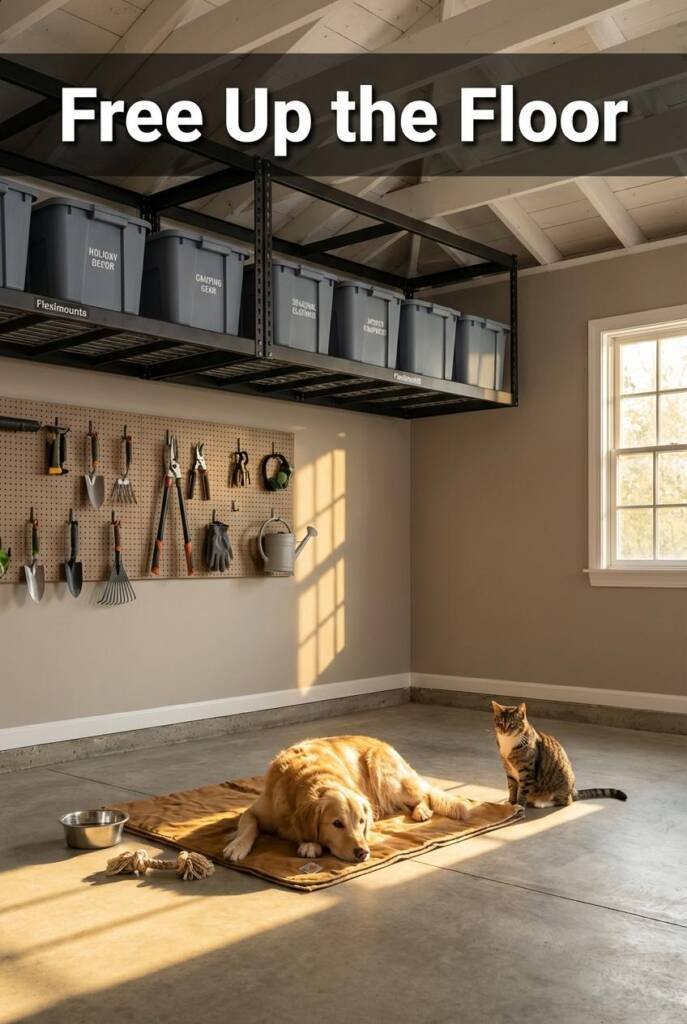
Most garage floors are a maze of totes, holiday décor, and forgotten gear — which means your dog is either squeezing between obstacles or stuck inside while you park. Ceiling-mounted storage racks reclaim all of that floor space by lifting everything overhead, giving your dog a wide-open area to hang out, stretch, or wait while you load the car. It’s the single biggest space transformation you can make in a weekend, and it looks surprisingly clean once it’s up.
The Fleximounts 4×8 Overhead Garage Storage Rack ($130–$170 on Amazon) is the gold standard here — it holds up to 600 lbs, mounts directly into ceiling joists, and has adjustable drop heights from 22″ to 40″ so you can customize clearance. With bins neatly stored above and nothing on the ground, your dog gets an unobstructed zone that’s free of sharp corners, unstable stacks, and tripping hazards. Pair it with labeled bins so you can find things without pulling everything back down.
Bonus: that open floor is easy to sweep, mop, or hose out — which matters when muddy paws are part of the deal.
How to Install a Ceiling-Mounted Storage Rack Without Losing a Weekend
- Find your joists: Use a stud finder to locate ceiling joists — the rack must anchor into framing, not just drywall. Mark joist locations with painter’s tape so your drill points are visible.
- Assemble and mount the frame: Follow the Fleximounts template (included) to pre-drill holes, then lag-bolt the ceiling brackets into joists using the provided 5/16″ hardware. A socket wrench speeds this up significantly.
- Attach the deck and adjust height: Slide the wire-grid deck onto the hanging brackets and lock it in place. Set the drop height to at least 30″ above your tallest vehicle or 78″ from the floor — whichever gives you the most usable clearance.
- Load it strategically: Place heaviest bins directly over joists and keep frequently accessed items toward the edges. Cap your total load at 75% of the rack’s rated capacity to maintain a safety margin.
- Budget move: Grab a Fleximounts 4×4 rack instead of the 4×8 — it runs around $80 and still frees up 16 square feet of floor space for your dog.
2. A Slatwall System So Slick Your Neighbors Will Think You Hired a Pro
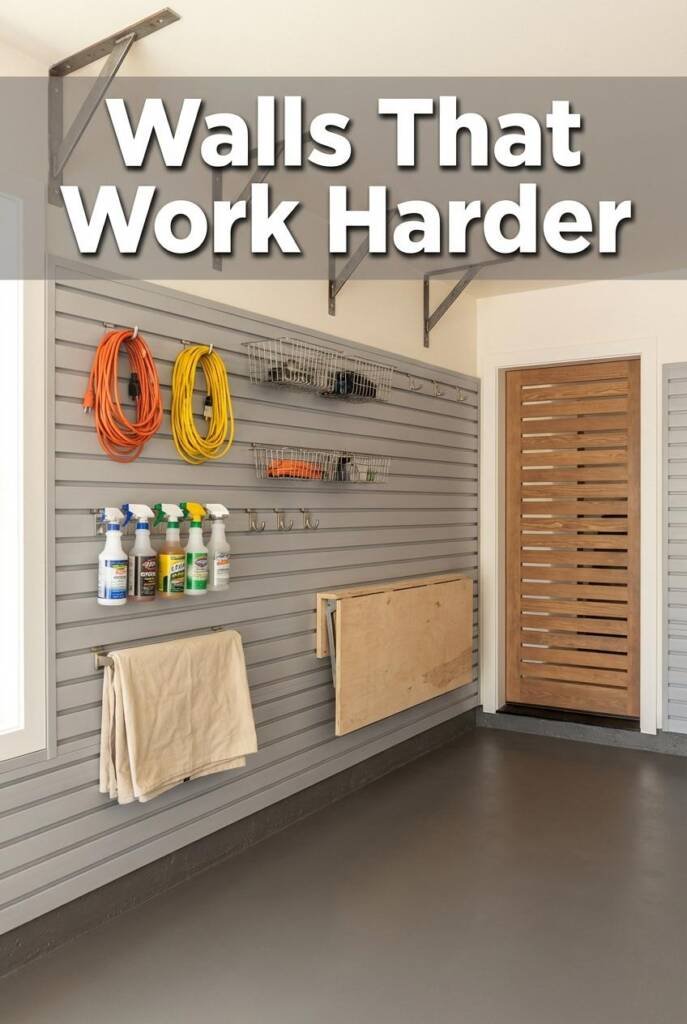
If your garage floor looks like a yard sale that never ended, it’s time to go vertical.
PVC slatwall panels transform a cluttered garage wall into a showroom-worthy storage system in a single afternoon. The interlocking panels mount directly to studs and accept a huge range of hooks, baskets, and shelves that snap in without tools — so you can rearrange your layout whenever you want. Everything from rakes to extension cords goes vertical, opening up square footage your dog currently has to navigate around (or worse, knock over).
This matters for your pup because a cleared floor means no more nosing around open containers of antifreeze, fertilizer, or rodent bait sitting at snout level. Wall-mounted bins with lids keep toxic items completely out of reach. The Proslat 8-foot by 4-foot panel kit ($89 at Home Depot) covers 32 square feet of wall and holds up to 75 pounds per square foot — more than enough for heavy power tools. Pair it with their heavy-duty hook and basket accessory kit ($45) and you’ve got a full system under budget.
Bonus: PVC slatwall is waterproof and wipes clean in seconds, so muddy paw prints on the wall after a rainy walk aren’t a permanent problem.
How to Mount a Slatwall Panel System for Under $150
- Find your studs and plan the layout: Use a stud finder to mark every stud along your target wall. Plan for panels to start 12–15 inches off the floor so you can still sweep underneath easily.
- Cut and mount the first panel: Trim your Proslat panel to length with a circular saw if needed, then secure it to studs with #10 x 2½-inch wood screws every 12 inches across. Use a level — the first row sets the tone for everything above it.
- Stack and interlock additional rows: Slide each new panel’s bottom lip into the top channel of the row below, then screw into studs. A standard 8×4-foot kit gives you five rows of usable slots.
- Add hooks, baskets, and bins: Snap accessories directly into the slatwall channels — no drilling required. Place anything toxic (paint thinner, pesticides) in lidded bins on the highest row, at least 5 feet off the ground.
- Budget move: Buy slatwall accessory hooks in bulk packs of 20 on Amazon for around $15 instead of paying $3–$5 each at hardware stores.
3. The DIY Dog Wash Station That Saves Your Bathtub (and Your Sanity)
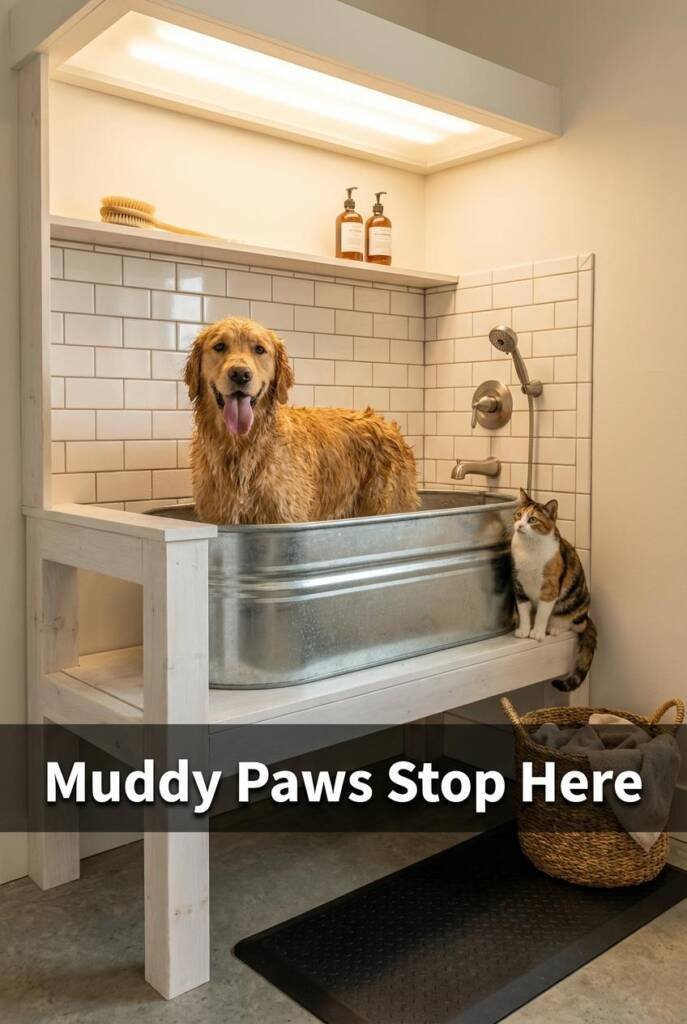
Your bathtub didn’t sign up for this — build a wash station where the mud actually belongs.
A raised wash station right inside your garage door means your dog goes from muddy disaster to clean and dry before a single paw hits the house floor. Think a 24″×36″ utility basin mounted at hip height on a simple 2×4 frame — no more kneeling over your bathtub, no more wet dog shaking mud across your bathroom tile. Add a handheld sprayer, a couple of hooks for towels and shampoo, and some waterproof vinyl plank on the wall behind it, and it honestly looks like a legit grooming setup.
The real win here is containment. A raised basin keeps the mess in one spot, drains directly into your existing garage utility line, and dries fast on concrete flooring. The JS Jackson Supplies stainless steel utility sink ($140 on Amazon) is deep enough to handle even a 70-lb Lab without a water-park situation. Mount a retractable hose reel next to it so the sprayer tucks away clean when you’re done — your garage stays organized instead of looking like a soggy pet store.
Bonus: this station doubles as a gear wash. Leashes, collars, muddy boots, outdoor toys — everything gets cleaned in one place before it comes inside.
How to Build a Budget-Friendly Garage Dog Wash Station
- Build the frame: Construct a simple 36″-tall frame from 2×4 lumber to support the basin at a comfortable working height. Use deck screws and L-brackets for stability — total lumber cost is about $20.
- Mount the sink and plumbing: Secure a deep stainless steel utility sink to the frame and connect the drain to your garage’s existing utility line using a standard 1½” P-trap and PVC fittings.
- Install the sprayer: Attach a handheld sprayer with a diverter valve to your nearest water hookup. A Liberty Garden retractable hose reel ($35) keeps everything tidy between baths.
- Waterproof the splash zone: Apply peel-and-stick vinyl plank to the wall behind and beside the station — a 20-sq-ft box from Floor & Decor runs about $25 and wipes clean instantly.
- Budget move: Skip the stainless steel and grab a heavy-duty plastic utility sink like theDERA fromDERA for around $75, cutting your total build cost to under $160.
4. Magnetic Tool Strips That Eliminate the One Thing Dogs Always Knock Over
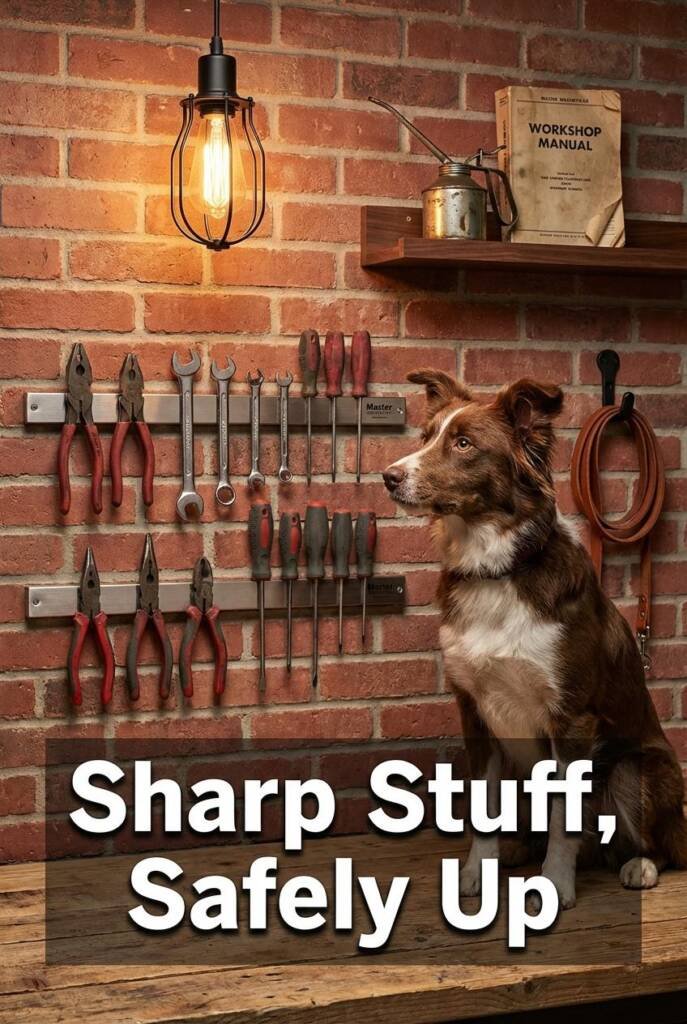
Your dog’s tail has already made the case against freestanding tool racks — time to take everything vertical.
Freestanding tool racks and open toolboxes are basically dog-tail magnets — one enthusiastic greeting and your screwdrivers are scattered across the concrete. Magnetic tool strips solve this by pinning everything flat against the wall, completely out of the knock-over zone and well above paw reach. The clean, industrial look also makes your garage feel intentional instead of chaotic.
Mount your strips at 48–54 inches high and you instantly reclaim the entire lower wall and floor area where your dog actually lives. The Master Magnetics 24-inch heavy-duty strip ($12 at Home Depot or Amazon) holds up to 50 lbs per strip and grips pliers, wrenches, scissors, and even small socket sets with zero wobble. Two or three strips can handle a full home tool collection while keeping anything sharp or heavy securely locked to the wall — no more worrying about a wagging tail sending a box cutter to the floor.
Bonus: because every tool has a visible home, you’ll actually notice when something’s missing before your dog finds it first.
How to Organize a Full Tool Collection Using Magnetic Strips for Under $40
- Map your tool zones: Group tools by type and measure total linear inches needed — most home collections fit on 48–72 inches of strip space, which is two to three 24-inch strips.
- Install strips into studs: Use a stud finder and mount strips at 48–54 inches high with the included screws — drywall anchors alone won’t hold heavier wrenches long-term.
- Arrange by weight and frequency: Place heaviest tools like hammers and pipe wrenches at the center of each strip where magnetic pull is strongest, and everyday items at eye level.
- Clear the floor below: Remove the old toolbox or rack entirely to open up that floor space for a dog bed, water station, or movement path.
- Budget move: Three Master Magnetics 24-inch strips plus mounting hardware runs about $38 total — less than most single-tool organizer cabinets.
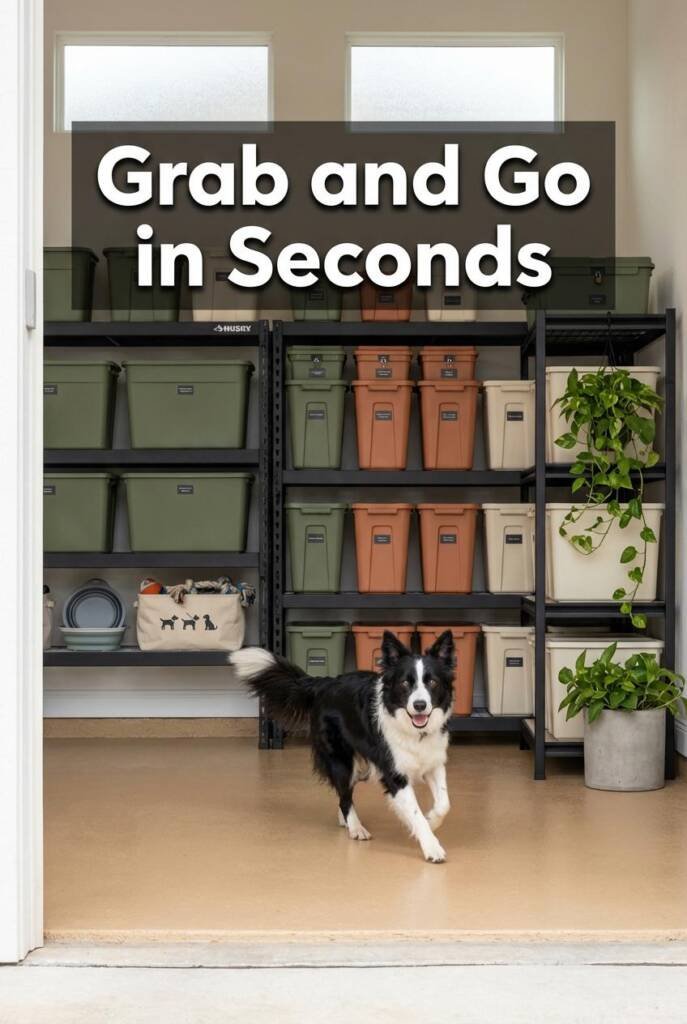
5. A Color-Coded Bin System That Makes Finding Anything a 5-Second Task
If finding a leash in your garage requires an archaeological dig, this system fixes that in about three hours.
A color-coded bin system turns your garage from a “where did I put that” nightmare into a grab-and-go command center — and it looks surprisingly sharp doing it. Assign each color a category: red for automotive supplies, blue for seasonal gear, green for dog stuff, yellow for tools. When everything has a visual home, you stop stacking random boxes on the floor, which is exactly how you reclaim square footage for your dog to move through safely.
The key is pairing your bins with sturdy shelving that lets you stack vertically instead of sprawling horizontally. Sterilite 18-gallon stackable totes ($8–$10 each at Target) are the sweet spot — big enough to be useful, uniform enough to look intentional. Place chemicals, paints, and antifreeze in locked or latched bins on the top shelf where your dog can never reach them. Dog leashes, harnesses, towels, and outdoor toys go in the bottom bins at your grab height so you’re not fumbling before a walk. Slap a label on every single bin with a Brother P-Touch label maker, and you’ll never dig through three mystery boxes again.
The floor space you free up by going vertical is real — we’re talking 15–20 square feet in a typical two-car garage, enough for a dog bed or crate station right by the door.
How to Set Up a Zone-Based Bin Organization System in One Afternoon
- Map your zones: Sort everything in your garage into 4–6 categories and assign each one a bin color. Lay it all out on the driveway so you can see what you actually have versus what’s just clutter to toss.
- Install heavy-duty shelving: Mount a 48″W × 72″H steel shelf unit like the Muscle Rack from Home Depot ($60–$80) along your longest wall, anchoring it to studs with lag bolts for stability.
- Load bins by safety priority: Place hazardous materials in latched bins on the top two shelves, general household items in the middle, and dog gear on the bottom shelf no higher than 36″ off the ground.
- Label everything: Use a label maker or bold permanent marker on the front and side of each bin so you can identify contents whether bins are facing out or stacked — no more pulling down three totes to find the dog shampoo.
- Budget move: Buy bins during back-to-school sales in August when stores like Target and Walmart discount storage totes to $5–$6 each, saving you roughly 40% on a full set of 10.
6. Rubber Interlocking Floor Tiles That Feel Better on Paws Than Cold Concrete
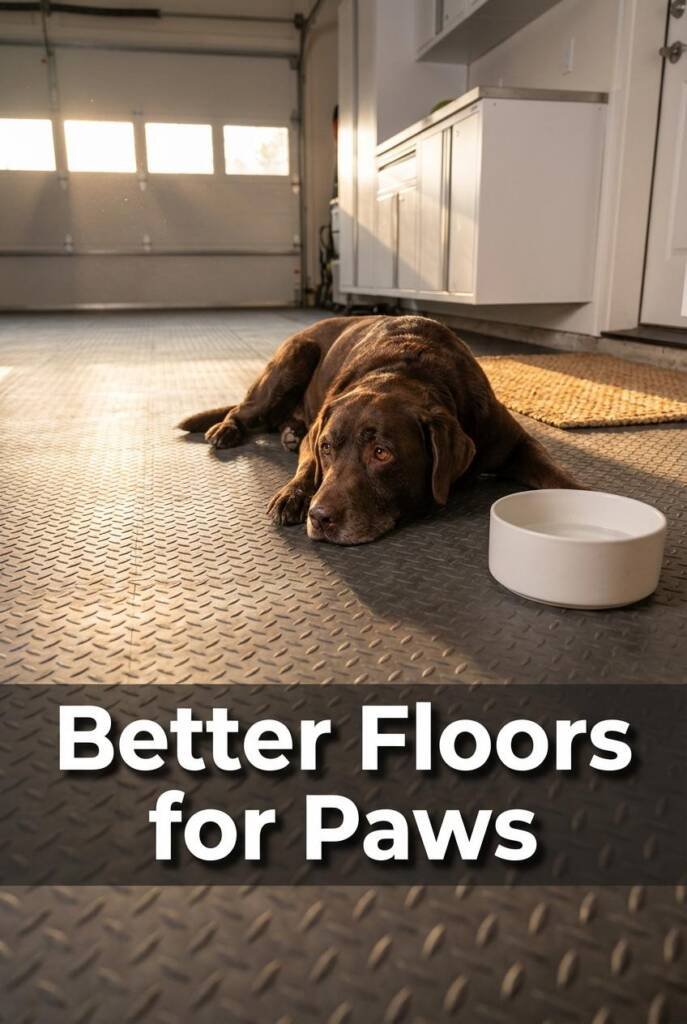
Your dog shouldn’t have to choose between hanging out with you in the garage and lying on a surface that makes their joints ache.
Cold concrete is brutal on aging joints — canine or human. Rubber interlocking floor tiles transform your garage from a harsh utility space into a comfortable zone where your dog actually wants to hang out. They come in a range of colors and textures, so you can create a clean, finished look that makes the whole garage feel intentional rather than thrown together.
For dogs specifically, the cushioned surface reduces impact stress on hips and knees, which is a game-changer if your pup has arthritis or joint issues. The IncStores 3/8-inch thick rubber tiles (around $3–$4 per square foot) are a solid pick — they’re durable enough to handle car tires but soft enough for a dog to nap on comfortably. And when your dog tracks in mud, rain, or worse? Pop the tiles apart, hose them down, snap them back. The whole cleanup takes about two minutes versus scrubbing stained concrete on your hands and knees.
Bonus: the rubber provides traction that concrete doesn’t. Older dogs who slip on smooth garage floors suddenly have grip again, which means fewer injuries and more confidence moving around the space.
How to Install Interlocking Rubber Garage Tiles Over a Weekend
- Measure and Prep the Floor: Calculate your square footage and order 10% extra for cuts and waste. Sweep the concrete clean — any debris underneath will create uneven spots.
- Dry-Fit Your Layout: Lay tiles starting from one corner without locking them, adjusting until the pattern reaches each wall. Trim edge pieces with a utility knife and straightedge.
- Lock Tiles Together: Starting from your corner, press interlocking edges firmly until they click flat. A rubber mallet helps seat stubborn connections without damaging the tile surface.
- Seal the Perimeter: Install IncStores border ramp edges ($1.50–$2 per linear foot) along exposed sides to prevent tripping and keep tiles from shifting under weight.
- Budget move: Cover just your dog’s primary zone — a 6×8-foot section runs about $150–$190 in rubber tiles, versus $500+ for a full two-car garage.
7. A Fold-Down Workbench That Disappears When It’s Playtime
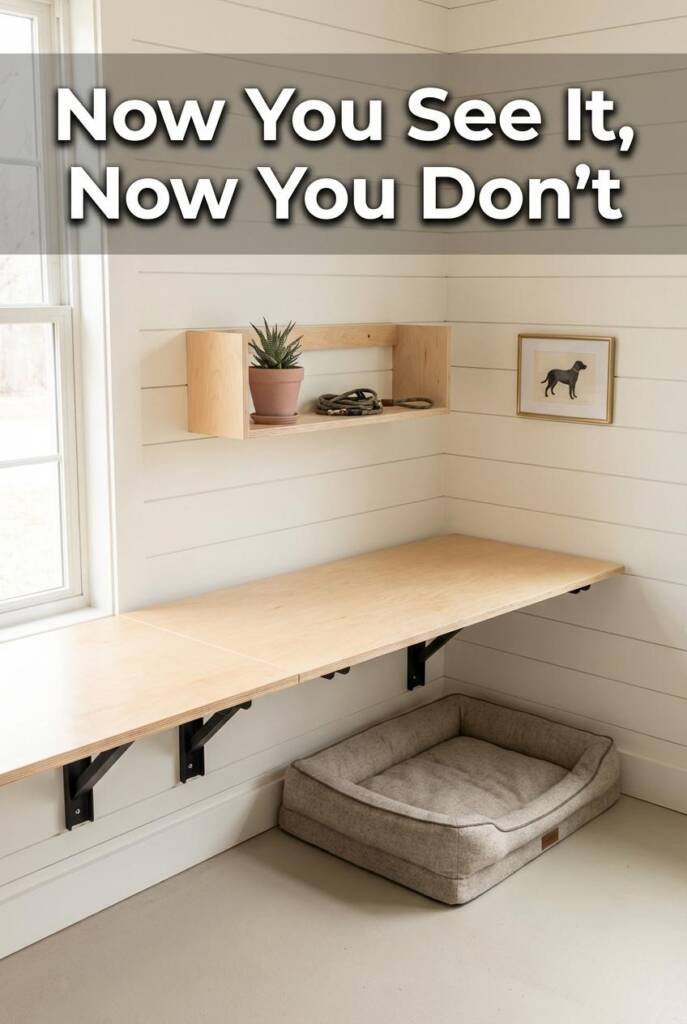
Your workbench is hogging square footage your dog could be using — so teach it to fold.
A fold-down workbench is the ultimate garage hack — full workspace when you need it, completely clear floor when you don’t. Mount a 2×4-foot bench to the wall with heavy-duty hinges, add folding leg brackets, and you’ve got a surface that swings flat against the wall in seconds. When it’s up, the transformation is dramatic: your dog suddenly has an open, obstacle-free zone to stretch out, play fetch, or just hang while you tinker with something else.
This matters more than you’d think for dog safety. Fixed workbenches collect sharp tools, loose screws, and chemical spills right at nose level. A fold-down version forces you to clear the surface every time you pack up — which means fewer hazards within sniffing range. The Bench Solution fold-down workbench ($89 on Amazon) supports up to 200 pounds and mounts to standard stud spacing, making it a solid turnkey option if you’d rather skip the DIY route.
Bonus: mount a magnetic tool strip above the bench height so everything stays on the wall even when the surface folds away. Your dog gets clean floor space, you lose nothing in functionality.
How to Build a Space-Saving Fold-Down Workbench for Under $100
- Mount the support frame: Secure a 48-inch French cleat or heavy-duty piano hinge into two wall studs at 36 inches high using 3-inch lag bolts.
- Attach the work surface: Use a ¾-inch birch plywood top (2×4 feet) — it’s lightweight enough to fold easily but rigid enough to handle real projects.
- Install folding leg brackets: Pick up a pair of Rockler folding leg brackets ($22) and mount them at each corner so the legs tuck flat when the bench swings up.
- Add a wall latch: Secure the bench in the upright position with a heavy-duty gate latch so it can’t accidentally drop on your dog.
- Budget move: A full DIY fold-down bench runs about $55–$75 in materials — skip pre-made kits and buy a half-sheet of plywood, two hinges, and folding brackets separately.
Garage Organization That Welcome Pets
Look at what you just did — or what you’re about to do. You went from a cluttered, dog-unfriendly chaos zone to a garage that functions like a real room in your home. Ceiling storage freed up the floor. Slatwall got your gear off the ground. Interlocking tiles made the space comfortable for paws. And that fold-down workbench? It gave you the ultimate flex: a fully functional workspace that vanishes the second your dog wants to play. Every single one of these projects pulls double duty, looking clean and intentional while making life genuinely better for your pet.
The beauty of smart garage organization is that it doesn’t ask you to choose between a space that looks good and a space that works for a household with animals. You get both. And once you see how much more your dog enjoys a garage that was designed with them in mind, you’ll wonder why you waited so long to make it happen.
Here at Sweet Purrfections, we create content at the intersection of cool home decor and real life with pets. Because we believe your home should look like it belongs in a design magazine AND work for the furry family members who actually run it.