Let’s be honest — if you’ve ever Googled kitchen storage ideas only to scroll past a hundred gorgeous pantries that clearly belong to people who’ve never had to hide a bag of Fancy Feast behind the quinoa, you know the frustration. Most kitchen organization content pretends pets don’t exist. But in our homes, the kibble shares shelf space with the cereal, the cat meds sit next to the vitamins, and there’s always a rogue treat pouch crammed in a drawer that won’t close. It’s time for storage solutions that acknowledge real life — fur babies and all.
That’s exactly why we put together this collection of 18 ideas that marry serious design with the very specific chaos of living with pets. We’re talking solutions that look intentional, not improvised. Think custom-looking built-ins, clever IKEA hacks, and repurposed vintage finds that make your cat’s supplies look like curated decor rather than clutter you shoved behind a cabinet door.
Every idea on this list comes with a practical DIY breakdown — materials, approximate cost, and step-by-step guidance — so you can actually execute these over a weekend instead of just pinning them into oblivion. Whether you’re renovating a full kitchen or just trying to bring order to one overstuffed pantry shelf, there’s something here for every budget and skill level. Let’s get into it.
1. The Pull-Out Pantry Drawer That Hides an Entire Pet Feeding Station
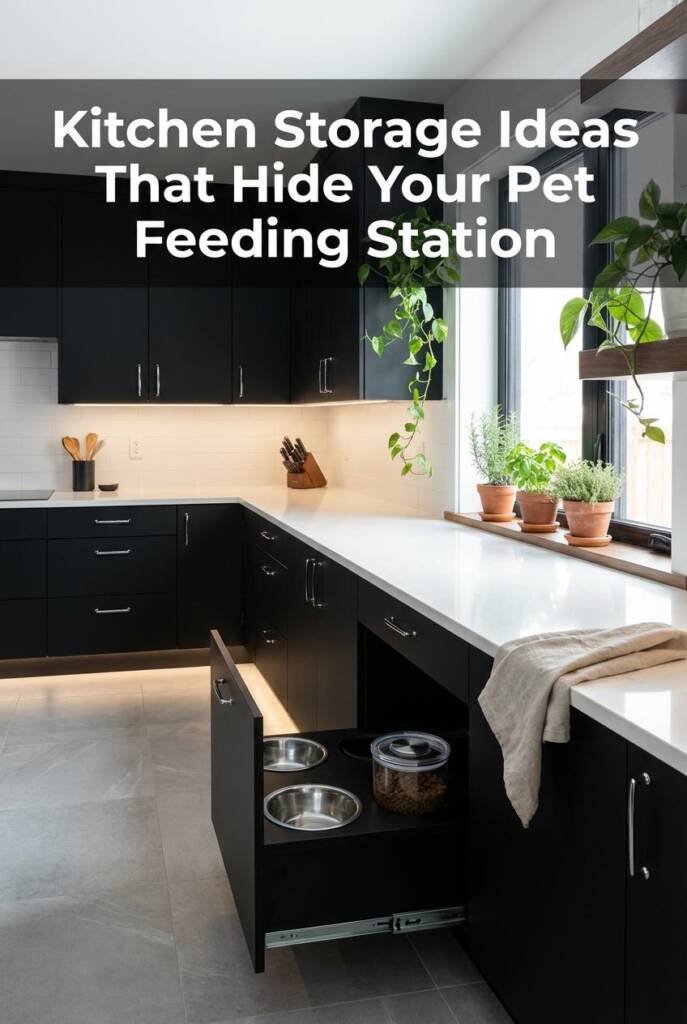
Your kitchen floor doesn’t need to be a pet food obstacle course — this pull-out drawer hides the entire mess behind a single cabinet door.
A deep pull-out pantry drawer installed in a base cabinet creates a fully hidden pet feeding station that disappears the moment you slide it shut. We’re talking food bowls, a water fountain, and an airtight kibble container all tucked behind a cabinet front that matches the rest of your kitchen — no bowls on the floor screaming “cat lady” to your dinner guests. It’s the ultimate kitchen storage idea for anyone who wants function without visual clutter.
This setup works especially well for cats because they prefer eating in calm, enclosed spaces away from foot traffic. Mount a Cat Mate Pet Fountain ($35 on Amazon) inside the drawer for fresh running water, and pair it with a SimpleHuman airtight container to keep kibble from going stale. The pull-out mechanism means you can clean, refill, and maintain everything without crawling on the floor — just slide, serve, and close.
One detail that makes this truly seamless: cut a small notch in the back of the drawer for the fountain’s power cord so the cabinet door closes flush every time.
How to Convert a Base Cabinet into a Hidden Pet Feeding Station
- Choose your cabinet: Pick a base cabinet at least 24″ wide and 20″ deep — standard kitchen dimensions work perfectly. Remove any existing shelving inside.
- Install heavy-duty slides: Mount full-extension ball-bearing drawer slides rated for 100+ lbs (Liberty D80624C, about $25/pair) so the drawer glides out completely for easy access.
- Build or buy the drawer box: Use 3/4″ plywood to build a drawer box, or order a custom pull-out tray from Rev-A-Shelf (starting around $60). Line the bottom with a waterproof mat to catch spills.
- Route the power cord: Drill a 1″ hole in the back panel of the drawer box for the water fountain cord, then feed it to the nearest outlet inside the cabinet.
- Budget move: Skip the custom pull-out and retrofit an existing deep drawer with a $12 waterproof boot tray as the feeding station base.
2. Matching Airtight Canisters That Make Kibble Look Like Artisan Flour
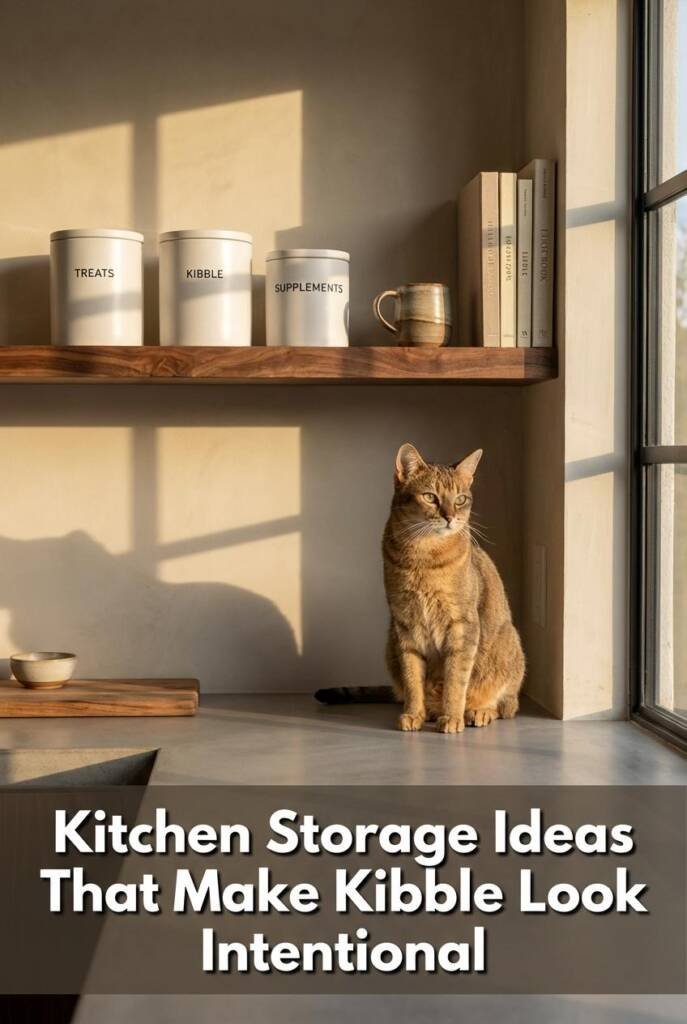
That ripped kibble bag leaning against your KitchenAid is doing absolutely nothing for your kitchen’s vibe.
Nobody wants a torn bag of Purina slumped against the backsplash like it lost a fight. Decanting kibble and treats into matching airtight canisters instantly makes your countertop look curated — like a coffee bar setup, but for your cat. The visual trick is simple: uniform containers with clean labels replace chaotic packaging with calm, intentional styling that actually fits your kitchen aesthetic.
Beyond looks, airtight storage keeps kibble fresher longer by blocking moisture and air — something cats notice, even if they won’t thank you for it. The mDesign Airtight Pet Food Storage Canister Set (around $28 for a set of two on Amazon) comes in matte white or clear options that pair beautifully with most kitchen styles. Size matters: a standard 3.5-quart canister holds roughly 4–5 pounds of dry food, which is the sweet spot for a single-cat household without dominating your counter.
For the finishing touch, add waterproof vinyl labels from a shop like Talented Kitchen ($13 for a customizable set) so guests see “Kibble” and “Treats” instead of guessing which jar holds the cat food and which holds the granola.
How to Style Pet Food Canisters That Actually Look Intentional
- Choose your canister style: Pick 2–3 matching airtight canisters in the same material — glass, ceramic, or matte plastic. Keep them between 2.5 and 4 quarts so they hold enough food without overwhelming your counter.
- Decant and seal: Pour kibble, treats, and any supplements into separate canisters immediately after opening the bag. Toss a silica packet inside each one to absorb excess moisture.
- Label everything: Apply waterproof vinyl labels with a clean font — Talented Kitchen and Pantry Luxe both offer pet-specific sets for under $15. Consistent labeling is what makes it look styled instead of random.
- Group with intention: Arrange canisters on a small tray or cutting board to anchor them as a vignette, keeping the tallest container in the back. A 10×14-inch wooden tray from Target ($10–$12) works perfectly.
- Budget move: Dollar Tree carries 2.5-quart screw-top glass jars for $1.25 each — buy three, add a $5 label set, and you’re styled for under $9.
3. The IKEA SEKTION Hack That Gives Pets Their Own Built-In Pantry
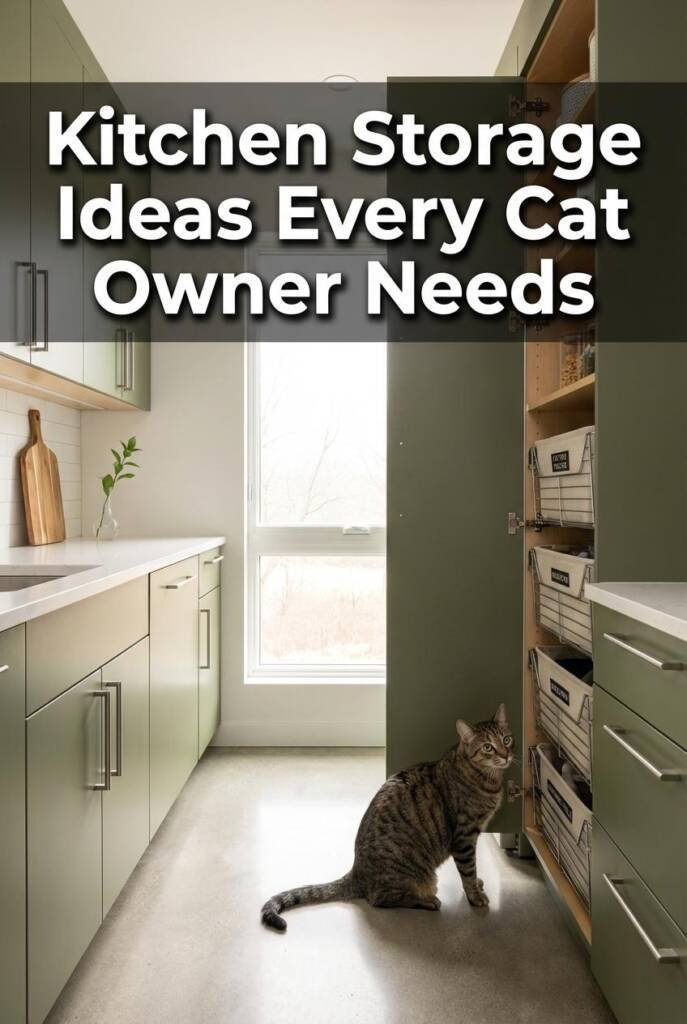
Your cat’s entire supply closet can hide behind one sleek cabinet door — and IKEA doesn’t even know they designed it for that.
A standard IKEA SEKTION frame (starting at $89 for a 15″ × 24″ × 80″ tall cabinet) becomes a jaw-dropping built-in pet pantry when you add custom pull-out inserts and matching door fronts. Positioned at the end of a cabinet run or flanking your fridge, it looks like it was always part of the kitchen — no one suspects it’s housing kibble, treats, and a litter supply stash until you swing the door open.
The magic is in the interior configuration. Fit the upper section with adjustable shelves for cat food cans and supplements, then install a pull-out drawer or tilt-out bin in the lower section for dry food storage. We love pairing this with the simplehuman Pet Food Can ($30) on one shelf — its airtight seal keeps wet food fresh and the stainless finish looks intentional next to SEKTION’s clean lines. For multi-cat households, dedicate one shelf per cat with labeled bins so feeding time doesn’t turn into a scavenger hunt.
The best part? IKEA’s modular system means you can swap inserts as your needs change — add hooks inside the door for scoop storage, or mount a small acrylic shelf for medications without drilling into your actual kitchen walls.
How to Build a Pet Supply Pantry Using IKEA SEKTION Cabinets
- Choose Your Frame Size: Select a SEKTION high cabinet (the 15″ × 24″ × 80″ frame at $89 works perfectly for a narrow pantry) and pick a door front that matches your existing kitchen cabinetry.
- Plan Your Interior Layout: Measure your largest pet food bag or container, then order UTRUSTA pull-out shelves ($26 each) for the upper zones and a MAXIMERA deep drawer ($52) for the bottom section.
- Add Airtight Storage Inside: Fill shelves with uniform airtight containers — IKEA 365+ dry food jars ($9.99) or OXO POP containers keep everything sealed and visible at a glance.
- Mount Door-Back Storage: Attach Command strip hooks or a slim wire rack to the inside of the cabinet door for scoops, treat pouches, and feeding schedules.
- Budget move: Skip IKEA’s custom door fronts and use SEMIHANDMADE panels (from $79) for a designer look at roughly half the cost of fully custom cabinetry.
4. A Vintage Bread Box Repurposed as the Cutest Treat Dispenser Ever
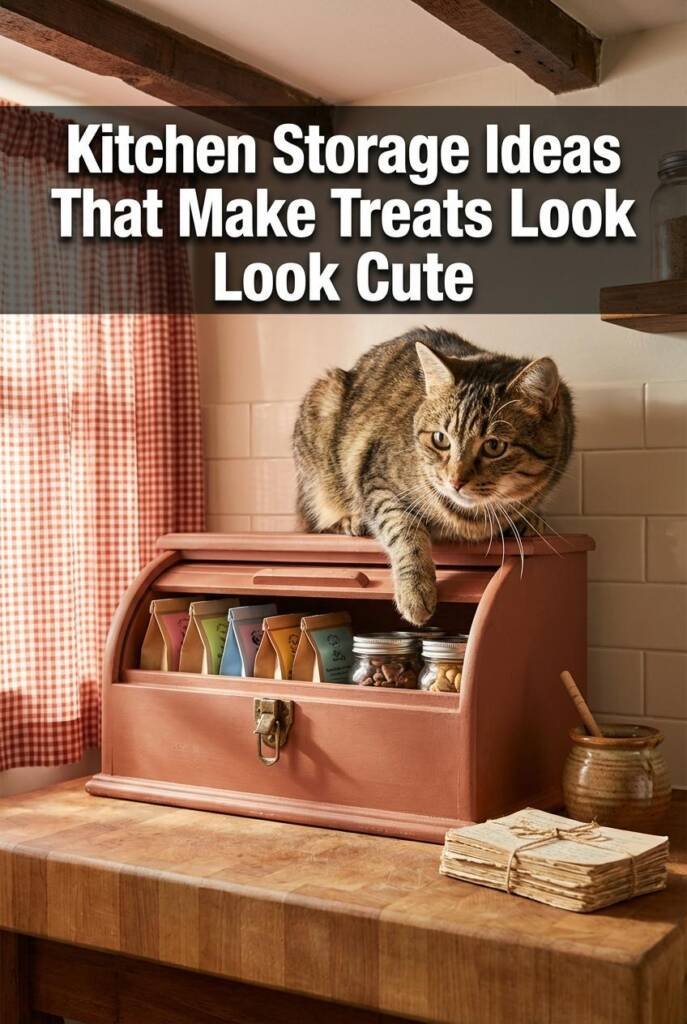
Your grandma’s bread box just got a second career — and honestly, it’s an upgrade.
A vintage bread box on your countertop looks like a deliberate design choice — nobody walking into your kitchen would guess it’s full of salmon-flavored cat treats. The roll-top or flip-lid style keeps everything sealed and accessible, and that retro silhouette adds warmth to any kitchen, whether you’re going mid-century modern or farmhouse. It’s one of those kitchen storage ideas that solves a problem while actually making your space prettier.
Bread boxes are perfectly sized for treat storage — most have roughly 16″ x 9″ interiors, enough room for multiple bags or containers of treats plus a small scoop. The enclosed design keeps treats fresh longer than an open bowl and blocks light, which degrades flavor and nutrients over time. The Typhoon Living Bread Bin (around $40 on Amazon) comes in cream, grey, and pastel shades with a bamboo lid that doubles as a cutting board — genuinely gorgeous. Line the inside with a small silicone mat for easy cleanup, and you’ve got a treat station that looks like it belongs in a design blog photo shoot.
How to Repurpose a Vintage Bread Box for Stylish Treat Storage
- Find the right box: Look for a bread box with a roll-top or lift-lid in the 16″ x 10″ range — thrift stores typically carry them for $8–$15, or grab the Typhoon Living Bread Bin new for about $40.
- Prep the interior: Wipe it down with white vinegar, let it dry completely, then line the bottom with a cut-to-fit silicone baking mat to catch crumbs and keep things sanitary.
- Organize the treats inside: Transfer treats into small glass jars or OXO Good Grips POP containers (the 0.4 qt size fits perfectly) so you can see what’s running low at a glance.
- Style the exterior: Place it alongside your coffee station or near the toaster so it blends with your countertop rhythm — add a small potted herb next to it for the full aesthetic moment.
- Budget move: Vintage bread boxes at Goodwill or estate sales typically run $5–$12, making this the cheapest countertop upgrade you’ll ever love.
5. Under-Sink Organization That Finally Tames the Cleaning-Plus-Cat-Stuff Chaos
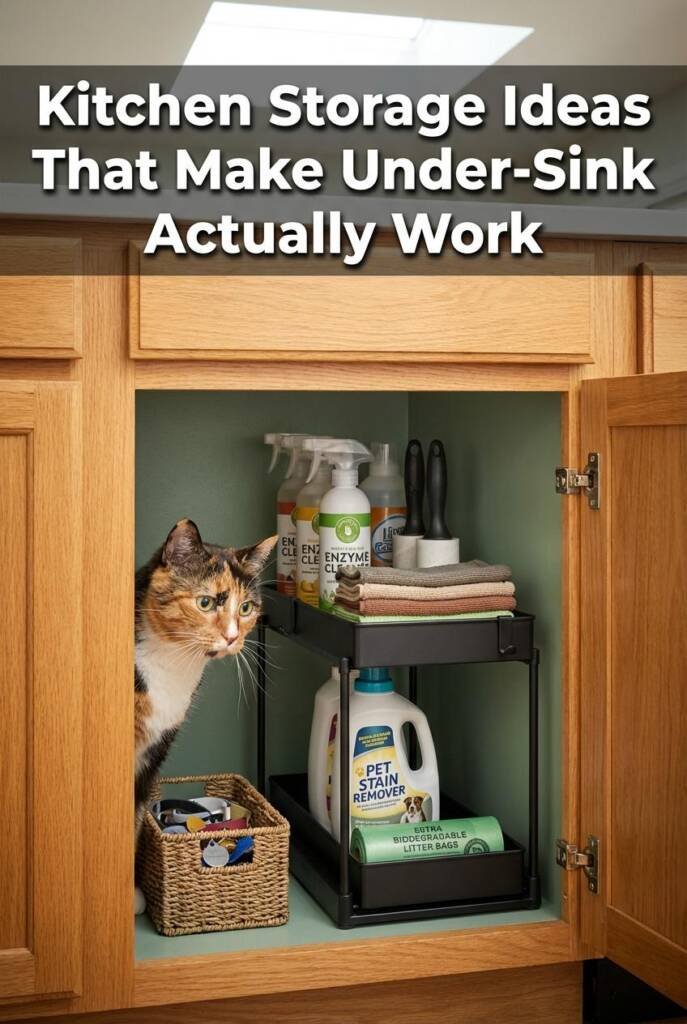
That cabinet under your sink isn’t a lost cause — it’s about 15 minutes and one expandable shelf away from being the most organized spot in your kitchen.
Under-sink cabinets are where organization goes to die — bleach bottles crammed against cat stain remover, lint rollers buried behind dish soap, and that bag of emergency kibble you forgot existed. A tiered pull-out organizer system changes everything by creating distinct zones: human cleaning on one side, pet cleaning on the other, with a top shelf for smaller items like grooming wipes and odor sprays. The visual effect when you open the cabinet is genuinely satisfying — everything visible, everything reachable, nothing falling over.
The SimpleHouseware Under Sink 2-Tier Expandable Shelf Organizer ($17–$22 on Amazon) is the workhorse here. It adjusts from 15 to 25 inches wide to fit around your plumbing, and the two-tier design gives you roughly double the usable space. Pair it with small labeled bins — one for cat-specific supplies like enzyme cleaners, fur removers, and feeding mat spray, another for general kitchen cleaning. You’ll stop rummaging and start grabbing exactly what you need in seconds.
For homes with curious cats, this setup also lets you add a simple child-lock to the cabinet door, keeping toxic cleaning products safely separated from the pet-safe ones you might be less careful about securing.
How to Organize Under Your Kitchen Sink for Pet and Cleaning Supplies
- Clear and categorize everything: Pull everything out from under your sink and sort into three piles: general cleaning, pet cleaning, and toss. Be ruthless — if it’s expired or half-empty with a duplicate, it goes.
- Install a tiered expandable shelf: Set up a 2-tier expandable organizer like the SimpleHouseware model ($17–$22), adjusting it to fit snugly around your pipes with at least 2 inches of clearance.
- Zone it with labeled bins: Place small open bins (6×8-inch size works well) on each tier — pet supplies on the left, household on the right. Label the front edge with a strip of washi tape or a mini chalkboard tag.
- Add a cabinet door rack for extras: Mount a $7–$10 adhesive door-mount rack on the inside of the cabinet door for flat items like lint rollers, rubber gloves, and travel-size pet stain remover.
- Budget move: Dollar Tree sells stackable clear bins and adhesive door hooks that can replicate this entire setup for under $10.
6. The Magnetic Spice Rack Trick for Tiny Cat Medication Bottles
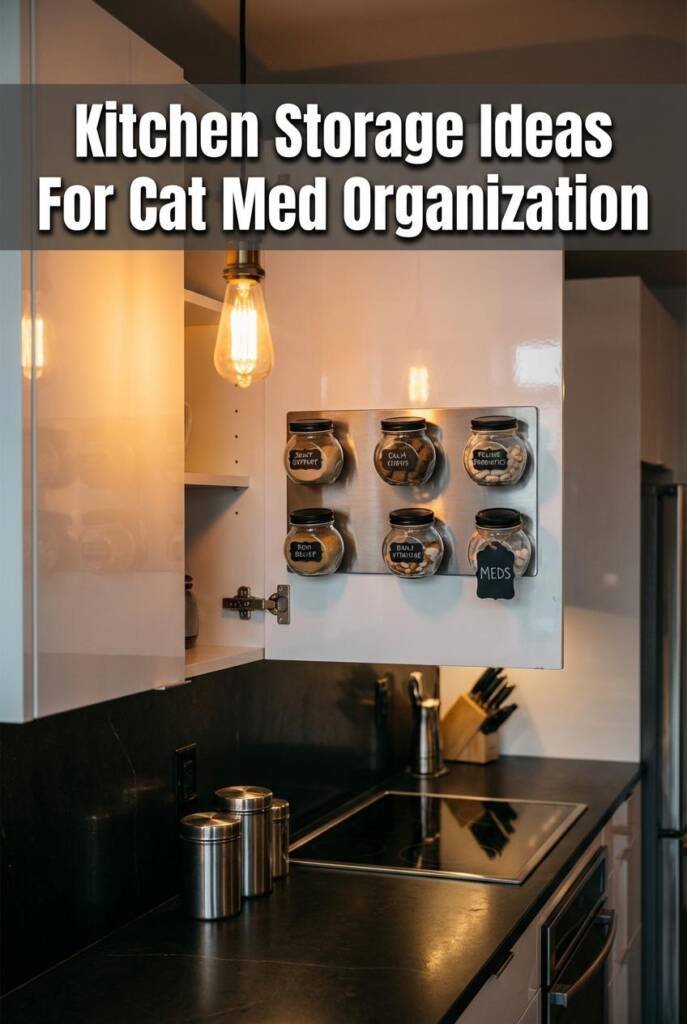
If you’ve ever panic-searched three drawers for your cat’s medication at 10 PM, this one’s for you.
Those tiny bottles of Gabapentin, Cerenia, and eye drops have a way of migrating to the back of your junk drawer, where they expire forgotten. Mount a row of magnetic spice jars on the inside of a cabinet door and suddenly every medication is visible, labeled, and completely out of paw’s reach. The clean grid of matching containers looks intentional — like a mini apothecary tucked behind your cabinet front.
This trick works especially well for cats because feline medications tend to come in small volumes — 1-2 oz bottles and half-empty blister packs that get lost among human stuff. The Gneiss Spice magnetic jars (set of 24 for around $40 on Amazon) have clear lids so you can read labels at a glance and a strong enough magnet to hold small syringes too. Stick the included metal plate inside any upper cabinet door and you’ve got instant organization without drilling into shelves.
Bonus: add a small label with dosage and frequency to each jar lid. When your pet sitter or partner needs to give meds, they’re not texting you a photo of three identical brown bottles asking “which one?”
How to Use Magnetic Spice Jars to Organize Pet Medications
- Install the magnetic plate: Clean the inside of an upper cabinet door with rubbing alcohol and mount the adhesive-backed metal strip — most kits include one around 10″ × 12″.
- Transfer and label: Place each medication bottle or blister pack into its own magnetic jar and add a label with the pet’s name, dosage, and expiration date.
- Arrange by frequency: Group daily meds at eye level and as-needed medications lower — you’ll grab the right jar without thinking.
- Check monthly: Do a 60-second sweep on the first of each month to toss anything expired and restock from your vet.
- Budget move: Dollar Tree sells 3-packs of small magnetic containers for $1.25 — grab four packs and you’re fully stocked for $5.
7. A Built-In Window Seat With Secret Pet Supply Storage Underneath
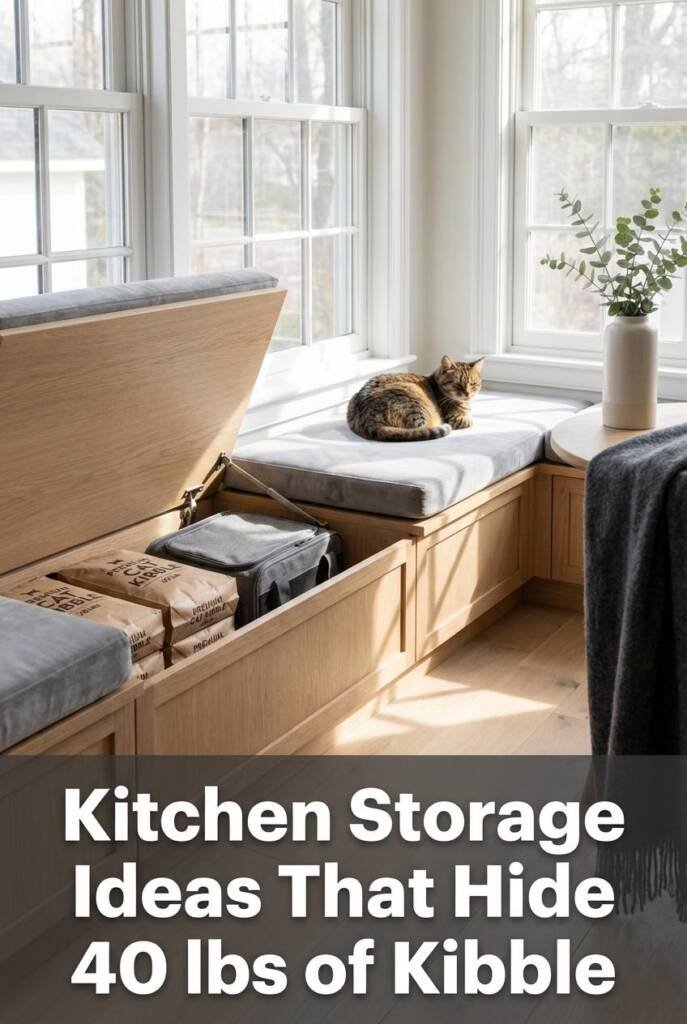
Your cat’s going to steal this seat anyway — you might as well hide 40 pounds of their kibble underneath it.
A built-in window seat with lift-top storage is one of those kitchen storage ideas that makes people ask who your designer is — while secretly holding 40+ pounds of kibble underneath. The banquette-style bench tucks neatly beneath a kitchen window, creating a cozy breakfast nook vibe with clean lines, zero clutter, and a cushioned top that doubles as your cat’s favorite sunbathing spot. Stain the base to match your cabinetry and it looks completely intentional.
Cats will claim this seat within minutes, and honestly, that’s a feature, not a bug. The lift-top design means you can store bulk pet food bags, treats, and extra supplies out of sight without sacrificing a single inch of cabinet space. Line the interior with a cedar panel or drop in a Gamma2 Vittles Vault ($25–$40 on Amazon) to keep food airtight and pest-free inside the bench. For homes with south- or west-facing kitchen windows, this becomes prime real estate for your cat — warm sun, a view of the birds, and a cushion all their own.
How to Design a Kitchen Window Seat With Hidden Pet Storage
- Measure and frame the bench: Build a rectangular frame from 2x4s to fit your window width, with a seat height of 18–20 inches and a depth of at least 16 inches for comfortable seating and ample storage volume.
- Install a lift-top mechanism: Use a pair of heavy-duty lid-stay hinges ($8–$12 at Home Depot) so the top stays open hands-free while you scoop or restock supplies.
- Line the interior for food storage: Add a removable plastic bin or airtight Vittles Vault container inside to keep kibble fresh and separate from leashes, toys, or grooming supplies.
- Finish with a cushion and trim: Top with a 3-inch foam cushion covered in washable fabric, and add baseboard trim around the base to match your existing kitchen millwork.
- Budget move: Skip custom carpentry and convert an IKEA KALLAX shelf ($69.99) on its side with a plywood lid and piano hinge for a budget window seat that holds the same amount of storage.
8. Lazy Susan Turntables That Spin Your Cat’s Entire Meal Prep Into View
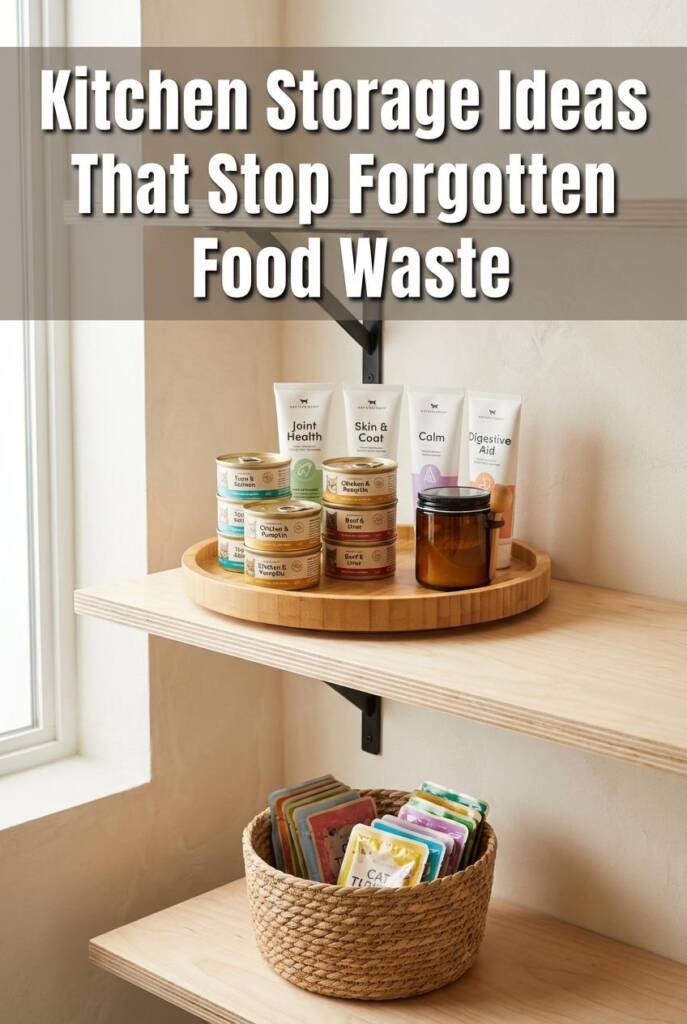
Every forgotten can in the back of your pantry is money (and a meal) wasted.
A two-tier lazy Susan turntable inside your pantry cabinet turns that chaotic pile of cat food cans, treat pouches, and supplement bottles into a single, satisfying spin. Instead of digging through rows of identical cans and discovering expired food months later, everything rotates into view with a flick of your wrist. It’s the kind of kitchen storage idea that looks intentional — like you planned your pantry, not just stuffed it.
The Copco Non-Skid 2-Tier Lazy Susan (about $20 on Amazon) fits most standard 24-inch pantry cabinets and holds a surprising amount — we’re talking 20+ 5.5-oz cans of Fancy Feast on the bottom tier alone, with the top tier reserved for supplements, probiotics, and those half-used treat bags. The non-skid surface keeps lightweight pouches from sliding around every time you rotate. For multi-cat households juggling prescription diets alongside regular food, dedicate one tier per cat so you never grab the wrong dinner.
How to Use Lazy Susan Turntables for Pet Food Cabinet Organization
- Measure your cabinet: Check the interior width of your pantry shelf — most lazy Susans need at least 10 inches of clearance, and 12 inches is ideal for a two-tier model.
- Group by category: Place heavier cans on the bottom tier and lighter items like treat pouches, supplements, and dental chews on top to keep the turntable balanced.
- Face labels outward: Arrange cans with labels facing out and oldest expiration dates at the front so you use them first — FIFO style, just like a restaurant.
- Add a small label clip: Stick a removable adhesive label on each tier’s edge (Command strips work great at $3/pack) to mark categories like “AM meals” and “PM meals.”
- Budget move: Skip the brand-name turntable and grab a basic 10-inch plastic lazy Susan from Dollar Tree for $1.25 — it holds a dozen cans just fine.
9. The Open Shelving Display That Makes Pet Bowls Look Like Collected Pottery
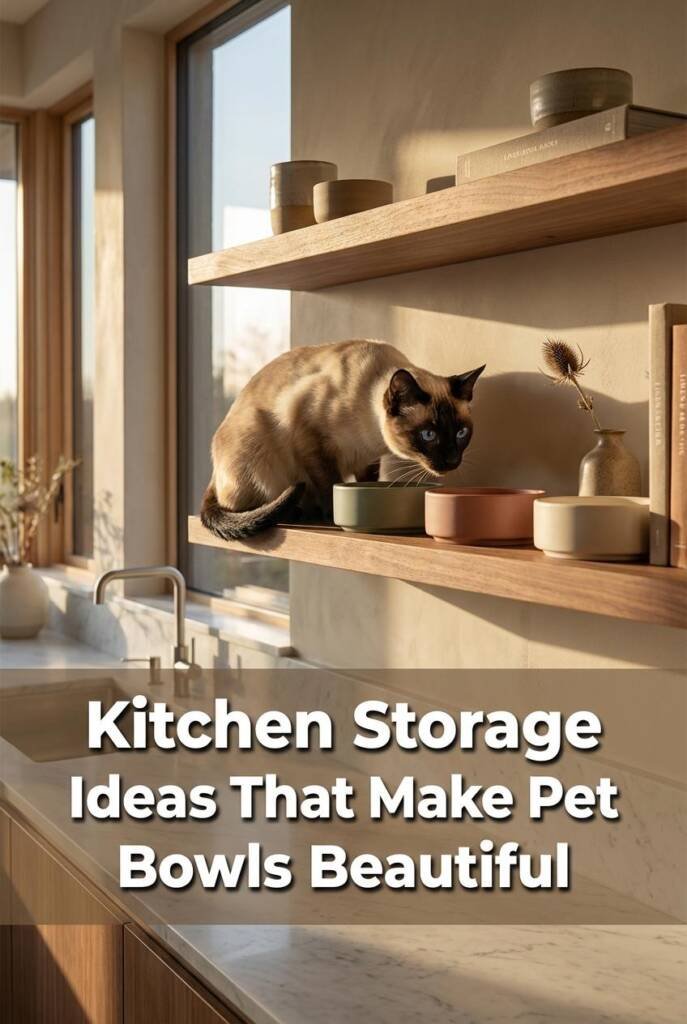
Your cat’s bowl might be the most beautiful dish in your kitchen — so stop hiding it under the table.
Handmade ceramic pet bowls are genuinely beautiful objects — the glazes, the organic shapes, the weight of them in your hand. So why hide them in a cabinet between meals? Styled on open kitchen shelving alongside your regular dishes, mugs, and cookbooks, they read as collected pottery rather than pet supplies. The effect is effortless and elevated, especially when you mix sizes and glaze colors within a cohesive palette.
For cats, this approach is especially practical. Keeping bowls up on shelves between feedings means cleaner floors, less dust in the bowls, and no tripping over them when you’re cooking. Brands like East Fork and Waggo make stunning ceramic cat bowls starting around $28–$45 that hold their own next to your nicest tableware. If you prefer something artisan, Etsy potters offer one-of-a-kind pieces with hand-thrown imperfections that make the display feel curated, not catalog-perfect.
How to Display Pet Bowls as Decorative Objects on Open Shelves
- Choose Your Shelf Placement: Dedicate one section of open shelving at eye level or just below, ideally within 2–3 feet of where you prep food so grab-and-go at mealtime is easy.
- Build a Cohesive Collection: Start with 3–5 bowls in complementary glazes — mixing matte and glossy finishes adds depth. Waggo’s Dipper Bowl ($34) pairs beautifully with handmade pieces.
- Style With Intention: Lean a small cutting board or cookbook behind the bowls to create layers, and leave a few inches of breathing room between pieces so each one reads individually.
- Rotate and Wash: Swap bowls in and out as you use them — hand wash with mild soap and let them dry on the shelf, making the display feel alive rather than static.
- Budget move: Thrift stores and pottery seconds sales often have handmade ceramic bowls in pet-friendly sizes for $5–$12 — just check for food-safe glazes.
10. A Toe-Kick Drawer You Didn’t Know Existed — Perfect for Flat Food Pouches

You’ve been walking over free storage space every single day.
That 4-inch gap between your base cabinets and the floor? It’s not just dead space — it’s a hidden drawer waiting to happen. A toe-kick drawer sits flush with your cabinet base, completely invisible until you pull it open with a tap or a slim handle. It’s the definition of hidden kitchen storage: no visual clutter, no sacrificed cabinet space, and guests will genuinely not know it’s there.
This is a dream spot for flat cat food pouches like Weruva Cats in the Kitchen (around $1.50 each), which stack perfectly in a 3.5-inch-tall drawer. Toss in silicone feeding mats, flavor variety packs, or even a flat container of treats. Because the drawer glides out at floor level, it’s also surprisingly easy to grab what you need during morning feeding — no bending into a deep cabinet. For homes where every inch of kitchen storage matters, this is the kind of idea that makes you wonder why it isn’t standard in every build.
How to Install a Toe-Kick Drawer for Hidden Pet Supply Storage
- Measure the void: Check the space between the bottom of your base cabinet and the finished floor — most kitchens have 3.5–4.5 inches. You need at least 3 inches of usable interior height for this to work.
- Buy or build the drawer: DERA toe-kick drawer kits run about $60–$90 on Amazon and come with soft-close slides rated for 50 lbs. Alternatively, a woodworker can build one from ½-inch plywood for around $40 in materials.
- Install the slides and box: Mount the ball-bearing slides to the cabinet base frame, then attach the drawer box. The whole install takes about 45 minutes with a drill and a level.
- Add a trigger mechanism: Install a push-to-open latch (about $5) so you don’t need a visible handle — just tap the face panel with your foot and the drawer glides out.
- Budget move: Skip the kit entirely and repurpose a shallow under-bed storage tray with adhesive drawer slides for under $20 total.
11. A Pegboard Wall That Organizes Leashes, Brushes, and Treats in One Gorgeous Grid
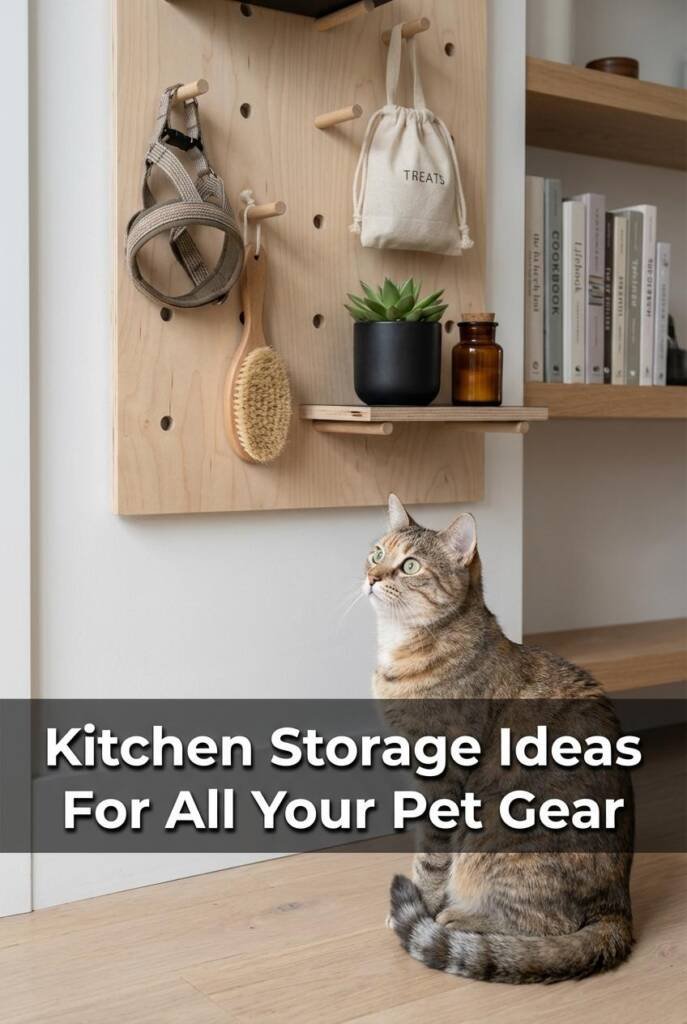
Your kitchen wall is doing nothing — put it to work with a pegboard that organizes every piece of pet gear in one satisfying grid.
A pegboard wall turns a blank stretch of kitchen real estate into a visual grid where every leash, brush, treat bag, and roll of waste bags has its own designated spot. The uniform rows and columns create an inherently organized look — paint the board a rich color like sage green or matte black and it reads more like intentional wall art than utility storage. It’s the kind of setup that makes guests say “wait, that’s for the *cat*?”
For cat households specifically, pegboard shines because feline gear is mostly small and lightweight — exactly what hooks and bins handle best. Hang grooming brushes, nail clippers, and harnesses on J-hooks, then add small wire baskets for treat pouches and catnip toys. The Wall Control 32″ x 32″ metal pegboard panel ($35–$45 at Home Depot) is sturdier than classic hardboard and comes in multiple colors, so you skip the painting step entirely. Mount it near your pantry or mudroom-adjacent wall and you’ve built a pet command center that keeps counters and junk drawers completely clear.
How to Create a Kitchen Pegboard Organization Wall for Pet Supplies
- Choose Your Panel and Location: Mount a 32″ x 32″ metal pegboard panel on a wall near your kitchen entry or pantry at eye level, using the included mounting hardware to leave a ½” gap for hook insertion.
- Map Your Zones: Divide the board into three zones — grooming tools on the left, walking gear in the center, treats and extras on the right — so you always grab what you need without scanning.
- Install Hooks, Bins, and Shelves: Use a mix of J-hooks (for brushes and leashes), 4″ wire baskets (for treat bags), and a small shelf attachment for items like flea medication — Wall Control accessory kits run about $15–$20.
- Label Each Zone: Add small adhesive labels or a strip of chalkboard tape below each section so every family member returns items to the right spot.
- Budget move: Grab a 2′ x 4′ hardboard pegboard from Lowe’s for under $10 and spray-paint it any color you want — total project cost stays below $30.
12. The Credenza-Style Cabinet That Hides a Cat Litter Box in the Kitchen Entryway
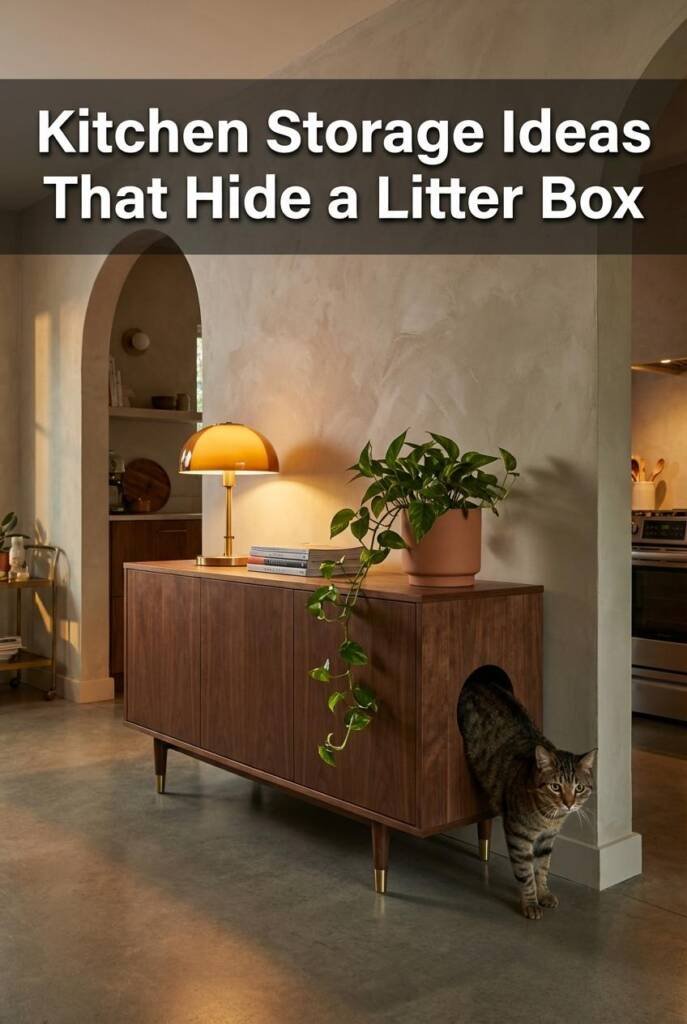
Your litter box belongs in the room you already clean every single day — and this credenza makes sure nobody sees it there.
A credenza-style litter box cabinet gives you the clean lines of mid-century furniture while solving one of the most annoying problems in a cat household — where to put the box without ruining your décor. With tapered legs, a walnut or oak veneer finish, and a discreet side entry cut into one end, it reads as a sleek console table in your kitchen entryway. Guests won’t know what’s inside unless your cat strolls out mid-conversation.
Placing the litter box in or near the kitchen makes practical sense: you’re already in there daily wiping surfaces and taking out trash, so scooping becomes part of the routine instead of a separate chore. The Merry Products Walnut Cat Washroom Bench (around $150 on Chewy) is a popular option with a towel bar and interior divider, though true credenza-style pieces from brands like New Age Pet run $180–$250 and look more like actual furniture. Either way, make sure the interior height clears at least 14 inches so your cat can comfortably turn around inside.
How to Conceal a Litter Box Inside a Kitchen Credenza Cabinet
- Choose the Right Credenza Size: Measure your largest litter pan and add 4 inches on each side for comfort — most standard pans need a cabinet interior of at least 24″W × 18″D × 15″H.
- Cut or Position the Entry: Place the side entry hole (roughly 7–8 inches wide) facing a wall or corner so litter scatter stays hidden and your cat has a clear, private path in.
- Line the Interior: Lay a waterproof liner or a $12 silicone boot tray inside the cabinet to catch any misses and make cleanup a 30-second job.
- Add Ventilation: Drill two or three 1-inch holes along the back panel or install a small USB-powered fan ($10 on Amazon) to keep air circulating and odors from building up.
- Budget move: Convert a thrifted MCM credenza into litter box furniture for under $60 — just cut an entry hole, seal the wood interior with polyurethane, and add a waterproof mat.
13. Clear Stackable Bins That Turn Your Pantry Into a Pet Supply Boutique
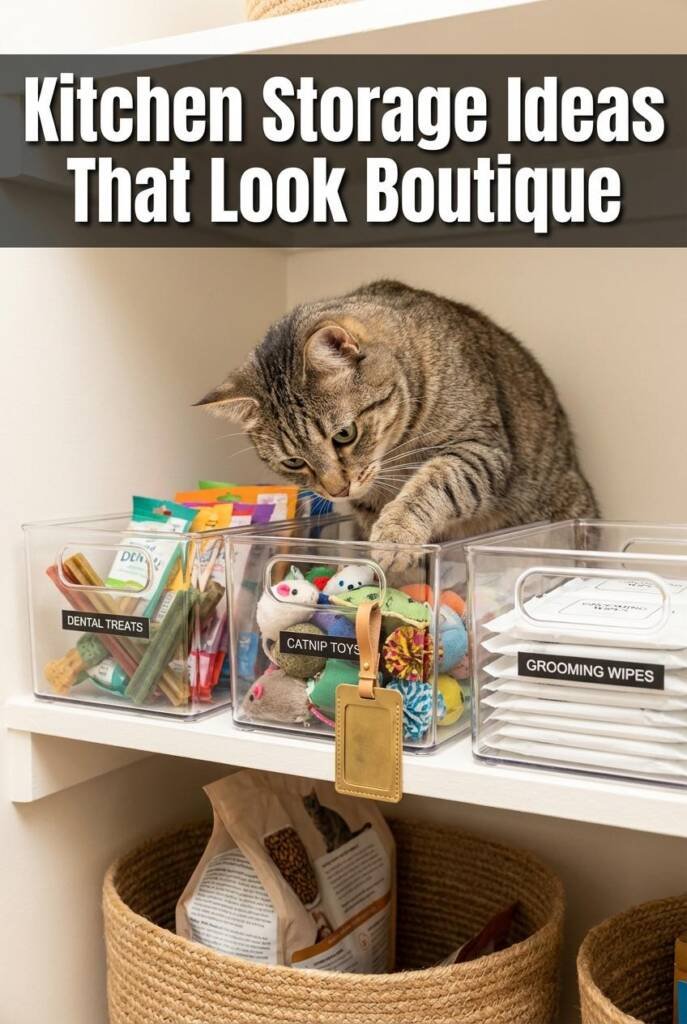
Your pantry’s pet shelf doesn’t have to look like a junk drawer with fur in it.
Uniform clear stackable bins do something no basket or bag ever will — they let you see exactly what you have while making your pantry look like it belongs in a Container Store ad. Line up treats, dental chews, catnip, supplements, and spare toys in matching bins on a single shelf, slap on a minimalist label, and suddenly your pet supplies look curated instead of crammed. The visual consistency is what sells it; even mundane items like hairball paste tubes look intentional when they’re housed in identical containers.
For cat households, these bins are a game-changer because cat supplies tend to be small, oddly shaped, and easy to lose behind cereal boxes. The mDesign Stackable Plastic Storage Bins (around $25 for a set of four on Amazon) are 10 inches deep with built-in handles, so you can pull one out like a drawer. Stack two high, line three across, and you’ve got a complete pet supply boutique on a single 30-inch pantry shelf. Add printed labels from a Cricut or grab waterproof vinyl ones from Etsy for $8–$12, and the whole setup looks like it was styled for a photo shoot.
How to Organize a Pantry Pet Section With Clear Stackable Bins
- Measure and plan your shelf: Measure your pantry shelf width and depth, then calculate how many 10×6-inch bins fit in rows of two high and two or three across.
- Sort supplies into categories: Group items into logical bins — treats, medication/supplements, grooming tools, and toys — tossing anything expired or forgotten.
- Label each bin: Use a label maker or waterproof vinyl labels ($8–$12 on Etsy) in a consistent font and color for that boutique-clean look.
- Stack and adjust: Place heavier bins on the bottom and lighter ones on top, leaving at least 1 inch of clearance above the top row so lids open easily.
- Budget move: Dollar Tree carries clear shoe-box-sized bins for $1.25 each — buy six for under $8 and you’ve got the same stacked look without the brand-name price.
14. A Rolling Kitchen Cart That Doubles as a Mobile Pet Feeding and Prep Station
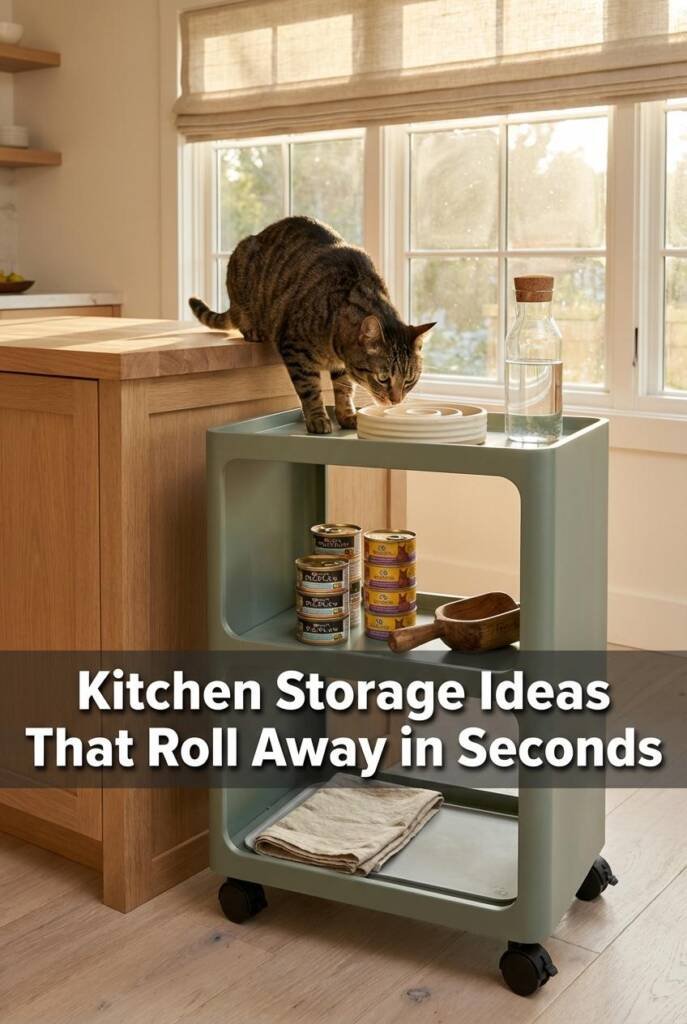
Your cat’s entire mealtime setup rolls out in two seconds and vanishes just as fast.
A slim three-tier rolling cart tucked beside your kitchen island looks like it belongs with your cookware — until you wheel it across the room and it becomes a fully equipped pet feeding and prep station. The IKEA RÅSKOG ($34.99) is the cult favorite here for good reason: it’s narrow enough at 13.75″ wide to slide into gaps between cabinets, comes in colors that blend with modern kitchens, and those deep mesh baskets keep everything corralled without looking like pet clutter.
Top tier holds your cat’s bowls during feeding time, middle tier stores portioned meals or supplements, and the bottom tier keeps a sealed food container and cleaning supplies out of sight. For cats who eat in a different spot than where you store their food, the mobility is a game-changer — no more carrying bowls across the kitchen. Use a silicone pet placemat on the top shelf to catch spills and protect the wire basket. When mealtime’s over, wipe it down, roll it back beside the island, and it disappears into your kitchen layout like any other cart holding oils and spices.
How to Set Up a Rolling Cart as a Pet Feeding and Storage Station
- Pick your cart and position: Grab an IKEA RÅSKOG ($34.99) or similar slim three-tier cart and measure the gap where it’ll park — you need at least 14″ of clearance.
- Line the top tier for feeding: Cut a silicone pet placemat like the Messy Mutts Silicone Mat ($12) to fit the top basket, creating a non-slip, waterproof feeding surface.
- Organize middle and bottom tiers: Place pre-portioned meals, medications, and treats on the middle shelf; store a small airtight food container (like the OXO Pop 2.5 qt) and wipes on the bottom.
- Lock and roll: Engage the caster locks during feeding so the cart stays put, then unlock and wheel it back to its parking spot when done.
- Budget move: Skip the RÅSKOG and grab a similar three-tier cart from Dollar Tree or Five Below for around $10–$15.
15. Woven Baskets on Top of Cabinets — The Forgotten Storage Zone Cats Already Claimed
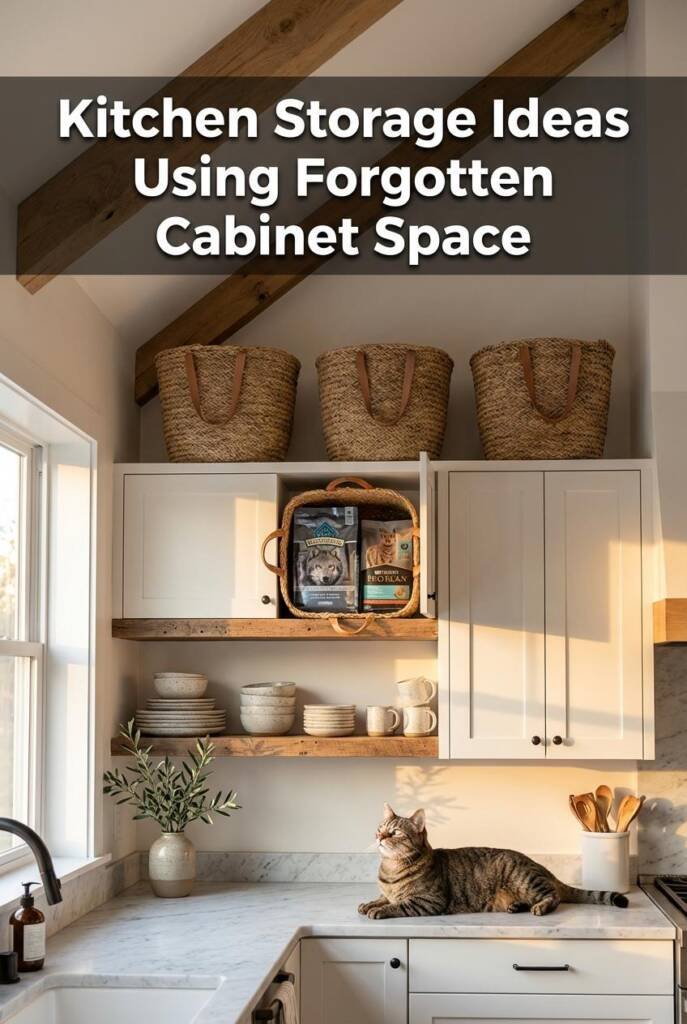
Your cat’s been squatting on top of those cabinets for years — time to make that space earn its keep.
That 12–15 inches of dead space above your upper cabinets? Your cat already knows it’s prime real estate — now make it work for you too. A row of matching woven baskets up there transforms dust-collector territory into genuinely beautiful storage for bulk kibble bags, extra litter, and seasonal pet supplies. The texture of natural woven material reads as intentional decor, not overflow storage, especially when you keep the baskets uniform in size and color.
This spot is perfect for supplies you buy in bulk but don’t need daily access to — think backup bags of Purina Pro Plan, extra filters for your water fountain, or that 40-lb box of litter you grabbed at Costco. The CURVER Jute line from Amazon ($18–$24 each) nails the woven look in lightweight, wipeable resin, so they won’t collect grease or dust the way natural seagrass does. Size up: their large rectangular baskets (17″ x 12″ x 8″) fit neatly above standard 12-inch-deep uppers with room to spare.
One styling note — odd numbers look best. Three or five matching baskets across a cabinet run creates a collected, intentional look that anchors the top of your kitchen visually instead of making it feel cluttered.
How to Use Above-Cabinet Space With Woven Baskets for Pet Storage
- Measure the gap: Use a tape measure to check the distance from your cabinet tops to the ceiling — you need at least 10 inches of clearance for baskets that are actually useful.
- Choose uniform baskets: Pick one style in one color and buy 3–5 of the same size. The CURVER Jute large rectangular baskets ($18 each on Amazon) are lightweight, stackable, and easy to wipe clean.
- Line and label: Drop a kitchen-size trash bag inside each basket as a liner to protect contents from grease and dust, then attach a small kraft-paper tag to the front handle noting what’s inside.
- Use a step stool you’ll actually keep out: Grab a folding kitchen step stool like the IKEA BEKVÄM ($25) and store it in your pantry gap — if access is annoying, you won’t use the space.
- Budget move: Thrift stores almost always have matching woven baskets in sets for $3–$5 each — check the home decor aisle before buying new.
16. A Chalkboard-Painted Cabinet Interior for Tracking Pet Food Inventory
Your pantry door is doing nothing right now — put it to work as the command center for your cat’s food supply.
Painting the inside of a pantry or cabinet door with chalkboard paint turns dead space into a functional inventory tracker that actually looks intentional. The matte black finish reads as a design detail rather than a DIY hack, and there’s something deeply satisfying about a neatly chalked list of your pet supplies right where you store them. It’s the kind of detail that makes guests say “oh, that’s smart” — because it is.
If you rotate between proteins for your cat (and you should, for variety and nutritional balance), a running tally prevents those panicked 9 PM trips to the store when you realize you’re out of their preferred flavor. Rust-Oleum Chalkboard Paint in black runs about $12 for a 30 oz can — more than enough for two cabinet doors. Pair it with a magnetic chalk holder stuck to the door’s edge so you always have something to write with. Track open bags, expiration dates, and reorder reminders in one glance.
This idea also works beautifully for multi-cat households where you’re managing different diets — senior formula for one, weight management for another. One door, all the info, zero guesswork.
How to Create a Chalkboard Inventory Tracker Inside a Cabinet Door
- Prep the surface: Lightly sand the inside of the cabinet door with 150-grit sandpaper, then wipe clean with a damp cloth to remove dust.
- Apply chalkboard paint: Use Rust-Oleum Chalkboard Paint ($12, any hardware store) and apply two thin coats with a foam roller, waiting 4 hours between coats.
- Cure and prime the surface: Let the paint cure for 3 full days, then “season” it by rubbing the side of a chalk stick across the entire surface and wiping clean — this prevents ghosting.
- Set up your tracking system: Create columns for item name, quantity, and reorder date, then attach a magnetic chalk holder like the Quartet Magnetic Chalk Holder ($5) to the door edge for easy access.
- Budget move: The entire project costs under $20 if you already own sandpaper and a foam roller — far less than a single forgotten emergency pet store run.
17. Drawer Dividers That Give Every Cat Accessory Its Own Little Apartment
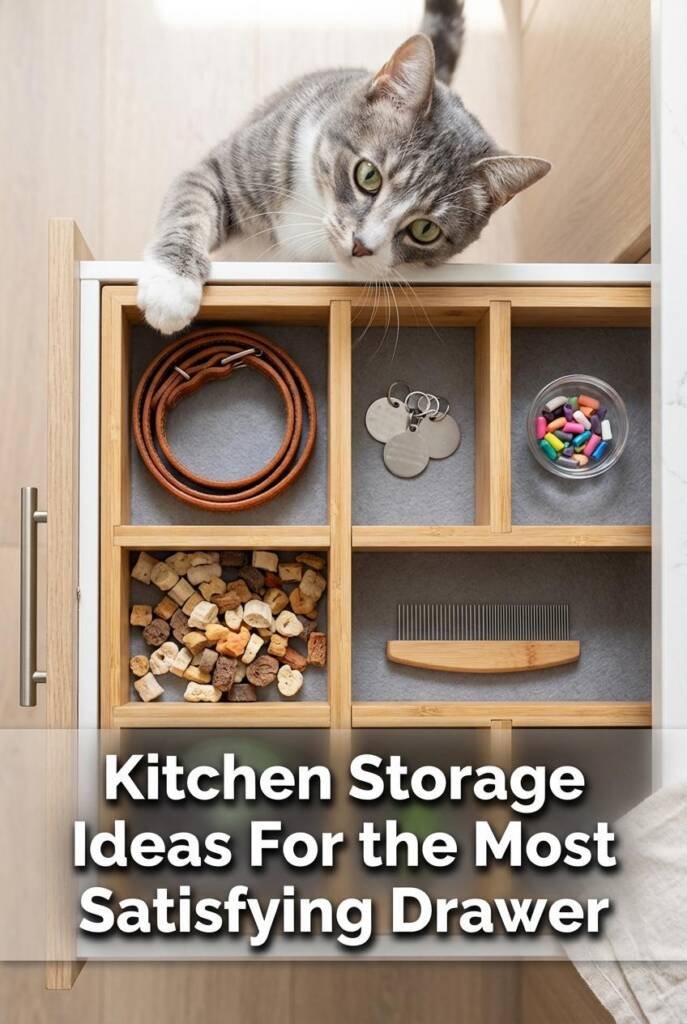
Your cat’s tiny accessories deserve better than the chaos dimension known as the junk drawer.
That kitchen junk drawer where cat collar tags, nail caps, catnip packets, and half-open treat bags go to disappear? It’s one set of bamboo dividers away from becoming the most satisfying organizational moment in your home. Custom-fitted drawer dividers turn a chaotic catch-all into a grid of neat compartments — each one sized for a specific category of small pet accessories. It looks clean, intentional, and oddly luxurious for what is essentially a drawer full of cat stuff.
This works brilliantly for cat owners because our accessories are tiny and easily lost. A spare bell, a packet of Soft Claws nail caps, vaccination tags, pill pockets, a backup breakaway collar — all of it vanishes into drawer entropy without dedicated slots. The Bambüsi Adjustable Bamboo Drawer Dividers (around $15 on Amazon) are spring-loaded, so they expand to fit any standard kitchen drawer without tools. The warm bamboo tone also makes the inside of your drawer look surprisingly premium. Pro tip: line each compartment with a small piece of cork shelf liner so items don’t slide around when you open and close the drawer.
How to Use Bamboo Drawer Dividers for Small Pet Accessory Organization
- Empty and Measure: Clear out the junk drawer completely and measure the interior dimensions. Most standard kitchen drawers are 4–5 inches deep, which is perfect for small accessories.
- Install Spring-Loaded Dividers: Place Bambüsi adjustable dividers ($15) crosswise and lengthwise to create a grid — aim for 6–9 compartments depending on your drawer size.
- Assign Categories: Dedicate each compartment to one type of item: collar tags, nail caps, treat bags, grooming tools, medications, and spare toys. Label with small adhesive tags if you share the household.
- Add Grip Liners: Cut cork or rubber shelf liner into pieces that fit each compartment’s floor to keep lightweight items like bells and tags from sliding.
- Budget move: Skip name-brand dividers and grab a pack of adjustable bamboo drawer organizers from Dollar Tree for $1.25 each — two packs cover a full-size kitchen drawer.
18. A Freestanding Apothecary Cabinet That Turns Pet Care Into a Beautiful Ritual
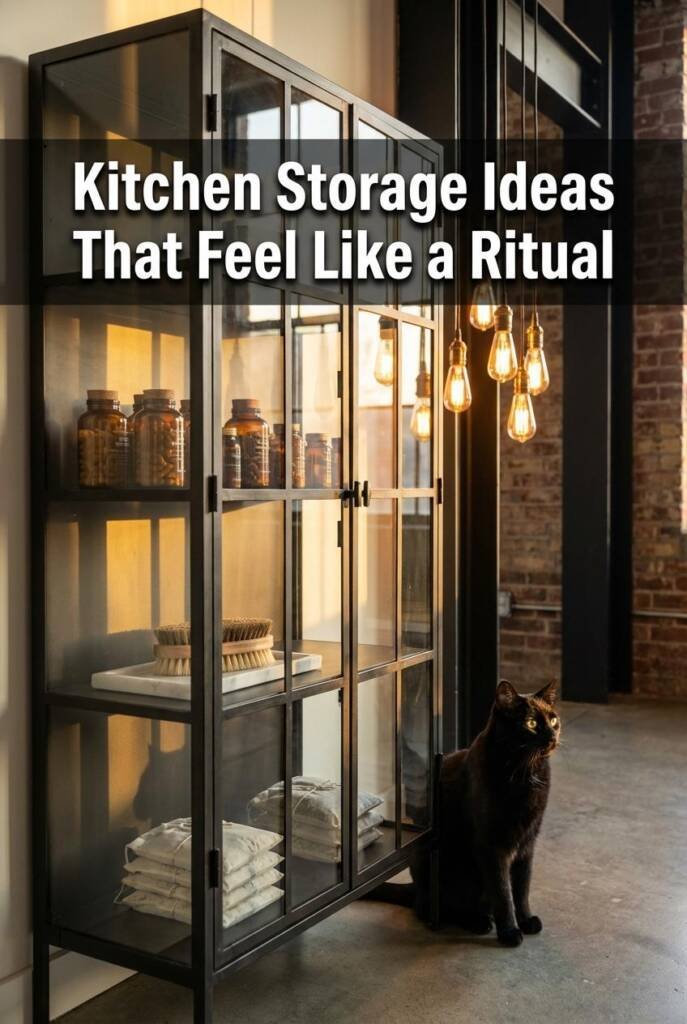
Your cat’s supplements deserve better than a Ziploc bag crammed behind the cereal.
A freestanding apothecary cabinet with glass-front drawers and cubbies transforms your pet care routine from a chore into something that actually feels intentional. Picture a tall, narrow cabinet in a kitchen corner — amber glass jars holding supplements, neatly labeled tins of treats, a wooden-handled brush resting on a linen-lined shelf. It looks like a wellness boutique, and it makes you want to use everything in it.
This setup works especially well for cats because their care involves so many small items — lysine powder, hairball supplements, nail clippers, flea combs, dental treats — that otherwise end up shoved in a junk drawer. The IKEA Fabrikör glass cabinet ($219) is the go-to starting point: 31.5″ wide, iron frame, and adjustable shelves that fit apothecary jars perfectly. Transfer everything from plastic packaging into matching containers, and suddenly your cat’s glucosamine chews look like artisanal candy.
This is the kind of kitchen storage idea that makes guests stop and ask about it — which is exactly the energy you want for the final piece in your organized kitchen.
How to Style an Apothecary Cabinet as a Pet Wellness Storage Display
- Choose the right cabinet: Go with a glass-front piece 30-36″ wide so it fits a kitchen corner without dominating the space. The IKEA Fabrikör or a vintage medical cabinet from Facebook Marketplace both work beautifully.
- Decant into matching vessels: Transfer treats, supplements, and powders into amber or clear apothecary jars — a set of 6 from Amazon runs about $24. Label each one with waterproof vinyl labels.
- Organize by category: Top shelf for supplements and medications, middle for treats and dental care, bottom for grooming tools laid on a linen tray or wooden box.
- Add one finishing detail: Place a small potted herb like cat grass or rosemary on top of the cabinet to bridge the gap between pet storage and kitchen decor.
- Budget move: Skip the IKEA buy and hunt estate sales for vintage medical or apothecary cabinets — they regularly go for $60-$100 and have more character than anything new.
Kitchen Storage Ideas That Welcome Pets
From hidden pull-out feeding stations to vintage bread boxes reimagined as treat dispensers, every one of these **kitchen storage ideas** proves the same point: you don’t have to sacrifice style to accommodate the pets who own your heart (and, let’s be real, your couch). The best storage solutions aren’t the ones that hide your life — they’re the ones that organize it so beautifully you actually want to show it off.
The thread running through all 18 ideas is that double-duty design philosophy. Every shelf, drawer, and cabinet earns its place by working harder — looking magazine-worthy on the surface while quietly handling the leashes, the supplements, the seven half-empty bags of treats your cat sniffed once and rejected. That’s what thoughtful home design looks like when pets are part of the equation.
Here at Sweet Purrfections, we create content at the intersection of cool home decor and real life with pets. Because we believe your home should look like it belongs in a design magazine AND work for the furry family members who actually run it.