DIY Cat Wall Ideas That Stop Territorial Aggression for Good
If your cats are constantly hissing, swatting, or chasing each other around the house, you’re not alone. Multi-cat households often struggle with territorial aggression, especially when cats feel like they’re competing for the same space. The constant tension can be stressful for both you and your feline friends.
Here’s the good news: you don’t need to rehome one of your cats or keep them in separate rooms forever. The solution is simpler than you think. A DIY cat wall gives your cats vertical territory, allowing them to coexist in the same room without direct confrontation. Cat climbing walls create separate pathways and zones, so each cat can claim their own space without feeling threatened.
In this guide, we’ll walk you through seven practical DIY cat wall designs specifically created to keep territorial cats apart. These aren’t just decorative cat shelves. Each design solves a specific behavioral problem, whether it’s ambush points, dead-end standoffs, or competition for window access. Best of all, these projects use affordable materials from stores like IKEA, Home Depot, or Amazon, and most can be completed in a weekend.
Let’s turn your walls into peace-keeping cat highways.
Why Cat Walls Work for Territorial Cats
Cats are naturally territorial animals. In the wild, they establish and defend their hunting grounds. In your home, they’re doing the same thing, except the “territory” is your couch, your hallway, and that sunny spot by the window.
When multiple cats share limited floor space, conflict is inevitable. They cross paths in doorways, compete for the best sleeping spots, and feel trapped when there’s nowhere to escape from a more dominant cat.
This is where a cat climbing wall changes everything. Vertical space is untapped territory in most homes. By installing a DIY cat wall, you’re essentially doubling or tripling the usable space in your home without adding square footage. Cats can travel, rest, and observe from elevated positions, which satisfies their natural instinct to seek high ground.
More importantly, cat walls allow cats to avoid each other. One cat can take the high route while another stays low. They can be in the same room without ever making eye contact or crossing paths. This reduces stress, prevents fights, and gives each cat a sense of ownership over their own territory.
The result is a calmer household where your cats can coexist peacefully, even if they’ll never be best friends.
What You’ll Need for These DIY Cat Wall Projects
Before we dive into the specific designs, let’s cover the basic materials you’ll need for most of these cat climbing wall projects.
Essential Materials
Floating shelves are the foundation of any DIY cat wall. Look for shelves that are 12 to 18 inches deep and made from solid wood or sturdy composite material. Avoid flimsy particle board that will sag under weight.
Heavy-duty brackets are non-negotiable. Each bracket should be rated to hold at least 20 pounds, and you’ll want to mount them directly into wall studs whenever possible. For drywall installations, use proper wall anchors rated for the weight.
A drill and stud finder are essential tools. The stud finder helps you locate the solid framing behind your walls, which is where you’ll get the strongest hold. A level ensures your shelves are perfectly horizontal so your cats don’t slide off.
Comfort and Safety Additions
Carpet squares or remnants give cats traction on smooth shelf surfaces. You can cut these to size and attach them with spray adhesive or double-sided carpet tape. Sisal rope wrapped around posts or shelf edges also provides grip and satisfies scratching instincts.
Non-slip tape along the front edge of shelves gives cats confidence when landing from jumps.
Optional Enhancements
Cat cubes or enclosed boxes can be mounted to your cat wall to create hideaways. Wooden ramps or carpeted steps help older cats or kittens access higher levels. Wall-mounted scratching posts can be integrated into your design.
Most of these materials are available at IKEA, Home Depot, Lowe’s, or online retailers. A basic three-shelf cat wall typically costs between 50 and 100 dollars in materials, depending on the quality of shelves you choose.
Now let’s get into the actual designs.
1. Opposite Wall Highway System
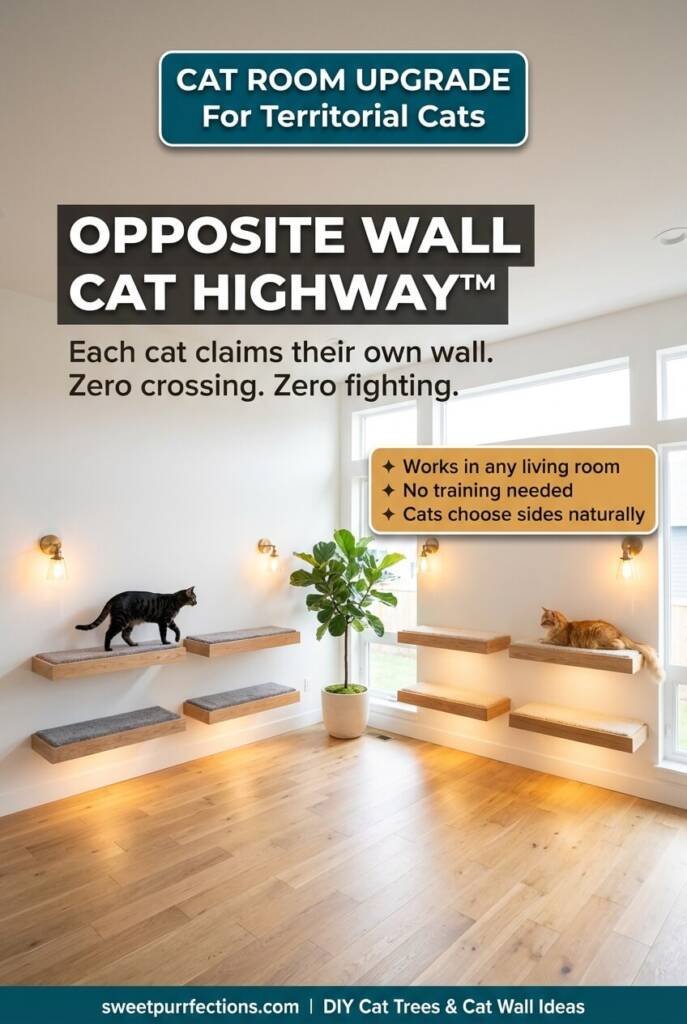
The Opposite Wall Highway System is one of the most effective cat climbing wall designs for keeping territorial cats separated. The concept is brilliantly simple. You install two parallel pathways of shelves on facing walls, creating mirror-image cat highways. Each cat naturally claims one side as their territory, and they never have to cross paths.
This design works because cats can see each other from a distance, which actually reduces tension. They’re not sneaking up on each other or getting surprised in tight spaces. Each cat has full visibility of where the other cat is, which allows them to make informed decisions about when to use their pathway.
The visual symmetry also looks fantastic in a room. You’re essentially creating intentional, functional wall art that happens to solve a behavioral problem.
Why This Design Prevents Confrontation
Cats are ambush predators, and a lot of household aggression happens because of surprise encounters. When pathways cross or merge, one cat can block or corner another. With opposite wall highways, there’s no intersection point. Each cat has complete autonomy over their route.
Dominant cats often claim the side of the room closest to the “action,” like near the TV or main sitting area. Submissive cats happily take the opposite wall, which feels safer and less trafficked. This natural division happens without you having to train or force anything.
Step by Step DIY Instructions
- Choose two facing walls that are at least 8 to 10 feet apart
- Measure wall length and plan for 3 to 4 shelves per wall
- Mark shelf placement at the same height on both walls, typically 4 to 5 feet high
- Use a stud finder to locate wall studs and mark them with a pencil
- Position shelf brackets so at least one side hits a stud
- Drill pilot holes for brackets
- Mount brackets securely, using a level to ensure they’re straight
- Attach shelves to the mounted brackets
- Space shelves 12 to 18 inches apart horizontally along each wall
- Cut carpet squares to fit each shelf surface
- Attach carpet with spray adhesive or double-sided carpet tape
Pro Tips for Success
Introduce both cats to their new highways at the same time using treats or favorite toys. Let them naturally choose which side they prefer rather than assigning sides.
If one cat tries to dominate both sides, temporarily block access to one pathway and only allow that cat to use one side. After a few days, they’ll establish it as “theirs” and be less interested in the other side.
This design works best in living rooms, long hallways, or bedrooms where you have two clear parallel walls.
2. Corner Tower Cat Wall System
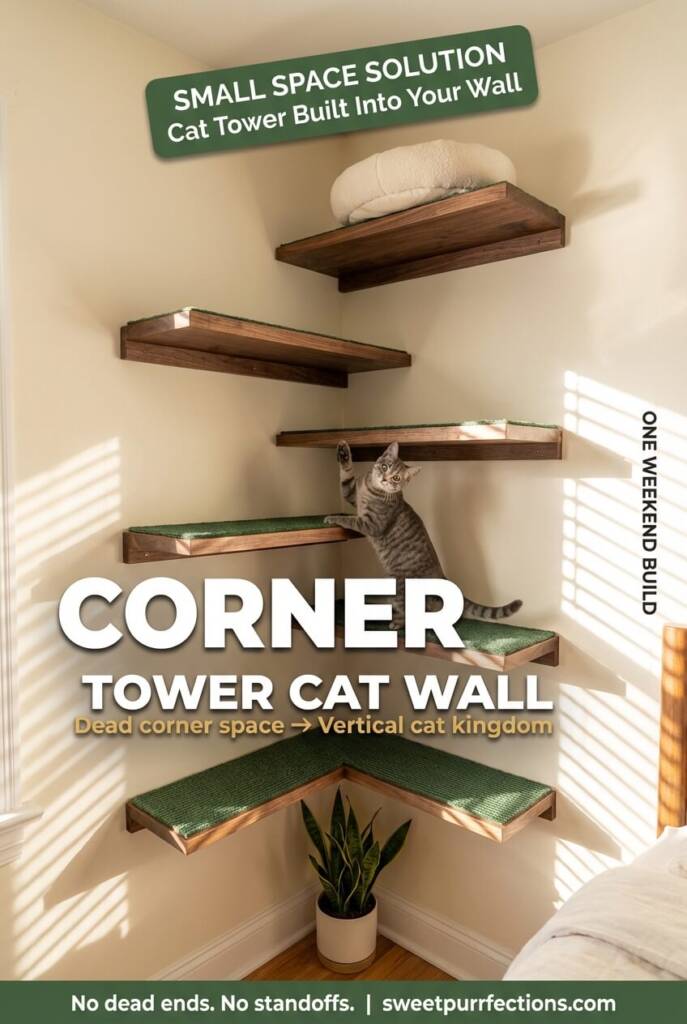
The Corner Tower System takes advantage of unused corner space while creating a single-file pathway that prevents cats from blocking or ambushing each other. By staggering shelves in an alternating pattern up the corner, you create a spiral staircase effect where only one cat can occupy the pathway at a time.
This design is perfect for smaller spaces where you don’t have room for elaborate wall highways. Corners are often wasted space in homes, and this cat climbing wall turns that dead zone into prime vertical real estate.
Why This Design Eliminates Cat Conflicts
The genius of the corner tower is that there are no bottlenecks. Each shelf is offset from the one below it, so cats can see what’s coming. If a cat is climbing up and another cat is coming down, they can see each other from several shelves away and make decisions accordingly.
There’s also no way for one cat to “camp out” and block the entire system. A cat would have to actively stay on the pathway to prevent access, which is uncomfortable and boring for them. Cats naturally keep moving through this system rather than parking on it.
Step by Step DIY Instructions
- Choose a corner location with at least 6 feet of vertical clearance
- Start with the first shelf positioned 2 feet from the floor in one corner
- Mark the location for the second shelf 12 to 18 inches higher on the opposite corner wall
- Continue alternating corners as you move up, creating a zig-zag pattern
- Aim for 4 to 6 shelves total, ending at 5 to 6 feet high
- Use a stud finder to locate studs in both corner walls
- Install corner brackets or standard L-brackets rated for at least 20 pounds
- Drill pilot holes and mount brackets securely
- Attach shelves, ensuring each one is level
- Add carpet squares or sisal mat sections for grip
- Test stability by pressing down firmly on each shelf before allowing cats to use it
Pro Tips for Success
Corner brackets provide extra stability since they’re anchored into two walls instead of one. If you can’t find corner-specific brackets, use two standard L-brackets per shelf.
Make sure the vertical spacing between shelves is consistent. If one gap is significantly larger than the others, older or less athletic cats may struggle with that jump and avoid the entire system.
Add a small cat bed or cushion at the top shelf to create a destination. Cats are more motivated to climb when there’s a comfortable lounging spot as a reward.
This design works beautifully in bedrooms, home offices, or any room where corner space is underutilized.
3. Room to Room Bridge Cat Wall
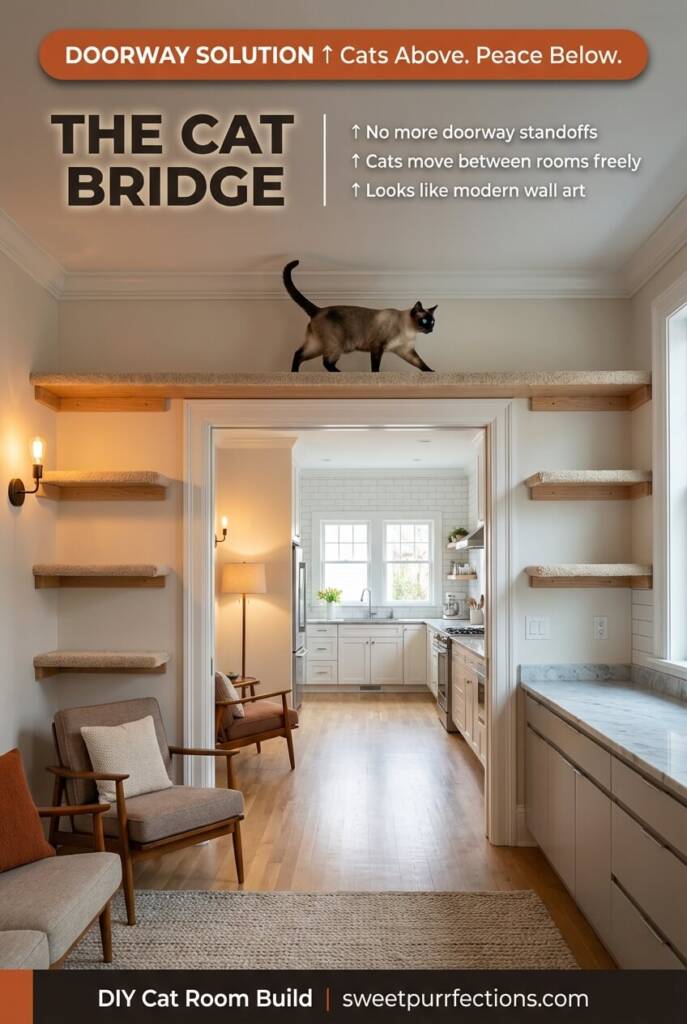
The Room-to-Room Bridge is perhaps the most visually impressive cat climbing wall design on this list. By installing a wide shelf above a doorway, you create an elevated highway that allows cats to move between rooms without ever touching the floor. This is where most territorial confrontations happen, so eliminating ground-level crossings dramatically reduces conflict.
This design turns doorways from conflict zones into neutral passages. Neither cat can claim ownership of the bridge since it’s just a transitional space. Cats move across it quickly rather than defending it as territory.
Why This Design Stops Doorway Standoffs
Doorways are natural choke points in any home. Cats often lurk near doorways to control access to rooms, especially rooms with resources like food, water, or litter boxes. A submissive cat may avoid entire rooms because they don’t want to risk a confrontation in the doorway.
The overhead bridge solves this completely. Cats can enter and exit rooms freely without the anxiety of ground-level doorway encounters. It also looks incredibly cool when you see a cat casually strolling across your doorframe.
Step by Step DIY Instructions
- Choose a doorway that connects two frequently used rooms
- Measure the doorframe width and add 6 inches on each side for overhang
- Select a sturdy shelf that’s 18 to 24 inches deep and long enough to span the doorway plus overhang
- Locate wall studs above the doorframe using a stud finder
- Mark bracket positions on both sides of the doorway, ensuring they hit studs
- Position brackets at least 6 inches from the ceiling to give cats clearance
- Install heavy-duty brackets capable of supporting 30 pounds or more
- Mount the shelf across the doorway on top of the brackets
- Ensure the shelf is completely level
- Add leading access shelves on both sides of the door so cats can climb up to the bridge
- Cover the bridge shelf with a carpet runner or outdoor carpet for traction
- Secure the carpet with staples on the underside or heavy-duty double-sided tape
Pro Tips for Success
Make absolutely certain this shelf is rock solid. Cats will be jumping onto it with force, and any wobble will make them lose confidence in using it.
The access shelves leading up to the bridge should be spaced no more than 18 inches apart vertically. Think of them as stairs leading to the bridge level.
Consider adding a small LED strip light under the bridge for nighttime visibility and aesthetic appeal.
This design works best in open floor plans, connecting living rooms to kitchens, or hallways to bedrooms. It becomes a central feature of your home that guests will definitely ask about.
4. Divided Window Cat Wall
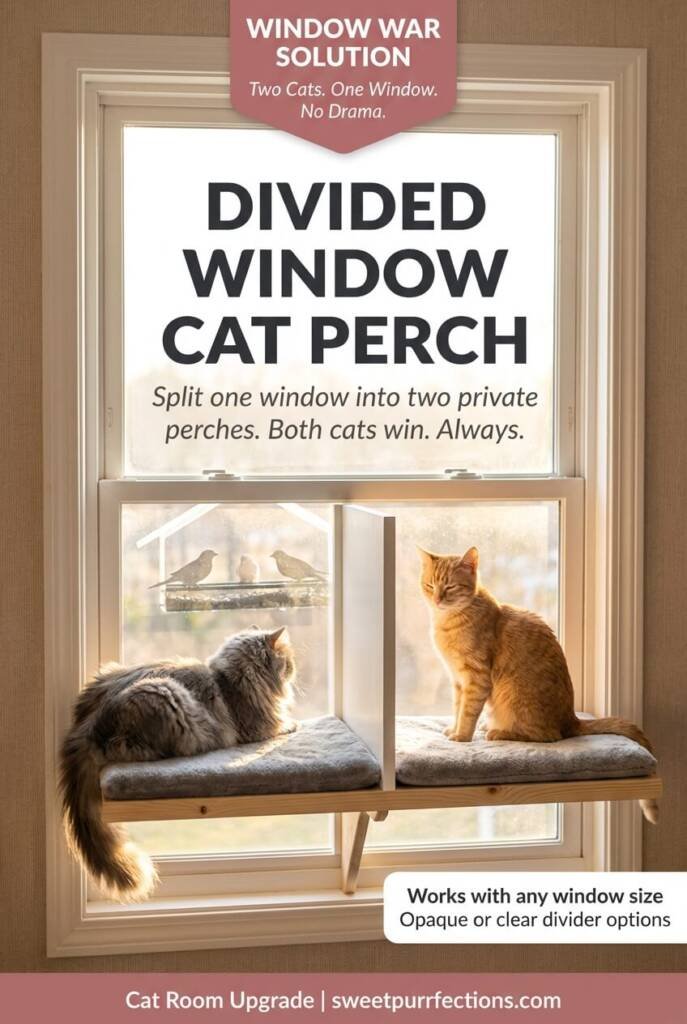
The Window Perch Divider is a brilliant solution for one of the most contested resources in any multi-cat home: window access. Cats are naturally drawn to windows for entertainment, sunbathing, and monitoring their outdoor territory. When multiple territorial cats want the same window, tensions run high.
This cat wall design splits a single window into two separate perches with a physical divider between them. Both cats get prime window real estate, but they can’t reach each other or make direct eye contact. It’s like having two separate windows in one.
Why This Design Eliminates Window Wars
Windows are high-value territory. The cat who controls the window feels like they control an important resource. Fighting over window access often escalates because neither cat wants to give up such a desirable spot.
By dividing the window, you remove the competition entirely. There’s no winner or loser. Both cats get equal access to the view, the sunlight, and the stimulation of watching birds or squirrels outside. The divider prevents one cat from intimidating or swatting at the other, which means both cats can actually relax and enjoy the window instead of staying alert for conflict.
Step by Step DIY Instructions
- Measure your window width and divide it in half to determine the size of each perch
- Purchase or build two individual window perch platforms, each 10 to 14 inches deep
- Cut a piece of 1/4 inch plywood or clear acrylic for the center divider
- The divider should be 12 to 18 inches tall, tall enough that sitting cats can’t see each other’s faces
- Install mounting brackets on each side of the window frame
- Position brackets so perches sit at the same height, typically at windowsill level or slightly below
- Mount both perch platforms securely to their brackets
- Attach the vertical divider between the two perches using L-brackets or wood screws
- Ensure the divider is centered and stable
- Add cushions or carpet squares to each perch for comfort
- Test the stability by pressing down on each perch with significant weight
Pro Tips for Success
If using clear acrylic for the divider, cats can still see through it, which some owners prefer for visibility. However, if your cats are highly aggressive toward each other, an opaque wooden divider works better to completely block visual contact.
Make sure the divider extends at least 2 inches beyond the front edge of the perches. This prevents cats from reaching around it to swipe at each other.
You can create tiered perches at slightly different heights if your window is tall enough. This adds visual interest and gives one cat the “high ground” advantage, which can actually reduce conflict by establishing clear hierarchy.
This design is perfect for apartments with limited window access or homes where the best window happens to be in a shared space like the living room.
5. Two-Tier Cat Wall
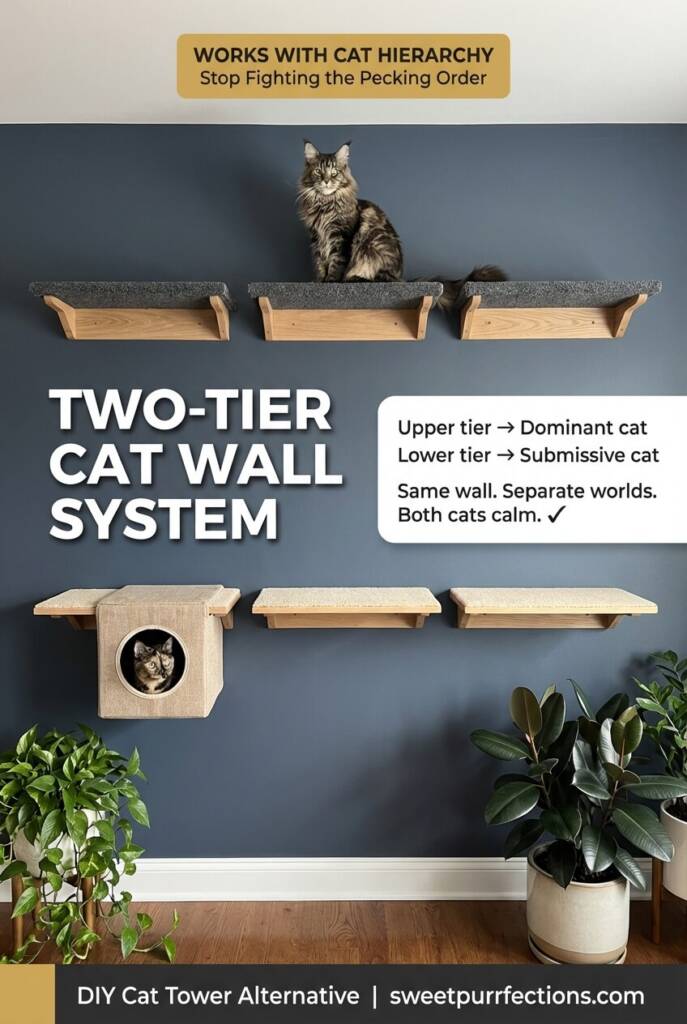
The High-Low Separation cat climbing wall works with your cats’ natural hierarchy instead of fighting against it. In every multi-cat household, there’s usually a social structure. One cat is more dominant, another is more submissive. This design gives each cat a tier that matches their personality and status.
The dominant cat gets the high tier at 5 to 6 feet, satisfying their instinct to claim elevated territory. The submissive cat gets the low tier at 2 to 3 feet, where they feel safer and less exposed. Because there’s significant vertical separation between the tiers, cats rarely cross paths or feel the need to compete.
Why This Design Reduces Territorial Stress
Trying to force cats to share the exact same space at the same height often backfires. The dominant cat constantly patrols and defends “their” level, and the submissive cat lives in a state of anxiety, never knowing when they’ll be chased off.
By creating distinct vertical zones, you’re essentially giving each cat their own floor in a two-story building. They can both be “on the cat wall” at the same time without feeling like they’re invading each other’s space. The vertical separation is key. Two feet of vertical distance is enough that cats perceive it as separate territory rather than contested ground.
Step by Step DIY Instructions
- Decide which wall will host your two-tier system
- Mark the upper tier height at 5 to 6 feet from the floor
- Mark the lower tier height at 2 to 3 feet from the floor
- Ensure at least 2 feet of vertical space between tiers
- Plan for 2 to 3 shelves per tier, spaced 12 to 18 inches apart horizontally
- Use a stud finder to locate studs along the wall
- Install brackets for upper tier shelves first, mounting into studs
- Attach upper tier shelves, ensuring they’re level
- Install brackets for lower tier shelves
- Attach lower tier shelves
- Use shelves that are at least 12 inches deep so cats can pass without touching if pathways overlap vertically
- Add carpet or sisal covering to all shelves for traction
- Place a cat bed or cushioned platform at the end of the upper tier as a destination
Pro Tips for Success
Let your cats choose their tiers naturally. Place treats on both levels initially, but you’ll likely notice the dominant cat gravitates to the high ground within the first few days.
Add a cat cube or enclosed hideaway box to the lower tier. This gives the submissive cat a secure retreat where they can see the room but feel protected.
If you have more than two cats, you can extend this concept to three tiers. Just maintain at least 18 to 24 inches of vertical separation between each level.
This is one of the easiest cat wall designs for beginners. It requires fewer shelves than wraparound systems and the installation is straightforward since everything is on one wall.
6. Wraparound Cat Wall Highway
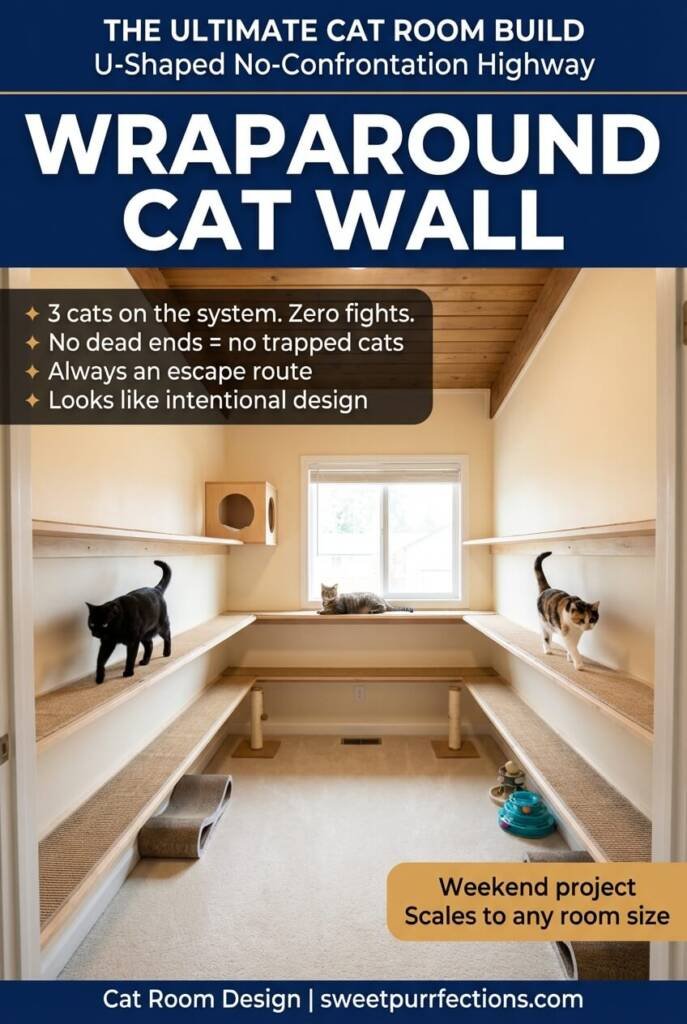
The U-Shaped No-Confrontation Path is the ultimate cat climbing wall for serious cat lovers ready to commit to a full room transformation. This design wraps around three walls of a room, creating a continuous highway with multiple entry and exit points. The key feature is that there are no dead ends where a cat can get trapped or cornered.
When cats meet head-on on this system, one cat can simply reverse direction and exit, or they can continue forward and pass each other on the wide pathway. There’s always an escape route, which dramatically reduces the anxiety that leads to aggressive behavior.
Why This Design Creates Peaceful Coexistence
Dead-end pathways are the worst design flaw in cat furniture. When a submissive cat ventures onto a shelf and suddenly encounters the dominant cat, they have nowhere to go. They’re trapped. This leads to either a confrontation or the submissive cat making a panicked leap to the floor.
The wraparound design eliminates this problem entirely. Cats can see far ahead on the pathway, so they rarely run into each other unexpectedly. When they do meet, the continuous loop means there’s always another direction to go. Most cats will simply wait for the other to pass or choose an alternate route.
This system also distributes territory more fairly. Instead of one cat claiming “the cat wall,” the sheer size of the wraparound means there’s always unclaimed space available.
Step by Step DIY Instructions
- Choose a room and map out a U-shaped route covering three walls
- Decide on a consistent height for the main pathway, typically 4 to 5 feet from the floor
- Measure and mark shelf positions along all three walls
- Space shelves 12 to 18 inches apart horizontally
- Use a stud finder to locate studs on all three walls
- Start installation on one end of the U-shape
- Install brackets and mount shelves working your way around the room
- Ensure all shelves are at the same height for a continuous pathway
- Use a level frequently to maintain consistency
- Create at least 2 access points where cats can jump up from the floor or furniture
- Create at least 2 exit points where cats can comfortably jump down
- Add a continuous carpet runner across all shelves for seamless traction
- Secure carpet with spray adhesive or staples on the underside of shelves
- Consider adding a branch-off pathway in the middle that leads to a cat tree or window perch
Pro Tips for Success
This is a bigger project that may take a full weekend. Work in sections and test each section’s stability before moving to the next wall.
Make sure the shelves are wide enough for two cats to pass each other comfortably if needed. Fourteen to 16 inch deep shelves work better than narrow 12 inch shelves for this design.
If your room has a doorway interrupting one wall, incorporate the over-the-door bridge design from earlier to maintain the continuous loop.
Add visual interest by varying shelf lengths. Some shelves can be 24 inches long, others 36 inches. This creates a more organic, less rigid appearance.
This design is best for dedicated cat rooms, large living rooms, or finished basements where you can commit an entire room to the cat highway concept.
7. Escape Hatch Cat Wall with Drop-Down Exits
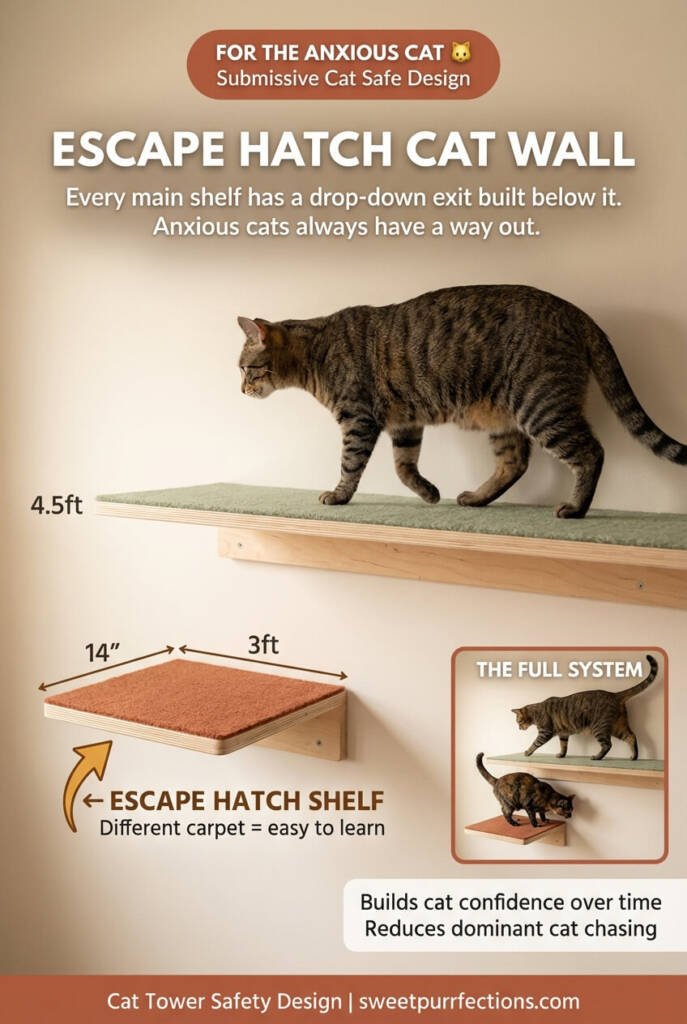
The Escape Hatch cat wall is specifically designed for households where one cat is significantly more aggressive or where a submissive cat needs extra security. This system features a main elevated pathway with smaller emergency exit shelves positioned directly below. If a cat feels threatened or cornered on the main path, they can quickly drop to the lower escape shelf and exit the system entirely.
This design is all about giving anxious or submissive cats confidence. When they know they always have an escape route, they’re more willing to use the cat climbing wall instead of hiding under furniture.
Why This Design Protects Vulnerable Cats
Submissive cats often avoid vertical space entirely because they’re afraid of getting trapped by the dominant cat. Even if the dominant cat isn’t actively aggressive, the submissive cat’s anxiety prevents them from enjoying cat wall benefits.
The escape hatch design removes that fear. The emergency exit shelves are positioned close enough that even a panicked cat can reach them with a quick drop. These lower shelves then lead to safe landing zones like a couch, cat tree, or open floor space where the cat can flee if needed.
Over time, many submissive cats gain confidence when they realize they can always escape. This often leads to reduced overall conflict as the submissive cat stops acting fearful, which in turn reduces the dominant cat’s urge to chase.
Step by Step DIY Instructions
- Plan your main pathway at 4 to 5 feet high with 2 to 3 shelves
- For each main pathway shelf, plan an escape shelf positioned 12 to 18 inches directly below it
- Offset escape shelves slightly so they’re not directly underneath, allowing room for cats to jump down comfortably
- Use a stud finder to locate studs for all shelf positions
- Install the main pathway shelves first with heavy-duty brackets
- Install the escape hatch shelves below using slightly smaller brackets
- Ensure escape shelves are at least 10 inches deep, wide enough for a confident landing
- Position escape shelves so they lead toward safe landing zones
- Add non-slip tape or carpet to the front edges of main shelves for confident jumping
- Cover all shelf surfaces with carpet for traction
- Place soft landing mats or cat beds below the escape routes initially
- Test the jump distances yourself by measuring and ensuring they’re comfortable for your cats’ sizes
Pro Tips for Success
The escape shelves don’t need to be as long as the main pathway shelves. Even a 12 to 18 inch escape platform is enough for a cat to land and then jump to safety.
Mark the escape route shelves with a different color carpet or texture so cats learn to identify them as exit points. Some owners use outdoor carpet for main shelves and indoor carpet for escape shelves.
If you have an elderly cat or a cat with mobility issues, add even more intermediate steps between the main level and escape level. The goal is that no single jump exceeds 18 inches vertically.
This design pairs beautifully with the high-low separation system. The upper tier can have escape hatches leading down to the lower tier, giving the submissive cat multiple ways to retreat.
How to Safely Install Your DIY Cat Wall
Installing a cat climbing wall correctly is critical for both safety and longevity. Even the best design will fail if the installation is weak. Here’s what you need to know to ensure your cat wall can handle years of jumping, running, and lounging.
Always Find the Studs
This is the single most important rule. Wall studs are the vertical wooden beams inside your walls that provide structural support. Drywall alone cannot reliably hold the weight of a cat jumping onto a shelf. Use a stud finder to locate studs and mark them clearly with a pencil before drilling anything.
Studs are typically spaced 16 or 24 inches apart. If your shelf placement doesn’t naturally align with studs, adjust your design slightly to hit at least one stud per bracket. For shelves between studs, use heavy-duty toggle bolts or wall anchors rated for at least 50 pounds.
Test Weight Capacity Before Use
Before allowing your cats on the new cat wall, test it yourself. Sit on each shelf and bounce slightly. Press down with your full body weight. If anything wobbles, creaks, or feels unstable, reinforce it immediately.
A cat weighing 10 to 15 pounds generates significantly more force when jumping and landing than their static weight suggests. Your shelves should feel rock solid under human weight.
Get the Spacing Right
Shelves spaced 12 to 18 inches apart horizontally are comfortable for most adult cats. Kittens and senior cats may need closer spacing, around 10 to 12 inches. Very athletic cats can handle up to 24 inches, but this isn’t recommended for a multi-cat system where different fitness levels exist.
Vertical spacing between tiers should be at least 24 inches to feel like separate territory. Any closer and cats may still perceive it as shared space.
Add Texture for Confidence
Smooth wood or laminate shelves are slippery, especially for older cats or cats with declawed front paws. Always add some form of traction. Carpet squares are the most popular option, but you can also use outdoor carpet runners, sisal mats, or even textured rubber shelf liner.
Secure the covering properly. Loose carpet that shifts when a cat lands will make them lose confidence in the entire system.
Start Low and Adjust Up
When building your first cat wall, consider mounting everything slightly lower than your final plan. Let your cats use it for a week, observe their behavior, and then adjust heights if needed. It’s much easier to move shelves up than to patch unnecessary holes in your walls.
Use a Level Religiously
Shelves that aren’t level will cause cats to slide toward one end. This is uncomfortable and dangerous. Check every shelf with a level during installation, even if the brackets look even. Wall surfaces are rarely perfectly straight.
What If Your Cats Still Fight on the Cat Wall
Even with the best DIY cat wall design, some cats need time to adjust to new territorial boundaries. Here’s how to troubleshoot common issues.
Give It Time
Don’t expect instant results. Cats need 2 to 3 weeks to establish new territorial patterns and learn the layout of their cat climbing wall. During this adjustment period, you might actually see slightly increased tension as they figure out who goes where.
Continue with normal routines and don’t interfere unless actual fighting occurs. Most cats will naturally work it out.
Increase Vertical Separation
If cats are still confronting each other on the cat wall after a few weeks, they may need more vertical distance between their claimed zones. Add another 12 inches of height difference between tiers or create more distinct upper and lower territories.
Add More Hiding Spots
Anxious cats feel safer with enclosed spaces. Mount a cat cube, cardboard box, or fabric hideaway to the cat wall. This gives nervous cats a retreat option where they can still observe the room but feel protected.
Use Positive Reinforcement
Encourage cats to use separate pathways by placing treats at the ends of their respective routes. Feed them on their designated tiers. Over time, they’ll associate their pathway with positive experiences and defend it less aggressively.
Consider Feliway or Calming Aids
Synthetic pheromone diffusers like Feliway can reduce overall territorial anxiety. Place diffusers near the cat wall during the first month of use. Some cats also benefit from calming treats or supplements, though you should consult your vet first.
Consult a Professional If Needed
If aggression continues after 4 to 6 weeks, or if fights are escalating in intensity, consult a veterinary behaviorist. Sometimes underlying medical issues, past trauma, or personality incompatibilities require professional intervention beyond environmental changes.
A cat wall is a powerful tool, but it’s not a magic solution for every multi-cat conflict. It works best when combined with proper resource distribution, like multiple litter boxes, feeding stations, and resting areas throughout the home.
Ready to Build Your DIY Cat Wall
Creating a cat climbing wall that keeps territorial cats apart doesn’t require professional carpentry skills or a massive budget. These seven designs prove that simple, strategic placement of shelves can transform your multi-cat household from a constant battleground into a peaceful coexistence.
Start with whichever design matches your space and skill level. The Opposite Wall Highway System and High-Low Separation are perfect for beginners. The Room-to-Room Bridge and Wraparound Highway are for more ambitious builders ready to make a statement.
Remember that every cat household is unique. You may need to combine elements from multiple designs or adjust dimensions based on your cats’ sizes and abilities. The goal is always the same: give each cat enough vertical territory that they never feel the need to compete for space.
Your cats will thank you with calmer behavior, reduced stress, and hopefully, the occasional peaceful coexistence in the same room. Even if they never become best friends, they can learn to share your home without constant conflict.
Which DIY cat climbing wall will you build first? Grab your drill, measure your walls, and start creating vertical peace in your home.
For more creative cat projects, DIY home ideas, and pet-friendly design inspiration, visit Sweet Purrfections. We’re your go-to resource for practical solutions that make life better for you and your furry family members.