Your dog deserves toys that spark joy, but store-bought options can drain your wallet fast. The good news? Your home is already full of materials waiting to become your dog’s next favorite plaything. These 10 DIY dog toys progress from simple 5-minute projects to impressive creations that’ll have fellow dog parents asking where you bought them. Let’s turn everyday items into tail-wagging treasures.
Short on Time? Budget-Friendly Dog Toys to Buy


1. The 5-Minute T-Shirt Rope Toy
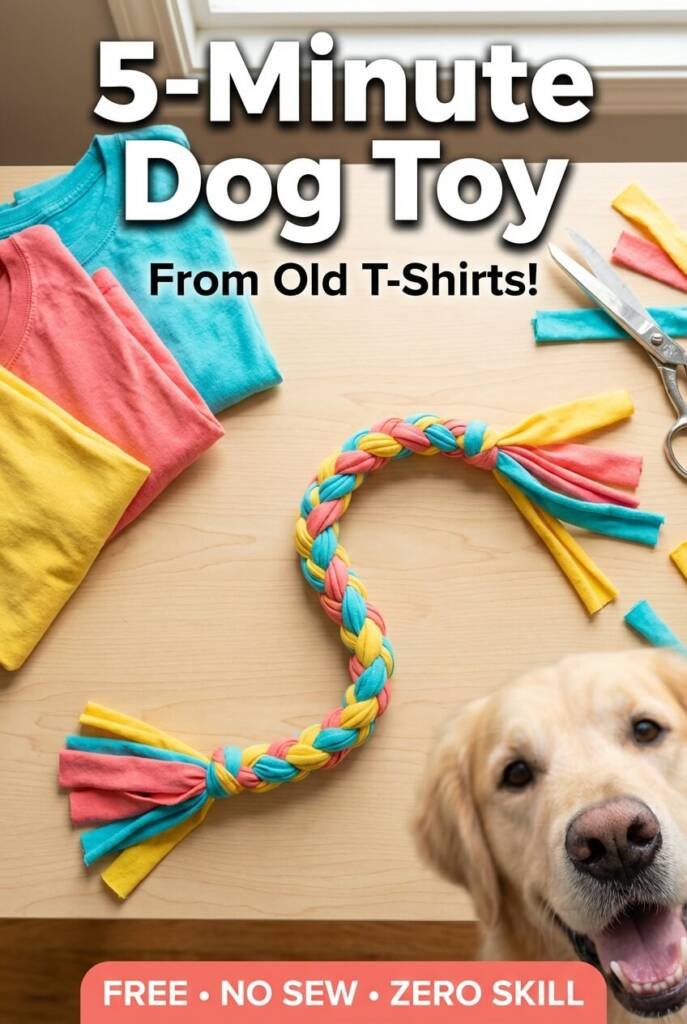
That pile of old t-shirts in your donation bag just found a better purpose. This no-sew rope toy costs absolutely nothing and takes less time than brewing your morning coffee. Cut three long strips from an old shirt (about 2-3 inches wide and as long as the shirt allows), tie them together at one end, braid tightly, and secure the other end with a knot. The soft fabric is gentle on puppy teeth yet durable enough for enthusiastic tuggers.
How to Make Your T-Shirt Rope Toy
- Select 1-2 cotton t-shirts (avoid shirts with embellishments or buttons)
- Cut three strips lengthwise, each about 2-3 inches wide
- Tie all three strips together with a tight overhand knot at the top
- Braid the three strips together, pulling firmly as you go
- Secure the bottom with another tight knot, leaving a few inches of fringe
Why Dogs Go Crazy for Texture Variety
- Cotton’s natural grip: The woven texture of t-shirt fabric gives dogs something their teeth can really sink into, unlike smooth plastic toys
- Scent retention magic: Fabric holds your scent, which provides comfort and makes the toy more appealing than sterile store versions
- The perfect tug resistance: T-shirt material has just enough give to make tug-of-war satisfying without snapping immediately
- Temperature advantage: Unlike rubber toys that get stiff in cold weather, fabric toys stay flexible year-round
2. The Knotted Rope Ring
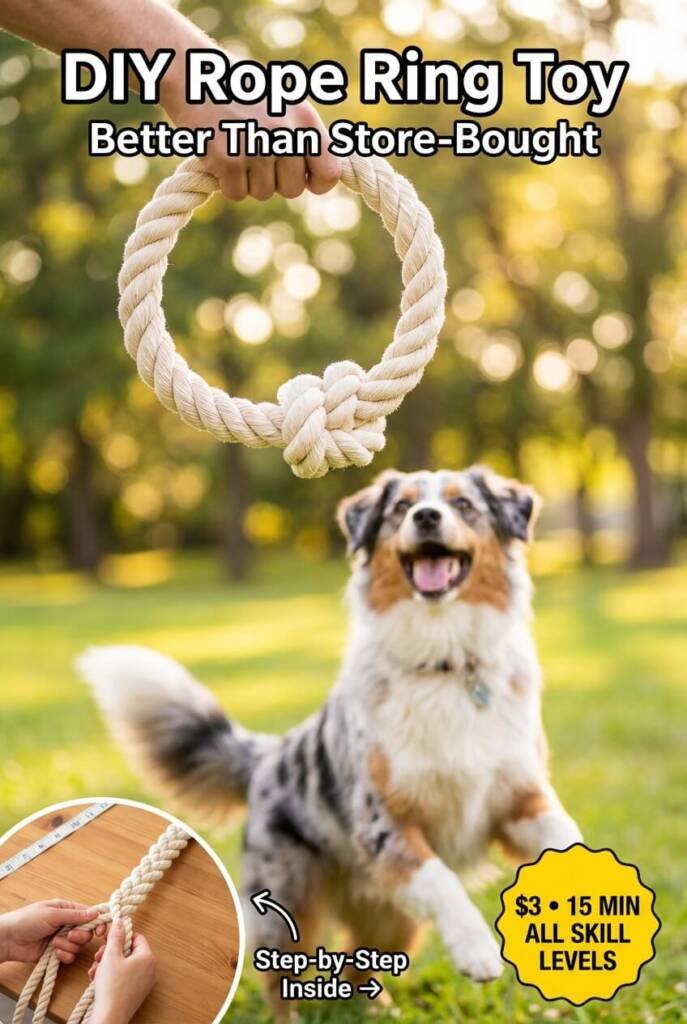
This circular rope toy bridges the gap between beginner and intermediate projects perfectly. By connecting the ends of a braided rope into a ring shape, you create a versatile toy that works for tug-of-war, fetch, and solo chewing sessions.
The circular design is easier for dogs to grip from any angle, and the lack of loose ends means less unraveling over time. This toy takes about 15 minutes to make and costs under $3 if you buy rope by the foot at hardware stores.
How to Make The Knotted Rope Ring
- Purchase 4-5 feet of cotton rope (3/4 inch diameter works for most dogs)
- Find the center point and fold the rope in half to create two equal lengths
- Starting at the fold, braid the two strands together tightly for the entire length
- When you reach the ends, bring them around to meet the folded starting point, forming a circle
- Tie the loose ends securely to the starting loop using multiple overhand knots
- Weave the excess rope ends back through the braid to hide them and add security
- Trim any remaining loose ends close to the knots
Ring Toys vs. Straight Rope: Why Shape Matters
- 360-degree grip advantage: Ring toys let dogs grab from any point on the circle, making them ideal for dogs who struggle with coordination or puppies still learning how to play
- Self-play compatibility: Unlike straight ropes that need two participants, ring toys can be shaken, tossed, and carried solo—perfect for independent players
- Gentler on human hands: The circular shape distributes pulling force more evenly during tug-of-war, reducing rope burn compared to straight pulls
- Fetch-friendly design: Rings fly through the air more predictably than floppy rope toys, and they’re easier for dogs to spot when they land
- Dental benefits: Dogs naturally chew around the entire circumference of ring toys, which helps clean more tooth surfaces than linear chewing on straight toys
3. The Sock Ball Surprise
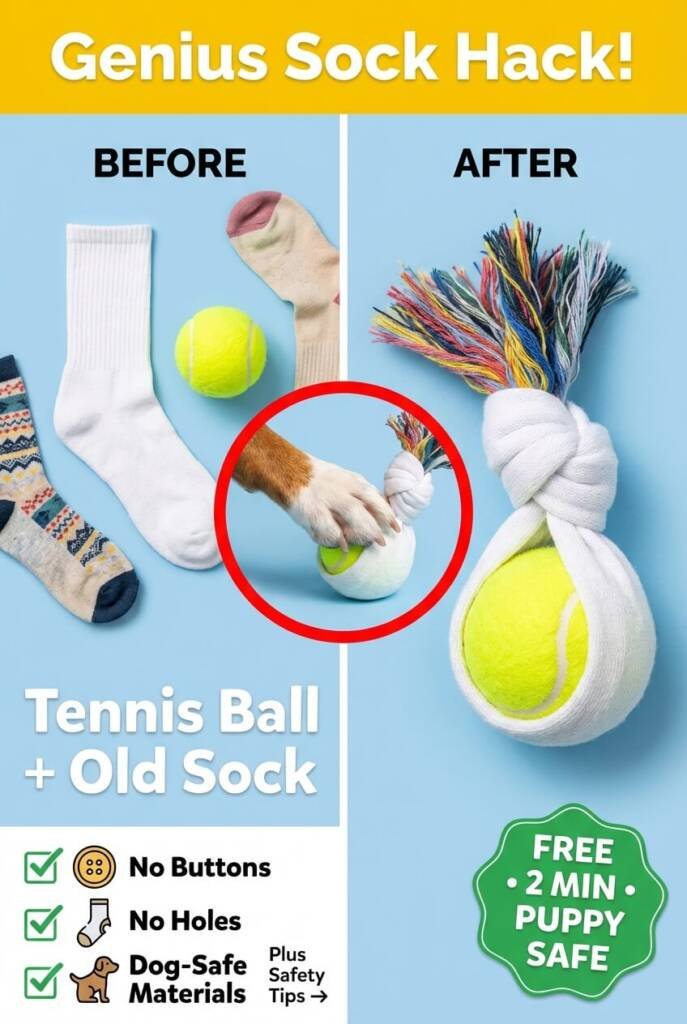
That lonely sock without a mate finally has a destiny. Hide a tennis ball inside an old sock, tie a knot above it, and watch your dog work to extract the ball or simply enjoy the sock-ball combo. This layered toy satisfies dogs who love to “unwrap” their prizes, and when the sock eventually gets destroyed, you just grab another orphaned sock from the drawer.
How to Make The Sock Ball Surprise
- Grab a clean, worn sock (tube socks work great for larger dogs)
- Place a tennis ball inside the sock, pushing it to the toe end
- Tie a tight knot in the sock just above the ball
- Optional: Add a second tennis ball above the first knot and tie again for extra challenge
- Trim any excess sock material or leave it as fringe for added texture
Which Household Items Are Actually Safe for Dog Toys
- Green light items: Clean socks (without holes that could trap toenails), tennis balls designed for dogs, empty plastic water bottles (supervised only), cardboard boxes without staples or tape
- Proceed with caution: Rope toys are great but monitor for string ingestion; remove and discard if fraying badly
- Never use these: Anything with batteries, small parts that detach easily, treated wood, items with sharp edges, cooked bones that splinter
- The surprise danger: Hair ties and rubber bands seem harmless but cause serious intestinal blockages—keep these away from crafting areas
- Fabric considerations: Old jeans work wonderfully for tough chewers, but avoid anything with zippers, buttons, or sequins that could be swallowed
4. Crinkle Bottle Fabric Wrap
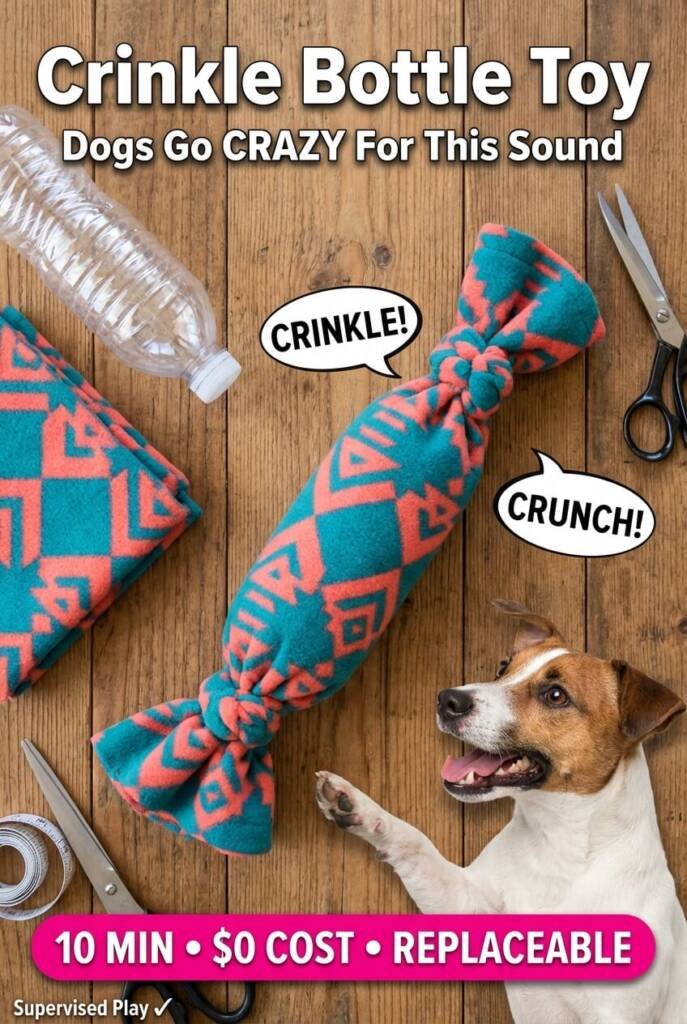
Dogs are weirdly obsessed with the crunch of plastic bottles, and this DIY lets them enjoy it safely. Take an empty plastic bottle (remove cap and ring), wrap it in fleece or denim fabric, and sew or tie the ends closed. The crinkling sound drives dogs wild, and the fabric barrier prevents them from shredding plastic. When the bottle eventually collapses, just replace it with a fresh one.
How to Make The Crinkle Bottle Fabric Wrap
- Clean and dry an empty plastic water or soda bottle (12-20 oz works best)
- Remove the cap, ring, and label completely
- Cut a rectangle of fleece or denim 2-3 inches wider than the bottle and long enough to wrap around it
- Place the bottle in the center of the fabric
- Wrap the fabric around the bottle and secure with tight knots on each end (or hand-stitch if you prefer)
- For extra durability, double-wrap with two layers of fabric
Understanding Your Dog’s Play Style
- The shaker: If your dog grabs toys and violently shakes them side-to-side, they’re expressing prey drive—crinkle toys satisfy this instinct perfectly
- The destroyer: Dogs who methodically dissect every toy aren’t being bad; they’re problem-solving and investigating—give them “destructible” toys they’re allowed to work on
- The hoarder: Some dogs collect toys without playing much—these pups often enjoy softer, comfort items over interactive ones
- The athlete: High-energy dogs who love fetch and tug need durable toys that can withstand repetitive use—braided options work best
- The gentle mouther: Dogs who carry toys softly without destroying them often have strong retriever instincts—they’d love puzzle toys that reward gentle interaction
5. The Braided Fleece Tug Champion
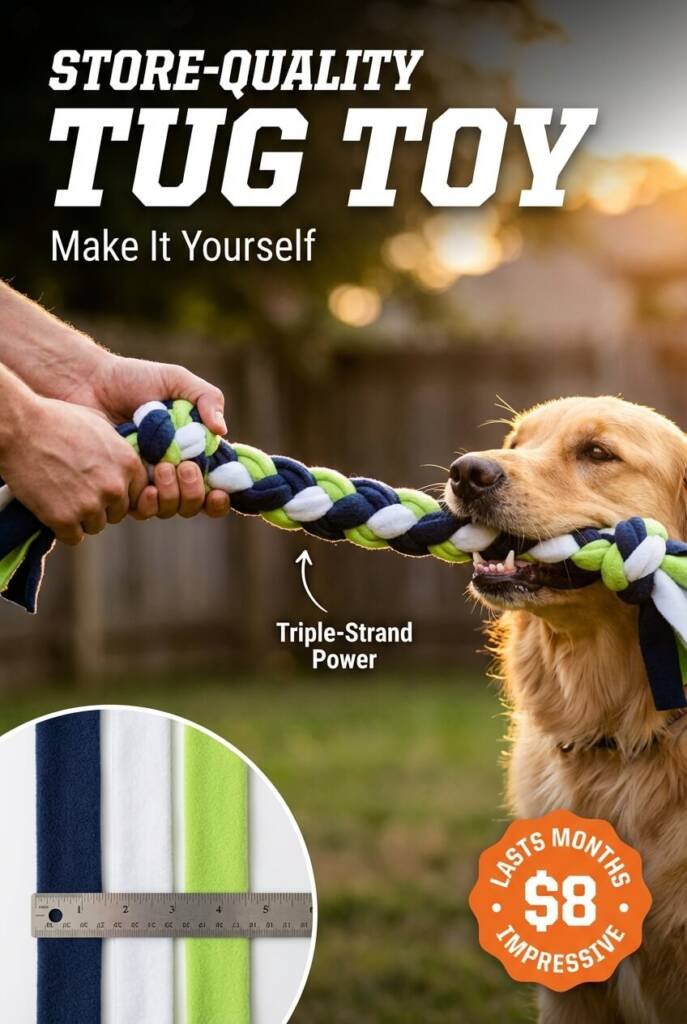
This is where DIY dog toys graduate from “cute craft” to “actually impressive.” Using three strips of fleece in different colors, create a tightly braided tug toy that rivals store-bought versions. The key is using polar fleece (which doesn’t fray) and braiding with consistent tension. Tie knots at each end, and you’ve got a toy that’ll survive months of aggressive tug-of-war sessions.
How to Make The Braided Fleece Tug Champion
- Purchase 1/2 yard of polar fleece in 3 different colors (or use old fleece blankets)
- Cut three strips 3-4 inches wide and 36-48 inches long (adjust length based on dog size)
- Line up all three strips and tie them together with an overhand knot about 4 inches from one end
- Secure the knotted end under something heavy or have someone hold it
- Braid tightly, keeping consistent tension—pull each strip firmly before crossing
- When you reach the end, tie another tight overhand knot leaving 4 inches of fringe
- Optional: Tie additional knots along the length for more grip points
Knot Styles That Hold Up to Aggressive Chewers
- The double overhand knot: Simply tie the same knot twice before tightening—this basic upgrade significantly increases holding power for rope ends
- The figure-eight knot: Creates a larger, bulkier knot that’s harder for dogs to untie with their teeth—perfect for toy ends
- Multiple knots in sequence: Space 3-4 knots along the length of braided toys to create grip zones and prevent complete unraveling if one knot fails
- The ball knot: Fold the rope back on itself and tie around the loop to create a ball shape—dogs love this as a grip point during tug
- Reinforcement trick: Before making your final knot, loop the end back through the braid by 2-3 inches, then knot over this—creates a nearly impossible-to-undo finish
6. Muffin Tin Treat Puzzle
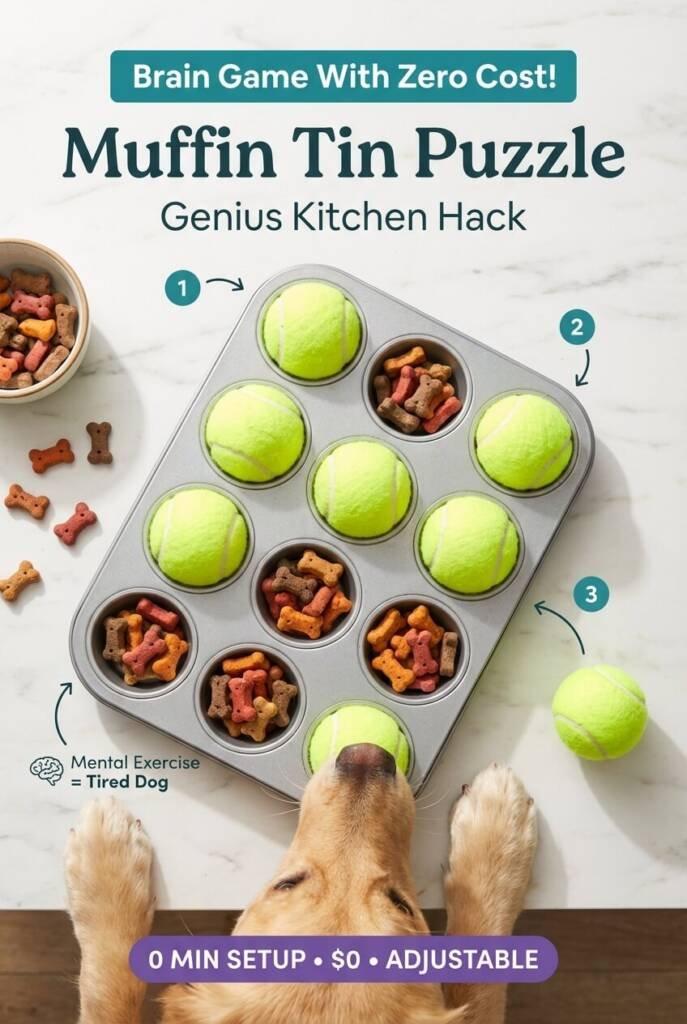
Your kitchen already contains one of the best puzzle toys money can’t buy. A standard muffin tin becomes an engaging brain game when you hide treats in the cups and cover them with tennis balls. Your dog has to figure out how to remove each ball to access the reward underneath. This genius setup costs nothing, adjusts difficulty easily (start with just a few balls covering cups), and keeps food-motivated dogs entertained for 15-20 minutes.
How to Make The Muffin Tin Treat Puzzle
- Grab a 12-cup muffin tin (metal works better than silicone for stability)
- Place small treats or pieces of kibble in 4-6 of the cups (start easy)
- Cover each filled cup with a tennis ball
- Show your dog the setup and let them figure out the ball-removal process
- As they master it, increase difficulty by filling more cups
- Advanced version: use different sized balls or place the tin inside a cardboard box
How Puzzle Toys Boost Your Dog’s Mental Health
- Tired minds = calm dogs: Fifteen minutes of puzzle-solving exhausts a dog’s brain as much as a 30-minute walk exhausts their body
- Reduced anxiety behaviors: Dogs who get daily mental enrichment show fewer destructive behaviors like excessive barking, digging, or chewing furniture
- Slows down speed eaters: Food puzzles force fast eaters to work for each bite, reducing bloat risk and improving digestion
- Confidence building: Successfully solving puzzles releases dopamine and builds your dog’s confidence in problem-solving situations
- Rainy day lifesaver: When weather keeps you indoors, puzzle toys prevent the pent-up energy that leads to zoomies at midnight
7. DIY Snuffle Mat Magic
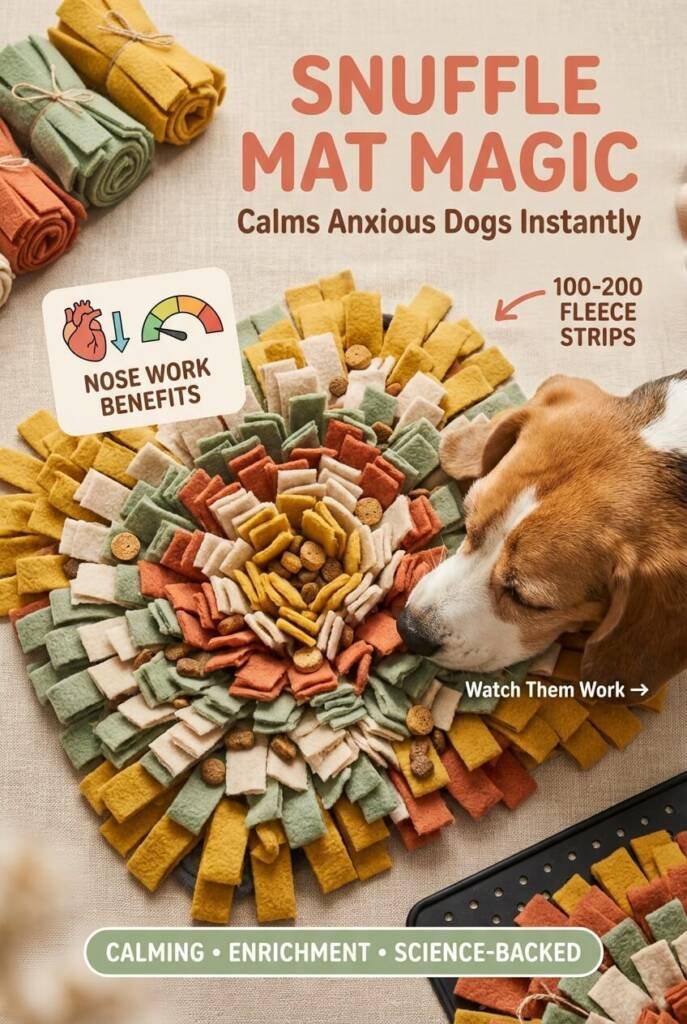
This might be the most valuable toy on the list. A snuffle mat mimics grass where dogs would naturally forage for food, tapping into instincts that calm and satisfy them. Using a rubber sink mat as the base, tie dozens of fleece strips through the holes to create a shaggy surface. Hide kibble or treats deep in the fabric, and watch your dog’s nose go to work. The sniffing action actually lowers heart rate and stress levels.
How to Make Your DIY Snuffle Mat
- Purchase a rubber sink mat with drainage holes (12×12 inches minimum)
- Cut polar fleece into strips about 1 inch wide and 8 inches long (you’ll need 100-200 strips depending on mat size)
- Take one strip and thread it under one square of the mat
- Tie the strip in a simple double knot on top, pulling snug
- Repeat with every hole in the mat, packing strips close together
- Fluff up all the tied strips to create a dense, shaggy surface
- Scatter treats throughout and let your dog sniff them out
The Science Behind Sniffing and Stress Relief
- The calming chemical release: When dogs use their nose intensively, their brain releases serotonin and dopamine—the same feel-good chemicals humans get from meditation
- Heart rate reduction: Studies show that scent work lowers a dog’s heart rate within minutes, making snuffle mats perfect for anxious or reactive dogs
- Natural exhaustion: A dog’s brain uses massive energy processing scents—10 minutes of sniffing tires them more than you’d expect
- Elderly dog benefits: Senior dogs with reduced mobility can still “work” with snuffle mats, providing mental stimulation when physical exercise becomes limited
- The distraction advantage: Snuffle mats work brilliantly during stressful events like thunderstorms or fireworks, giving dogs a focusing activity
8. Tennis Ball Rope Pull Combo
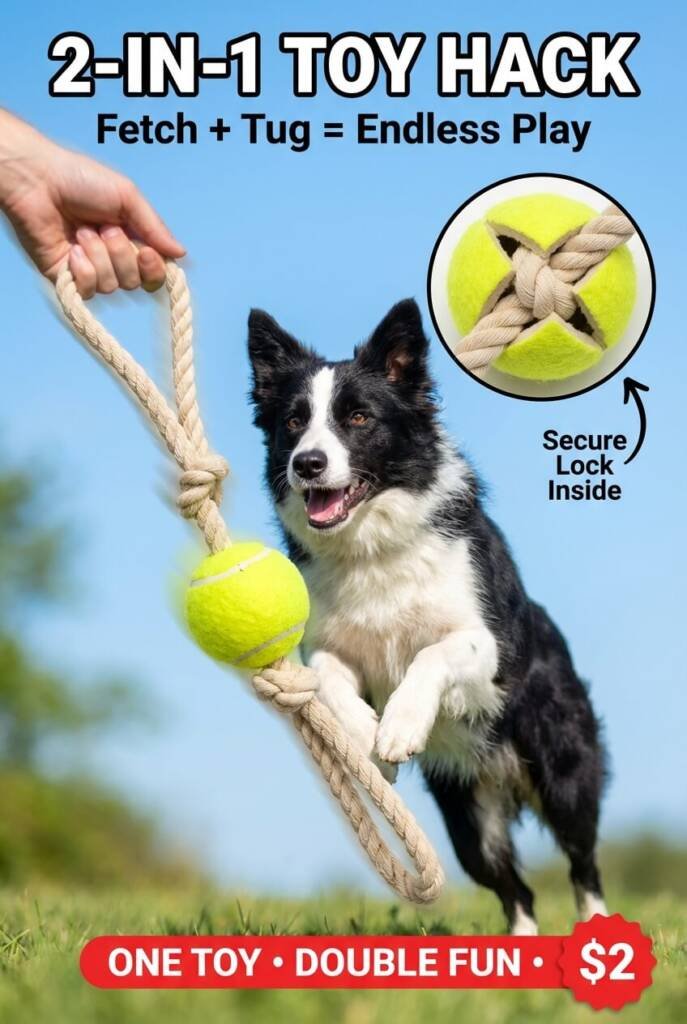
Why choose between fetch and tug when you can have both? This hybrid toy attaches a tennis ball to a braided rope handle, creating the ultimate interactive play tool. Cut a small X in a tennis ball, thread braided rope through it, and tie a massive knot on the inside to secure it. The rope gives you leverage for tug-of-war, while the ball portion makes it perfect for throwing. One toy, endless play possibilities.
How to Make The Tennis Ball Rope Pull Combo
- Get a new tennis ball and 2-3 feet of braided rope (at least 1/2 inch thick)
- Use a utility knife to carefully cut a small X in the tennis ball (about 1 inch across)
- Thread one end of the rope through the X—this takes patience, use a screwdriver to help push it through
- Once 3-4 inches of rope is inside the ball, tie a large overhand knot (tie it 2-3 times to make it bulky)
- Pull the rope back so the knot sits firmly inside the ball and can’t slip out
- Braid or knot the remaining rope to create a comfortable handle
- Test the security before giving to your dog
Choosing the Right Rope Diameter for Your Dog’s Size
- Small dogs (under 20 lbs): Use 1/4 to 3/8 inch rope—anything thicker becomes awkward for tiny mouths to grip comfortably
- Medium dogs (20-50 lbs): Stick with 1/2 to 5/8 inch rope—the sweet spot for most popular breeds like Beagles, Cocker Spaniels, and Border Collies
- Large dogs (50-80 lbs): Go with 3/4 inch rope minimum—Labs, German Shepherds, and Golden Retrievers need substantial diameter to really sink their teeth in
- Giant breeds (80+ lbs): Use 1 inch or thicker rope—Great Danes, Mastiffs, and Saint Bernards can destroy thinner options in minutes
- Material matters too: Cotton rope is gentler on teeth and gums, while nylon rope offers superior durability for power chewers
9. Wooden Puzzle Feeder Box
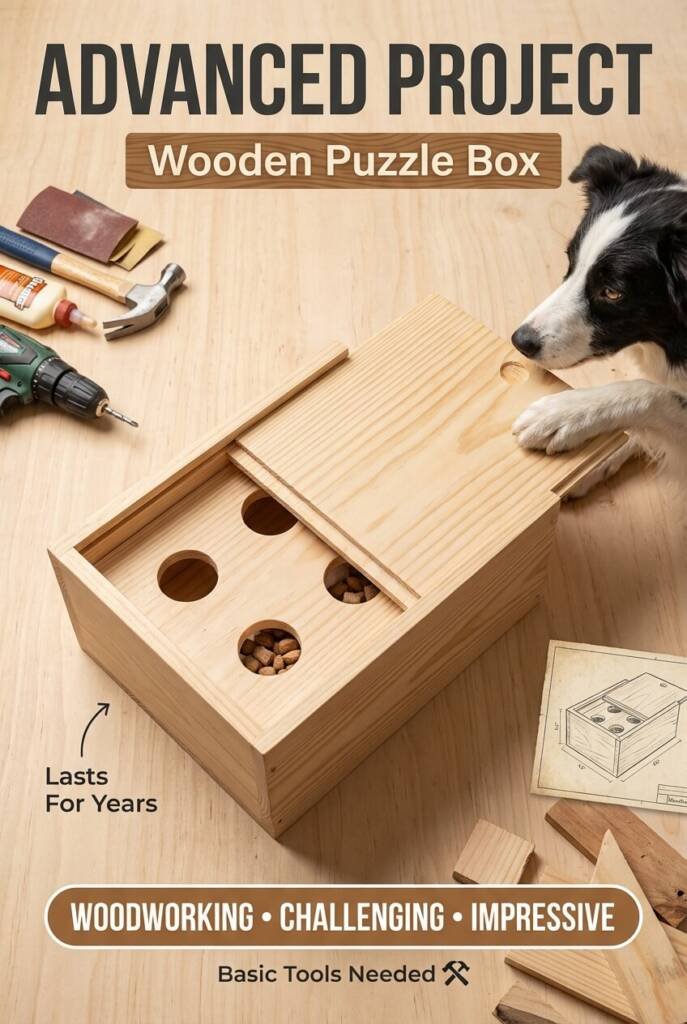
Now we’re in advanced territory. This project requires basic woodworking skills but creates a puzzle toy that’ll last for years. Build a simple wooden box with a sliding lid that has holes drilled in it. Dogs must slide the lid back and forth to align holes with the treats inside. You can make this as simple or complex as your skills allow—even a basic version impresses and challenges dogs who’ve mastered easier puzzles.
How to Make The Wooden Puzzle Feeder Box
- Cut untreated wood pieces: base (8×6 inches), two side walls (8×3 inches), two end walls (6×3 inches), sliding lid (8×6 inches)
- Sand all pieces thoroughly to prevent splinters
- Use wood glue and small nails to attach the four walls to the base, creating an open-top box
- Drill 4-6 holes (about 1.5 inches diameter) in the sliding lid piece
- Create a channel for the lid to slide: attach thin wood strips along the inside top edges of the long walls, leaving just enough gap for the lid to slide
- Insert the lid into the channel so it slides back and forth
- Add a small knob or handle to the lid for easy human adjustment
- Drop treats in the box and partially cover with the lid—dog must slide it to access treats
Leveling Up: Making Puzzles Harder as Your Dog Learns
- Start ridiculously easy: When introducing any new puzzle, make it almost impossible to fail—this builds confidence and prevents frustration
- The 80% success rule: Your dog should succeed about 80% of the time; if they’re failing more than that, you’ve increased difficulty too quickly
- Add one variable at a time: Don’t change multiple aspects simultaneously—if increasing the number of steps, keep everything else the same
- Frustration signals to watch: Excessive pawing, walking away, whining, or destructive behavior means you need to dial back difficulty
- The plateau is normal: Dogs often master a level quickly, then seem stuck before the next breakthrough—keep practicing at their current level
- Retirement rotation: Once a puzzle becomes too easy (solved in under 30 seconds), retire it for a few weeks, then bring it back for variety
10. The Ultimate Braided Rope Ball with Handle
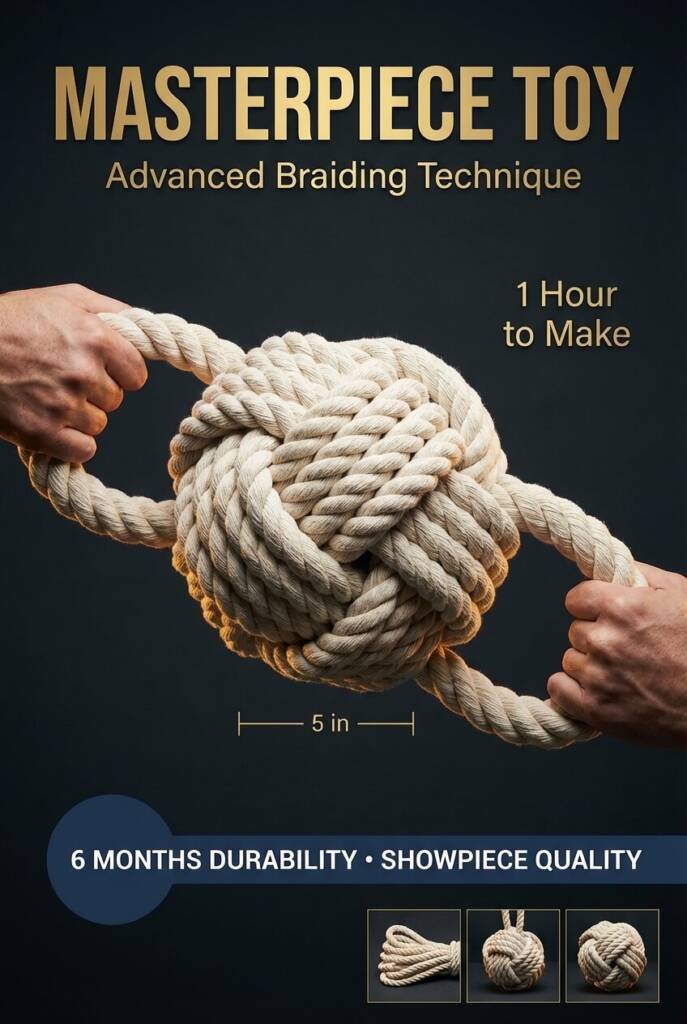
This masterpiece combines multiple advanced braiding techniques into one impressive toy. Create a dense rope ball using the Turk’s head knot method (or simplified version), then attach braided rope handles extending from opposite sides. This creates a tug toy with a substantial grip point in the middle. It’s the kind of toy that takes an hour to make but lasts six months even with daily use. Fellow dog owners will absolutely ask you to make them one.
How to Make The Ultimate Braided Rope Ball with Handle
- You’ll need about 15 feet of thick rope (3/4 to 1 inch diameter)
- Cut the rope into three 5-foot sections
- Find the center point of all three ropes and tie them together with strong twine
- Divide the six rope ends into two groups of three (one group on each side of the center knot)
- Braid tightly moving away from the center on both sides, creating two rope handles
- Tie off each braided handle end with tight knots
- For the ball: Take the center knot and begin wrapping extra rope around it in multiple directions, tucking ends through loops
- Secure everything by threading rope ends back through the ball and trimming excess
- Alternative simple version: Tie multiple knots on top of each other at the center until you create a ball-like mass
Making Toys Last: Maintenance Tips for Handmade Dog Toys
- Weekly inspection routine: Check all knots for loosening and retighten before they become problems—catching issues early doubles toy lifespan
- The washing advantage: Fabric and rope toys can go in the washing machine (hot water, no detergent) every 2-3 weeks, which sanitizes and tightens fibers
- Strategic retirement: When toys start showing significant wear, retire them for tug-only use (supervised) rather than leaving them for solo chewing
- Rotation system: Keep 3-4 toys in circulation and store the rest—dogs stay more interested, and toys experience less wear
- The freezer trick: Freeze rope toys when wet to create a soothing teething toy, and the freezing actually tightens the weave temporarily
- Know when to toss: If you see the inner core of rope, stuffing coming out, or pieces small enough to swallow, it’s time to recycle and make a fresh one
Your DIY Dog Toy Shopping Essentials
![PetDroid Interactive Dog Toys Dog Ball, [Newly Upgraded] Durable ...](https://m.media-amazon.com/images/I/41P-nlk1L0L._SL500_.jpg)


- Polar Fleece Fabric (1-2 yards): The MVP of dog toy making because it doesn’t fray, comes in endless colors, and stands up to serious chewing. Look for anti-pill fleece for maximum durability. One yard gives you enough material for 3-4 braided toys.
- Cotton Rope (25-50 feet): Choose 100% cotton over synthetic because it’s gentler on teeth and biodegrades if your dog swallows small fibers. Buy rope with a tight, dense weave rather than loosely twisted versions that fall apart quickly.
- Rubber Sink Mat with Holes: The foundation for snuffle mats and other puzzle creations. The grip backing keeps toys in place during enthusiastic play. A single mat typically costs under $5 and lasts for years.
- Dog-Safe Peanut Butter (xylitol-free): Essential for frozen treats and high-value puzzle rewards. Store brands work perfectly—just always check the ingredient list for xylitol, which is toxic to dogs.
- Assorted Tennis Balls: Buy the economy packs designed for dogs rather than sports-quality tennis balls. Dog versions use non-toxic felt and hold up better to chewing. Keep a stash since they’re useful for multiple toy projects.
More Creative DIY Ideas for Pet Lovers and Home Enthusiasts
Creating these toys is just the beginning of what you can accomplish with simple materials and a little creativity. At Sweet Purrfections, we’re passionate about helping pet lovers and home enthusiasts discover projects that bring joy without breaking the bank.
Whether you’re crafting for your own furry family members or looking for unique gift ideas for fellow animal lovers, handmade touches always mean more than store-bought alternatives.
Your dog doesn’t care about brand names—they care about things that smell like you, challenge their minds, and survive their enthusiastic play style. These ten toys prove that the best things for our pets often come from our own hands and a little ingenufulness. Keep exploring, keep creating, and watch those tails wag.